Software Management
Generalities
On a Linux system, it is possible to install software in two ways:
- Download software packages from the repository and install them on the local computer
- Compile the project source code package and install it on the local computer
Note
This document does not describe how to compile and install source code packages on the local computer. Usually, you should obtain the corresponding software package from the repository, unless the software package you need is not in the repository. This is because the package management system can help users solve dependency issues. For beginners, resolving the dependencies required to compile source code packages can be challenging.
The package: Developers compile a set of source files into executable machine language in advance and package them into binary files in a specific format. Unless otherwise specified, the term "software package" in Linux refers to binary software packages.
The source file: A single code file that is readable by humans (with extensions such as .c, .py, .java), which might be just a code snippet or module of the entire project that requires compilation or an interpreter to run on a computer.
The source code package: A compressed archive file that packages the source files and related files (such as build files like Makefile and configure; document files such as README and LICENSE ) of the entire project. File suffixes such as .tar.gz or .tar.xz often indicate this file type.
RPM Overview
RPM (RedHat Package Manager) is a software management system. It is possible to install, uninstall, update, or check software contained in packages.
RPM is the package management system used by all Red Hat distributions (Rocky Linux, Fedora, CentOS, SUSE, Mandriva, ...), with packages identified by the .rpm file suffix. Debian and its derivatives use the DPKG package management system to manage software packages, which are identified by the .deb file suffix.
Naming conventions for RPM software packages:
Terminology Explanation
When we use the capitalized "RPM", it refers to the package management system. When using the lowercase "rpm", in the vast majority of cases, it specifically refers to the rpm command. When using .rpm, it refers to the package format suffix. Readers should not be confused by them when reading the documents.
Today's RPM package management system is still constantly updated and iterated, see here.
Local package manager
The rpm command: Command-line tool for managing local RPM packages in Red Hat's upstream and downstream distributions.
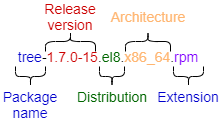
Full Package Name: The complete name of the binary software package, such as tree-1.7.0-15.el8.x86_64.rpm.
Package Name: The name of the software package, such as tree.
If the corresponding software package is new to the operating system (not installed), you should use the "Full Package Name" when using the rpm command. If the corresponding software package is not new to the operating system (already installed), you should use the "Package Name" when using the rpm command instead. This is because the rpm stores the relevant software package information in the /var/lib/rpm/ database directory.
The usage of the rpm command is as follows:
rpm [options] <Package-Name> | <Full-Package-Name>
Install, upgrade, and uninstall software packages
The relevant options are as follows:
| Option | Description |
|---|---|
-i <Full-Package-Name> |
Installs the package. |
-U <Full-Package-Name> |
Updates an already installed package. |
-e <Package-Name> |
Uninstalls the package. |
-h |
Displays a progress bar. |
-v |
Informs about the progress of the operation. |
--test |
Tests the command without executing it. |
- Install one or more packages -
rpm -ivh <Full-Package-Name> ... - Upgrade one or more packages -
rpm -Uvh <Full-Package-Name> ... - Uninstall one or more packages -
rpm -e <Package-Name> ...
Since rpm is a local package manager, users must resolve dependency issues manually during software installation. If relevant dependencies are missing, a prompt such as "failed dependencies" will appear.
Understand the dependency relationships of RPM packages:
- Tree dependency relationship (a.rpm ---> b.rpm ---> c.rpm) - When installing a.rpm, it prompts for the required installation of b.rpm first. When installing b.rpm, it prompts to install c.rpm first. This problem is easiest to solve by stringing the installations together with:
rpm -ivh a.rpm b.rpm c.rpm - Circular dependency relationship (a.rpm ---> b.rpm ---> c.rpm ---> a.rpm) -
rpm -ivh a.rpm b.rpm c.rpm - Module dependency relationship - Go to this website to search
Q: Why does software package installation always have dependency issues?
Because software or applications almost always rely on other software or libraries, if the required program or shared library is not present on the operating system, you must meet this prerequisite before installing the target application.
Query package
The relevant options are as follows:
| Option | Description |
|---|---|
-q |
Query whether the software package has been installed, such as rpm -q tree-1.7.0-15.el8.x86_64.rpm |
-a |
When used in conjunction with the -q option, query all installed rpm packages, such as rpm -qa |
-i |
Used in conjunction with the -q option to query detailed information about the corresponding installed rpm package. Such as rpm -qi bash |
-l |
When used in combination with the -q option, query the list of files released by the corresponding installed rpm package |
-p |
Specifies uninstalled software packages, for example rpm -qip tree-1.7.0-15.el8.x86_64.rpm and rpm -qlp tree-1.7.0-15.el8.x86_64.rpm |
-f |
When used in conjunction with the -q option, query the software package to which the installation file belongs, such as rpm -qf /usr/bin/bash |
-R |
When used in conjunction with the -q option, query the dependencies of installed rpm packages. When used in conjunction with the -p option, you can query the dependencies of rpm packages that are not installed, such asrpm -qRp mtr-0.92-3.el8.x86_64.rpm |
--last |
list package(s) by install time, most recent first |
The RPM database is located in the directory /var/lib/rpm/.
Some examples:
sudo rpm -qa

sudo rpm -qilp zork-1.0.3-1.el8.x86_64.rpm tree-1.7.0-15.el8.x86_64.rpm

# list the last installed packages:
sudo rpm -qa --last | head
NetworkManager-config-server-1.26.0-13.el8.noarch Mon 24 May 2021 02:34:00 PM CEST
iwl2030-firmware-18.168.6.1-101.el8.1.noarch  Mon 24 May 2021 02:34:00 PM CEST
iwl2000-firmware-18.168.6.1-101.el8.1.noarch  Mon 24 May 2021 02:34:00 PM CEST
iwl135-firmware-18.168.6.1-101.el8.1.noarch   Mon 24 May 2021 02:34:00 PM CEST
iwl105-firmware-18.168.6.1-101.el8.1.noarch   Mon 24 May 2021 02:34:00 PM CEST
iwl100-firmware-39.31.5.1-101.el8.1.noarch    Mon 24 May 2021 02:34:00 PM CEST
iwl1000-firmware-39.31.5.1-101.el8.1.noarch   Mon 24 May 2021 02:34:00 PM CEST
alsa-sof-firmware-1.5-2.el8.noarch            Mon 24 May 2021 02:34:00 PM CEST
iwl7260-firmware-25.30.13.0-101.el8.1.noarch  Mon 24 May 2021 02:33:59 PM CEST
iwl6050-firmware-41.28.5.1-101.el8.1.noarch   Mon 24 May 2021 02:33:59 PM CEST

# list the installation history of the kernel:
sudo rpm -qa --last kernel
kernel-4.18.0-305.el8.x86_64                  Tue 25 May 2021 06:04:56 AM CEST
kernel-4.18.0-240.22.1.el8.x86_64             Mon 24 May 2021 02:33:35 PM CEST
Usage Tips
When using the query function (the -q option), the corresponding software package must be deterministic. In other words, you cannot use wildcards in the rpm command line to match the package name. To filter a specific one or more packages, you need to use the pipe symbol (|) and the grep command.
sudo rpm -qa | grep ^dbus
dbus-common-1.12.8-27.el8_10.noarch
dbus-glib-0.110-2.el8.x86_64
dbus-libs-1.12.8-27.el8_10.x86_64
dbus-daemon-1.12.8-27.el8_10.x86_64
dbus-tools-1.12.8-27.el8_10.x86_64
dbus-1.12.8-27.el8_10.x86_64
Verify the signature of the software package
You must use the -K option to complete this operation.
When you download an rpm binary package from an unknown website or untrusted location, you do not know whether it has been tampered with. Therefore, users need to verify the software package's signature to ensure the downloaded package is complete and free of tampering.
Import the required public key before performing signature verification on the software package. This is usually done by the system administrator.
Starting from RHEL 8.x, you can use the dnf download command to download specific software packages. For example, if you need to download the wget package, use:
sudo dnf download wget

ls -l wget-1.19.5-12.el8_10.x86_64.rpm
-rw-r--r-- 1 root root 750748 Jan  3 17:29 wget-1.19.5-12.el8_10.x86_64.rpm

# Use the "-K" option to verify the signature of the corresponding software package
## You can also use the "-v" or "-vv" option to display more detailed information
sudo rpm -K wget-1.19.5-12.el8_10.x86_64.rpm
wget-1.19.5-12.el8_10.x86_64.rpm: digests signatures OK

# If the software package you downloaded has been tampered with, the following information will be displayed:
echo  "change content" >> /root/wget-1.19.5-12.el8_10.x86_64.rpm
sudo rpm -K wget-1.19.5-12.el8_10.x86_64.rpm
wget-1.19.5-12.el8_10.x86_64.rpm: DIGESTS SIGNATURES NOT OK
When the signature of a software package fails to pass the verification, you should not continue to use the package.
Verify file changes after software package installation
You need to use the -V option to complete this operation.
After installing the RPM software package, the RPM database records the initial and changed characteristics of the relevant files to determine whether they have been maliciously modified.
sudo rpm -q chrony
chrony-4.5-2.el8_10.x86_64

rpm -V chrony
S.5....T.  c /etc/chrony.conf
The output is broken into 3 separate columns.
-
First column (S.5....T.)
Use 9 fields to represent the valid information of the file after the installation of the RPM software package. Any field or characteristic that passed a given check/test is indicated by a ".".
These 9 different fields or checks are:
- S: Whether there is a modification to the size of the file.
- M: Whether there is a modification to the type of file or file permissions (rwx).
- 5: Whether there is a modification to the MD5 checksum of the file.
- D: Whether there is a modification to the number of devices.
- L: Whether there is a modification of the path to the file.
- U: Whether there is a modification of the owner of the file.
- G: Whether there is a modification of the group to which the file belongs.
- T: Whether there is a modification to the mTime (modify time) of the file.
- P: Whether there is a modification to the program function.
-
Second column (c)
c: Indicates modifications to the configuration file. It can also be the following values:
- d: documentation file
- g: ghost file. Very few can be seen
- l: license file
- r: readme file
-
Third column (/etc/chrony.conf)
- /etc/chrony.conf: Represents the path of the modified file.
DNF Package Manager
DNF (Dandified Yum) is a software package manager, successor of YUM (Yellow dog Updater Modified).
The dnf command: This command lets you manage binary software packages by interacting with the repository. For the most common functional item commands, their usage is the same as the yum command. For some newer distributions (such as Rocky Linux 10.x or Fedora 43), there are updates to the dnf command-line tool. For example, in Rocky Linux 10.x, users can selectively install dnf5 from the repository.
Red Hat-based distributions, such as Rocky Linux, Fedora, and CentOS, use the dnf command-line tool. Its equivalent in the Debian world is apt (Advanced Packaging Tool) command-line tool.
dnf's functional item commands
The syntax of the dnf command is as follows:
dnf [options] <command> [<args>...]
The "command" in syntax represents the functional item command of dnf. Some commands are built-in, while others require support from third-party plugins. You can see the usage of each function command with the --help option, such as dnf list --help.
-
listcommandList the software packages based on the different options following this command. By default, list all the software packages available for installation in the operating system (
dnf listis equivalent todnf list --all).dnf list --installed- List the installed software packages for the current operating systemdnf list --updates- List the software packages that you can upgrade
The specific options for the list command are as follows:
Specific options Description --allshows all packages (default) --availableshows only available packages --installedshows only installed packages --extrasshows only extras packages --updatesshows only upgrades packages --upgradesshows only upgrades packages --autoremoveshows only autoremove packages --recentshows only recently changed packages -
searchcommandSearch for software packages in the repository using the given string. Such as
dnf search vim. -
installcommandInstall one or more software packages from the repository. Such as
dnf -y install wget tree. The-yoption indicates that the automatic response is "yes". When you install packages this way,dnfhandles dependency resolution automatically.In addition to installing software packages from the repository, you can also install software packages from specified URL or local RPM software package, such as
dnf install https://dl.fedoraproject.org/pub/epel/epel-release-latest-8.noarch.rpm,dnf install /tmp/mtr-0.92-3.el8.x86_64.rpm -
infocommandView information on one or more software packages, such as
dnf info wget tree -
deplistcommand (deprecated)Lists the dependencies of the software package. Please use
dnf repoquery --deplist <Package-Name>as an alternative. -
repolistcommandDisplays repository-related information, default to displaying enabled repositories (
dnf repolistis equivalent todnf repolist --enabled)dnf repolist --all- Lists all repositoriesdnf repolist -v- Displays detailed information of enabled repositoriesdnf repolist --disabled- Lists only disabled repositories.
-
historycommandDisplays the history of typed
dnfcommands. By default,dnf historyis equivalent todnf history list, You can replace the "list" here with any one ofinfo,redo,replay,rollback,store,undooruserinstalled. -
providescommandView the software package to which the given file belongs. Such as
dnf provides /usr/bin/systemctl. -
removecommandRemoves one or more software packages from the current operating system. By default, it will ask whether to uninstall the software package and its corresponding dependency package, and can automatically respond with "yes" through the
-yoption. -
autoremovecommandAutomatically deletes packages that were once used as dependencies but are no longer in use. Such as
dnf -y autoremove. -
makecachecommandGenerates a cache for newly added repositories or for outdated metadata.
-
updateorupgradecommandUpgrades one or more software packages in the operating system. For example,
dnf update -ywill upgrade all upgradable software packages in the operating system. -
grouplist,groupinstall,groupremoveorgroupinfocommandThe objects of these commands are package groups, which are sets of software packages prepared for a specific scenario or environment.
There are these package groups in Rocky Linux 8.x:
sudo dnf grouplist
Available Environment Groups:
   Server with GUI
   Server
   Workstation
   KDE Plasma Workspaces
   Virtualization Host
   Custom Operating System
Installed Environment Groups:
   Minimal Install
Available Groups:
   Container Management
   .NET Core Development
   RPM Development Tools
   Development Tools
   Graphical Administration Tools
   Headless Management
   Legacy UNIX Compatibility
   Network Servers
   Scientific Support
   Security Tools
   Smart Card Support
   System Tools
   Fedora Packager
   Xfce
To avoid ambiguity, when operating on a single or multiple package groups, you should enclose the name of a single package group in double quotation marks.
-
cleancommandCleans the cached data. You can clean all the data caches with:
dnf clean all.Metadata type to clean Description allRemoves all temporary files created for enabled repositories. dbcacheRemoves cache files generated from the repository metadata. expire-cacheMarks the repository metadata as expired. metadataRemoves repository metadata. packagesRemoves any cached packages from the system. -
downloadcommandDownloads one or more software packages from the repository to the local computer without installing them.
You can use the options
--destdir DESTDIRor--downloaddir DESRDIRto specify the saving path, such asdnf download tree --downloaddir /tmp/. -
repoquerycommandQueries relevant information using the different options after the command, similar to
rpm -q.dnf repoquery --deplist <Package-Name>- Views dependenciesdnf repoquery --list <Package-Name>- Views the list of files after installing the software package (regardless of whether the software is already installed on the operating system)
-
config-managercommandManages repositories through the command line, including adding, deleting, enabling, and disabling repositories.
dnf config-manager --add-repo <URL>- Adds a single brand-new repositorydnf config-manager --set-disabled devel- Permanently disables a single repositorydnf config-manager --set-enabled devel- Permanently enables a single repository
You can view the available plugin commands through the output of the dnf --help command:
sudo dnf --help
...
List of Plugin Commands:

builddep                  Install build dependencies for package or spec file
changelog                 Show changelog data of packages
config-manager            manage dnf configuration options and repositories
copr                      Interact with Copr repositories.
debug-dump                dump information about installed rpm packages to file
debug-restore             restore packages recorded in debug-dump file
debuginfo-install         install debuginfo packages
download                  Download package to current directory
groups-manager            create and edit groups metadata file
needs-restarting          determine updated binaries that need restarting
offline-distrosync        Prepare offline distrosync of the system
offline-upgrade           Prepare offline upgrade of the system
playground                Interact with Playground repository.
repoclosure               Display a list of unresolved dependencies for repositories
repodiff                  List differences between two sets of repositories
repograph                 Output a full package dependency graph in dot format
repomanage                Manage a directory of rpm packages
reposync                  download all packages from remote repo
system-upgrade            Prepare system for upgrade to a new release
...
Tip
If these plugin commands are missing, please install the dnf-plugins-core package. See more information here: https://dnf-plugins-core.readthedocs.io/en/latest/index.html
configuration file description
You can find all repository configuration files (ending in .repo) in the /etc/yum.repos.d/ directory. Each .repo file can contain a single or multiple repositories, and users can selectively enable or disable them based on their specific situation.
ls -l /etc/yum.repos.d/
total 72
-rw-r--r--  1 root root 1919 Sep 13  2024 docker-ce.repo
-rw-r--r--  1 root root 1680 Aug 31  2024 epel-modular.repo
-rw-r--r--  1 root root 1332 Aug 31  2024 epel.repo
-rw-r--r--  1 root root 1779 Aug 31  2024 epel-testing-modular.repo
-rw-r--r--  1 root root 1431 Aug 31  2024 epel-testing.repo
-rw-r--r--. 1 root root  710 Jun  7  2024 Rocky-AppStream.repo
-rw-r--r--. 1 root root  695 Jun  7  2024 Rocky-BaseOS.repo
-rw-r--r--  1 root root 1773 Jun  7  2024 Rocky-Debuginfo.repo
-rw-r--r--. 1 root root  360 Jul 11  2024 Rocky-Devel.repo
-rw-r--r--. 1 root root  695 Jun  7  2024 Rocky-Extras.repo
-rw-r--r--. 1 root root  731 Jun  7  2024 Rocky-HighAvailability.repo
-rw-r--r--. 1 root root  680 Jun  7  2024 Rocky-Media.repo
-rw-r--r--. 1 root root  680 Jun  7  2024 Rocky-NFV.repo
-rw-r--r--. 1 root root  690 Jun  7  2024 Rocky-Plus.repo
-rw-r--r--. 1 root root  715 Mar 29 17:39 Rocky-PowerTools.repo
-rw-r--r--. 1 root root  746 Jun  7  2024 Rocky-ResilientStorage.repo
-rw-r--r--. 1 root root  681 Jun  7  2024 Rocky-RT.repo
-rw-r--r--  1 root root 2335 Jun  7  2024 Rocky-Sources.repo
The content format of a single repository in each .repo file is fixed, for example:
[baseos]
name=Rocky Linux $releasever - BaseOS
mirrorlist=https://mirrors.rockylinux.org/mirrorlist?arch=$basearch&repo=BaseOS-$releasever
#baseurl=http://dl.rockylinux.org/$contentdir/$releasever/BaseOS/$basearch/os/
gpgcheck=1
enabled=1
countme=1
gpgkey=file:///etc/pki/rpm-gpg/RPM-GPG-KEY-rockyofficial
Content description:
- Use "[ ]" to include the repository ID, which must be unique.
- Below the "[ ]" are the repository options.
- The "name" option - Specifies the detailed name of the repository.
- The "mirrorlist" option - URL of a mirrorlist for the repository. URLs support multiple protocols, such as https, http, ftp, file, NFS, etc. The "$" in the value represents the relevant repository variable.
- The "baseurl" option - List of URLs for the repository. URLs support multiple protocols, such as https, http, ftp, file, NFS, etc. The "$" in the value represents the relevant repository variable.
- Lines starting with "#" are comment lines.
- The "gpgcheck" option - Whether to perform GPG signature check on packages found in this repository. The default value is False(0).
- The "enabled" option - Includes this repository as a package source. The default value is True(1).
- The "countme" option - Upload anonymous usage statistics data. The default value is False(0).
- The "gpgkey" option - GPG public key path.
For more information, please refer to man 5 yum.conf.
Application Streams
Application Streams in RL 8.x and RL 9.x:: Rocky Linux 8.x and 9.x, use a new modular technology, allowing repositories to host multiple versions of applications and their dependencies. Due to the adoption of a modular architecture, the Application Streams in these two operating systems are also referred to as "Module Streams". System administrators can choose a specific version, which provides greater flexibility. If system administrators need to manage the Application Streams, they often need to use the dnf module command.
Application Streams in RL 10.x: Starting from Rocky Linux 10.x, system administrators can still use the Application Streams, but the Application Streams are no longer provided in a modular form. In other words, the dnf module command in 10.x no longer works, and system administrators can manage different versions of applications in the traditional way. In this version of the operating system, the term "Application Streams" does not equal "Module Streams".
Each Application Stream has a different lifecycle. Please refer to the following link:
- https://access.redhat.com/support/policy/updates/rhel-app-streams-life-cycle#rhel8_application_streams
- https://access.redhat.com/support/policy/updates/rhel-app-streams-life-cycle#rhel9_application_streams
- https://access.redhat.com/support/policy/updates/rhel-app-streams-life-cycle#rhel10_dependent_application_streams
In this document, the author mainly explains the Application Streams of modular architecture.
Module Streams
Important note:
- To use modular architecture Application Streams in RL 8.x and RL 9.x, you need to enable the AppStream repository first. In the Appstream repository, modules represent collections of software packages for logical units that are built, tested, and published together. A single module can contain multiple streams (versions) of the same application.
- Each module receives updates separately.
- After enabling a single module, users can only use one stream (version) of that module.
- Each module can have its own default stream (default version) marked with "[d]".
- The default stream is active unless you disable the module or enable another stream for the module.
Module Profiles
Module Profiles: A set of software package lists bound together for specific usage scenarios. For example:
sudo dnf module list nginx
Last metadata expiration check: 10:04:05 ago on Wed 07 Jan 2026 01:42:24 PM CST.
Rocky Linux 8 - AppStream
Name                      Stream                       Profiles                       Summary
nginx                     1.14 [d]                     common [d]                     nginx webserver
nginx                     1.16                         common [d]                     nginx webserver
nginx                     1.18                         common [d]                     nginx webserver
nginx                     1.20                         common [d]                     nginx webserver
nginx                     1.22                         common [d]                     nginx webserver
nginx                     1.24                         common [d]                     nginx webserver

sudo sudo dnf module install nginx:1.14
Last metadata expiration check: 10:04:31 ago on Wed 07 Jan 2026 01:42:24 PM CST.
Dependencies resolved.
========================================================================================================================
 Package                            Architecture  Version                                        Repository        Size
========================================================================================================================
Installing group/module packages:
 nginx                              x86_64        1:1.14.1-9.module+el8.4.0+542+81547229         appstream        566 k
 nginx-all-modules                  noarch        1:1.14.1-9.module+el8.4.0+542+81547229         appstream         22 k
 nginx-filesystem                   noarch        1:1.14.1-9.module+el8.4.0+542+81547229         appstream         23 k
 nginx-mod-http-image-filter        x86_64        1:1.14.1-9.module+el8.4.0+542+81547229         appstream         34 k
 nginx-mod-http-perl                x86_64        1:1.14.1-9.module+el8.4.0+542+81547229         appstream         45 k
 nginx-mod-http-xslt-filter         x86_64        1:1.14.1-9.module+el8.4.0+542+81547229         appstream         32 k
 nginx-mod-mail                     x86_64        1:1.14.1-9.module+el8.4.0+542+81547229         appstream         63 k
 nginx-mod-stream                   x86_64        1:1.14.1-9.module+el8.4.0+542+81547229         appstream         84 k
Installing dependencies:
 dejavu-fonts-common                noarch        2.35-7.el8                                     baseos            73 k
 dejavu-sans-fonts                  noarch        2.35-7.el8                                     baseos           1.5 M
 fontconfig                         x86_64        2.13.1-4.el8                                   baseos           273 k
 fontpackages-filesystem            noarch        1.44-22.el8                                    baseos            15 k
 gd                                 x86_64        2.2.5-7.el8                                    appstream        143 k
 jbigkit-libs                       x86_64        2.1-14.el8                                     appstream         54 k
 libX11                             x86_64        1.6.8-9.el8_10                                 appstream        611 k
 libX11-common                      noarch        1.6.8-9.el8_10                                 appstream        157 k
 libXau                             x86_64        1.0.9-3.el8                                    appstream         36 k
 libXpm                             x86_64        3.5.12-11.el8                                  appstream         58 k
 libjpeg-turbo                      x86_64        1.5.3-14.el8_10                                appstream        156 k
 libtiff                            x86_64        4.0.9-36.el8_10                                appstream        190 k
 libwebp                            x86_64        1.0.0-11.el8_10                                appstream        273 k
 libxcb                             x86_64        1.13.1-1.el8                                   appstream        228 k
Installing module profiles:
 nginx/common
Enabling module streams:
 nginx                                            1.14

Transaction Summary
========================================================================================================================
Install  22 Packages

Total download size: 4.5 M
Installed size: 14 M
Is this ok [y/N]:
Each Module Stream can have any number of profiles (or none at all). The default profiles of the Module Stream is marked with "[d]".
In the above example, when the user needs to install nginx, the following command is equivalent:
sudo dnf install nginx

sudo dnf install nginx:1.14

sudo dnf install nginx:1.14/common
Management Module Streams
The command used is dnf module, and it has some subcommands for functional items.
Usage Tips
When a single line dnf module command operation involves modules, multiple module names are allowed, such as dnf module enable nginx httpd:2.4 or dnf module list nodejs:10 perl.
View
You can use list or info in the subcommands to complete this operation.
dnf module list- Gets a list of all available modules.dnf module list <Module-Name>ordnf module list <Module-Name>:<Stream>- Lists all available streams (versions) for the current module. Lists the information of a single module stream. For examplednf module list postgresqlordnf module list postgresql:15.dnf module list --enabled- Lists the enabled module stream(s).dnf module info <Module-Name>ordnf module info <Module-name>:<Stream>- Displays module stream information. If you only type the name of a module without a stream, all stream information for that module will be displayed. For examplednf module info rubyordnf module info ruby:2.6.dnf module --info --profile <Module-Name>ordnf module --info --profile <Module-Name>:<Stream>- Lists the profile information of the module stream. If you only type the name of a module without a stream, all stream profile information for that module will be displayed.
Install
Before installing a specific stream of a module, you need to enable that stream. The syntax used is as follows:
dnf module enable <Module-Name>:<Stream> ...
For example:
dnf -y module enable httpd:2.4
Re-emphasize
The default stream is active unless you disable the module or enable another stream for the module.
The following installation methods are acceptable:
dnf -y module install <Module-Name>- Uses the default stream and default profile of a single module (if a default profile exists). For examplednf -y install httpddnf -y install <Module-Name>:<Stream>/<Profile>- Using a specific stream and profile of a single module. For example,dnf -y install httpd:2.4:/minimal. If there are multiple profiles, you can use*to represent all of them, for examplednf module install httpd:2.4/*
Remove
You can use the following syntax for removal:
dnf -y module remove --all <Module-name>:<Stream> ...- Removes all packages from a single stream in a single module. For examplednf -y module remove --all httpd:2.4dnf -y module remove --all <Module-name>:<Stream>/<Profile> ...- Removes all packages associated with a specific profile, using*to represent all profiles. For examplednf -y module remove httpd:2.4/*
Reset
You can use the reset function item command to reset the module to its initial state. The corresponding syntax is as follows:
dnf -y module reset <Module-Name> ...- For examplednf -y module reset httpd
Important Notice
Resetting the module will not change any installed software packages.
Switch
You can switch to the updated stream. There are two prerequisites to complete this operation:
- The operating system has been fully updated
- The installed software packages in the operating system are not newer than the software packages available in the repository
You can use the dnf distro-sync command to switch to a new stream.
If there are available updates for the module's stream, you need to perform the following steps:
dnf module reset <Module-Name> ...dnf module enable <Module-Name>:<New-Stream> ...dnf distro-sync
If already installed in the operating system, you can use the switch-to command option to upgrade or downgrade these software packages. The specific syntax is:
dnf module switch-to <Module-Name>:<Stream>
Disable
The syntax used is:
dnf module disable <Module-Name> ...
Customize using a YAML file
A system administrator can customize the default stream and the default profile by creating a YAML file in the /etc/dnf/modules.defaults.d/ directory.
Taking the PostgreSQL module as an example, you can see from the output information that its default stream is 10 and the default profile is "server":
sudo dnf module list postgresql
Name                   Stream             Profiles                       Summary
postgresql             9.6                client, server [d]             PostgreSQL server and client module
postgresql             10 [d]             client, server [d]             PostgreSQL server and client module
postgresql             12                 client, server [d]             PostgreSQL server and client module
postgresql             13                 client, server [d]             PostgreSQL server and client module
postgresql             15                 client, server [d]             PostgreSQL server and client module
postgresql             16                 client, server [d]             PostgreSQL server and client module

Hint: [d]efault, [e]nabled, [x]disabled, [i]nstalled
Set 15 as the default stream and set the default profile for postgresql:12 to "client":
sudo vim /etc/dnf/modules.defaults.d/postgresql.yaml
---
document: modulemd-defaults
version: 1
data:
        module: postgresql
        stream: "15"
        profiles:
                "9.6": [server]
                "10": [server]
                "12": [client]
                "13": [server]
                "15": [server]
...

sudo dnf module list postgresql
Last metadata expiration check: 0:41:35 ago on Sat 10 Jan 2026 10:10:22 PM CST.
Rocky Linux 8 - AppStream
Name                   Stream             Profiles                       Summary
postgresql             9.6                client, server [d]             PostgreSQL server and client module
postgresql             10                 client, server [d]             PostgreSQL server and client module
postgresql             12                 client [d], server             PostgreSQL server and client module
postgresql             13                 client, server [d]             PostgreSQL server and client module
postgresql             15 [d]             client, server [d]             PostgreSQL server and client module
postgresql             16                 client, server                 PostgreSQL server and client module

Hint: [d]efault, [e]nabled, [x]disabled, [i]nstalled
Complete Example
Taking the nodejs module as an example:
sudo dnf module list nodejs
Last metadata expiration check: 0:44:38 ago on Sat 10 Jan 2026 10:10:22 PM CST.
Rocky Linux 8 - AppStream
Name                Stream              Profiles                                          Summary
nodejs              10 [d]              common [d], development, minimal, s2i             Javascript runtime
nodejs              12                  common [d], development, minimal, s2i             Javascript runtime
nodejs              14                  common [d], development, minimal, s2i             Javascript runtime
nodejs              16                  common [d], development, minimal, s2i             Javascript runtime
nodejs              18                  common [d], development, minimal, s2i             Javascript runtime
nodejs              20                  common [d], development, minimal, s2i             Javascript runtime
nodejs              22                  common, development, minimal, s2i                 Javascript runtime
nodejs              24                  common, development, minimal, s2i                 Javascript runtime

Hint: [d]efault, [e]nabled, [x]disabled, [i]nstalled

sudo dnf -y module enable nodejs:18

sudo dnf module list --enabled nodejs
Last metadata expiration check: 0:46:01 ago on Sat 10 Jan 2026 10:10:22 PM CST.
Rocky Linux 8 - AppStream
Name                Stream              Profiles                                          Summary
nodejs              18 [e]              common [d], development, minimal, s2i             Javascript runtime

Hint: [d]efault, [e]nabled, [x]disabled, [i]nstalled

sudo dnf -y module install nodejs:18/minimal

sudo dnf module list --enabled nodejs
Last metadata expiration check: 0:47:26 ago on Sat 10 Jan 2026 10:10:22 PM CST.
Rocky Linux 8 - AppStream
Name               Stream             Profiles                                             Summary
nodejs             18 [e]             common [d], development, minimal [i], s2i            Javascript runtime

Hint: [d]efault, [e]nabled, [x]disabled, [i]nstalled

sudo dnf -y module install nodejs:18/common

sudo dnf module list --enabled nodejs
Last metadata expiration check: 0:48:34 ago on Sat 10 Jan 2026 10:10:22 PM CST.
Rocky Linux 8 - AppStream
Name              Stream            Profiles                                                Summary
nodejs            18 [e]            common [d] [i], development, minimal [i], s2i           Javascript runtime

Hint: [d]efault, [e]nabled, [x]disabled, [i]nstalled

sudo dnf -y module remove --all nodejs:18/*

sudo dnf -y module reset nodejs

sudo dnf module list nodejs
Last metadata expiration check: 0:50:03 ago on Sat 10 Jan 2026 10:10:22 PM CST.
Rocky Linux 8 - AppStream
Name                Stream              Profiles                                          Summary
nodejs              10 [d]              common [d], development, minimal, s2i             Javascript runtime
nodejs              12                  common [d], development, minimal, s2i             Javascript runtime
nodejs              14                  common [d], development, minimal, s2i             Javascript runtime
nodejs              16                  common [d], development, minimal, s2i             Javascript runtime
nodejs              18                  common [d], development, minimal, s2i             Javascript runtime
nodejs              20                  common [d], development, minimal, s2i             Javascript runtime
nodejs              22                  common, development, minimal, s2i                 Javascript runtime
nodejs              24                  common, development, minimal, s2i                 Javascript runtime

Hint: [d]efault, [e]nabled, [x]disabled, [i]nstalled
Using the EPEL repository
Q: What is EPEL and how is it used?
EPEL (Extra Packages for Enterprise Linux) is an open source and free community-based repository maintained by the EPEL Fedora Special Interest Group. This resource provides a set of additional packages for RHEL (and CentOS, Rocky Linux, and others) from the Fedora sources.
Whether individuals or businesses use Rocky Linux 8.x/9.x/10.x, it is usually recommended to enable the EPEL repository.
You can install the EPEL repository in the following ways:
sudo dnf install epel-release
Review relevant information and verify successful installation:
sudo dnf info epel-release
Last metadata expiration check: 1 day, 23:02:38 ago on Sat 10 Jan 2026 10:10:22 PM CST.
Installed Packages
Name         : epel-release
Version      : 8
Release      : 22.el8
Architecture : noarch
Size         : 34 k
Source       : epel-release-8-22.el8.src.rpm
Repository   : @System
From repo    : epel
Summary      : Extra Packages for Enterprise Linux repository configuration
URL          : http://download.fedoraproject.org/pub/epel
License      : GPLv2
Description  : This package contains the Extra Packages for Enterprise Linux (EPEL) repository
             : GPG key as well as configuration for yum.

rpm -qa | grep epel
epel-release-8-14.el8.noarch

sudo dnf repolist
repo id            repo name
...
epel                                      Extra Packages for Enterprise Linux 8 - x86_64
...
Here you can see that the package does not contain executables, libraries, and so on, but only the configuration files and GPG keys for setting up the repository.
Associated .repo files:
ls -lh /etc/yum.repos.d/epel*
-rw-r--r-- 1 root root 1.7K Apr 23  2025 /etc/yum.repos.d/epel-modular.repo
-rw-r--r-- 1 root root 1.4K Apr 23  2025 /etc/yum.repos.d/epel.repo
-rw-r--r-- 1 root root 1.8K Apr 23  2025 /etc/yum.repos.d/epel-testing-modular.repo
-rw-r--r-- 1 root root 1.4K Apr 23  2025 /etc/yum.repos.d/epel-testing.repo
By default, only repositories with the ID epel in the epel.repo file are enabled.
cat /etc/yum.repos.d/epel.repo
[epel]
name=Extra Packages for Enterprise Linux 8 - $basearch
# It is much more secure to use the metalink, but if you wish to use a local mirror
# place its address here.
#baseurl=https://download.example/pub/epel/8/Everything/$basearch
metalink=https://mirrors.fedoraproject.org/metalink?repo=epel-8&arch=$basearch&infra=$infra&content=$contentdir
enabled=1
gpgcheck=1
countme=1
gpgkey=file:///etc/pki/rpm-gpg/RPM-GPG-KEY-EPEL-8
...
List all available software packages with repository ID epel:
dnf --repoid epel list --available
If there are other repositories in your operating system but you want to install packages only from EPEL:
sudo dnf --disablerepo="*" --enablerepo="epel" install nmon
Last metadata expiration check: 0:08:13 ago on Mon 12 Jan 2026 09:34:25 PM CST.
Dependencies resolved.
========================================================================================================================
 Package                   Architecture                Version                          Repository                 Size
========================================================================================================================
Installing:
 nmon                      x86_64                      16p-5.el8                        epel                       80 k

Transaction Summary
========================================================================================================================
Install  1 Package

Total download size: 80 k
Installed size: 161 k
Is this ok [y/N]:
Friendly reminder
When multiple repositories are enabled, the same software package may have multiple versions, and by default, the newer version has the highest priority. This is also the reason why the --disablerepo and --enablerepo options are used.
Support consideration
EPEL is a project initiated by volunteers in the Fedora community, so it is not commercially supported by Red Hat. Just like Fedora itself, Red Hat hosts the infrastructure for this project, and Red Hat engineers are involved as maintainers and leaders, but there are no commercial support contracts or service-level agreements provided by Red Hat for packages in EPEL.
For the FAQ about EPEL, See the EPEL FAQ in the Fedora documentation.
Author: Antoine Le Morvan
Contributors: Colussi Franco, Steven Spencer, Ganna Zhyrnova, tianci li