Cloud Server Using Nextcloud
Prerequisites and assumptions
- Server running Rocky Linux (you can install Nextcloud on any Linux distribution, but this procedure assumes you are using Rocky).
- A high degree of comfort operating from the command line for installation and for configuration.
- Knowledge of a command-line editor. Using
vifor this example, but you can use your favorite editor if you have one. - This procedure covers the
.zipfile installation method. You can also install Nextcloud with a snap. - This procedure uses the Apache sites enabled document (linked later) for directory setup.
- This procedure also uses mariadb-server hardening (also linked later) for database setup.
- Throughout this document, the assumption is that you are root, or that you can elevate privileges with
sudo. - The example domain in use here is "yourdomain.com".
Introduction
If you are in charge of a server environment for a large (or even a small) company, consider using cloud applications. Doing things in the cloud can free up your own resources for other tasks, but there is a downside: the loss of control over your company's data. If a compromise occurs in the cloud application, you could risk your company's data too.
Taking the cloud back into your own environment is a way to regain control over your data, but at the expense of your time and energy. Sometimes, this is a cost worth paying.
Nextcloud offers an open-source cloud platform with security and flexibility in mind. Note that building a Nextcloud server is a good exercise, even if you end up taking your cloud off-site. The following procedure deals with setting up Nextcloud on Rocky Linux.
Nextcloud install
Installing and configuring repositories and modules
For this installation, you need two repositories. You need to install the EPEL (Extra Packages for Enterprise Linux) and the Remi Repository for 10.
Note
While Rocky Linux 10 requires PHP 8.3, the Remi repository provides additional PHP packages necessary for Nextcloud.
To install the EPEL, run:
dnf install epel-release
To install the Remi repository, run:
dnf install https://rpms.remirepo.net/enterprise/remi-release-10.rpm
Then run dnf upgrade again.
Run the following to see a list of available PHP modules:
dnf module list php
This gives you this output for Rocky Linux 10:
Remi's Modular repository for Enterprise Linux 10 - x86_64
Name                   Stream                      Profiles                                      Summary
php                    remi-7.4                    common [d], devel, minimal                    PHP scripting language
php                    remi-8.0                    common [d], devel, minimal                    PHP scripting language
php                    remi-8.1                    common [d], devel, minimal                    PHP scripting language
php                    remi-8.2                    common [d], devel, minimal                    PHP scripting language
php                    remi-8.3                    common [d], devel, minimal                    PHP scripting language
php                    remi-8.4                    common [d], devel, minimal                    PHP scripting language

Hint: [d]efault, [e]nabled, [x]disabled, [i]nstalled
Use the newest PHP that Nextcloud is compatible with. At this moment, this is 8.4. Enable that module with:
dnf module enable php:remi-8.4
To see how this changes the output of the module list, run the module list command again, and you will see the "[e]" next to 8.3:
dnf module list php
The output is the same except for this line:
php remi-8.4 [e] common [d], devel, minimal PHP scripting language
Installing packages
The example here uses Apache and MariaDB. To install the needed packages, do the following:
dnf install httpd mariadb-server vim wget zip unzip libxml2 openssl php84-php php84-php-ctype php84-php-curl php84-php-gd php84-php-iconv php84-php-json php84-php-libxml php84-php-mbstring php84-php-openssl php84-php-posix php84-php-session php84-php-xml php84-php-zip php84-php-zlib php84-php-pdo php84-php-mysqlnd php84-php-intl php84-php-bcmath php84-php-gmp
Configuring
Configuring Apache
Set apache to start on boot:
systemctl enable httpd
Then start it:
systemctl start httpd
Create the configuration
In the Prerequisites and Assumptions section, there was a statement that you would use the Apache Sites Enabled procedure for your configuration. Click over to that procedure and set up the basics there, and then return to this document to continue.
For Nextcloud, you will need to create the following configuration file:
vi /etc/httpd/sites-available/com.yourdomain.nextcloud
With the content:
<VirtualHost *:80>
  DocumentRoot /var/www/sub-domains/com.yourdomain.nextcloud/html/
  ServerName  nextcloud.yourdomain.com
  <Directory /var/www/sub-domains/com.yourdomain.nextcloud/html/>
    Require all granted
    AllowOverride All
    Options FollowSymLinks MultiViews
    <IfModule mod_dav.c>
      Dav off
    </IfModule>
  </Directory>
</VirtualHost>
Once done, save your changes (with Shift+:+w+q+! for vi).
Next, create a link to this file in /etc/httpd/sites-enabled:
ln -s /etc/httpd/sites-available/com.yourdomain.nextcloud /etc/httpd/sites-enabled/
Creating the directory
As noted in the configuration earlier, you need to create the DocumentRoot. Do this with:
mkdir -p /var/www/sub-domains/com.yourdomain.com/html
This is where you will install your Nextcloud instance.
Configuring PHP
You need to set PHP's time zone. To do this, open up php.ini with your text editor of choice:
vi /etc/opt/remi/php84/php.ini
Then find the line:
;date.timezone =
Remove the remark (;) and set our time zone. For this example time zone, you can put in either:
date.timezone = "America/Chicago"
OR
date.timezone = "US/Central"
Then save and exit the php.ini file.
Note that, for consistency, your time zone in the php.ini file should match your machine's time zone setting. You can discover what this is by doing the following:
ls -al /etc/localtime
You should see something such as this, assuming you set your time zone when you installed Rocky Linux and are living in the Central time zone:
/etc/localtime -> /usr/share/zoneinfo/America/Chicago
Configuring mariadb-server
Set mariadb-server to start on boot:
systemctl enable mariadb
And then start it:
systemctl restart mariadb
Again, as indicated earlier, use the setup procedure for hardening mariadb-server for the initial configuration.
Installing .zip
The next few steps assume that you are remotely connected to your Nextcloud server via ssh with a remote console open:
- Navigate to the Nextcloud website.
- Let your mouse hover over 'Download', which will open a drop-down menu.
- Click 'Nextcloud server'.
- Click 'Download server archive'.
- Right-click 'Get ZIP file' and copy the link.
- In your remote console on the Nextcloud server, type
wgetand then a space and paste in what you just copied. You should get something similar to the following:wget https://download.nextcloud.com/server/releases/latest.zip. - Once you hit enter, the download of the .zip file will start and complete quickly.
Once the download is complete, extract the Nextcloud .zip file with:
unzip latest.zip
Copying content and changing permissions
After completing the .zip file extraction step, you should now have a new directory in /root called "nextcloud." Change into this directory:
cd nextcloud
Either copy or move the content to our DocumentRoot:
cp -Rf * /var/www/sub-domains/com.yourdomain.nextcloud/html/
OR
mv * /var/www/sub-domains/com.yourdomain.nextcloud/html/
The next step is to make sure that Apache owns the directory. Do this with:
chown -Rf apache.apache /var/www/sub-domains/com.yourdomain.nextcloud/html
For security reasons, you also want to move the data folder from inside the _DocumentRoot _ to outside it. Do this with the following command:
mv /var/www/sub-domains/com.yourdomain.nextcloud/html/data /var/www/sub-domains/com.yourdomain.nextcloud/
Configuring Nextcloud
Ensure your services are running. If you followed the earlier steps, they should already be running. You have had several steps between those initial service starts, so restart them just to be sure:
systemctl restart httpd
systemctl restart mariadb
If everything restarts and there are no issues, then you are ready to move on.
To do the initial configuration, you want to load the site in a web browser:
http://your-server-hostname/ (replace with your actual hostname)
Assuming that you have done everything correctly so far, you should see a Nextcloud setup screen:
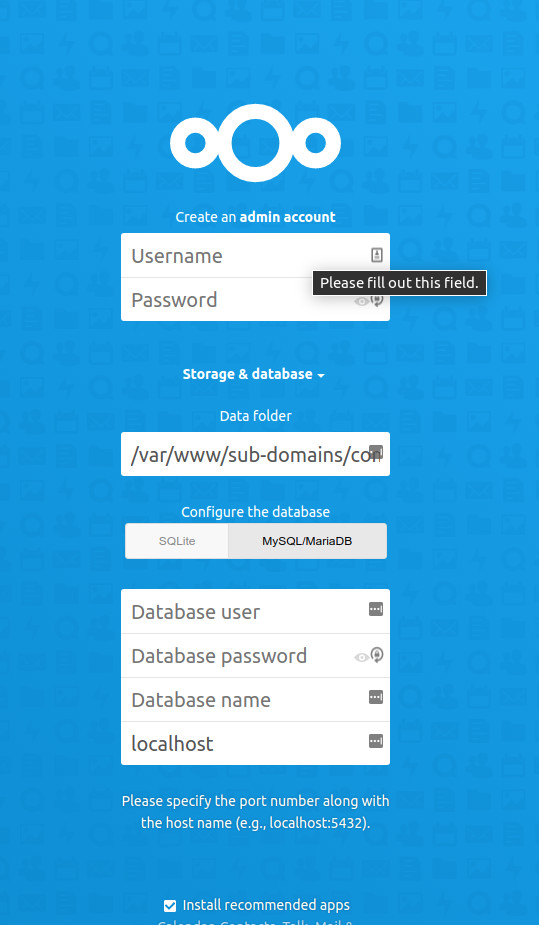
There are a couple of things that you want to do differently from the defaults:
- At the top of the web page, where it says
Create an admin account, set the user and password. For the sake of this example, enteradminand set a strong password. Remember to save this somewhere safe (such as a password manager) so you do not lose it. Even though you have typed into this field, do not hit Enter until you complete all the fields. - Under the
Storage & databasesection, change theData folderlocation from the default document root, to where you moved the data folder earlier:/var/www/sub-domains/com.yourdomain.nextcloud/data. - Under the
Configure the databasesection, change fromSQLitetoMySQL/MariaDBby clicking on that button. - Type the MariaDB root user and password that you set earlier into the
Database userandDatabase passwordfields. - In the
Database namefield, typenextcloud. - In the
localhostfield, type
Once you have all this, click Finish Setup and you should be up and running.
The browser window will refresh for a bit, and then usually not reload the site. Enter your URL in the browser window again, and you should see the default first page.
Your administrative user is already logged in (or should be), and there are several informational pages to help you get up to speed. The "Dashboard" is what users will see when they first log in. The administrative user can now create other users, install other applications, and perform many different tasks.
The "Nextcloud Manual.pdf" file is the user manual, so that users can get familiar with what is available. The administrative user should read through or at least scan the high points of the admin manual On the Nextcloud website
Next steps
At this point, do not forget that this is a server where you will store company data. It is important to lock it down with a firewall, set up backup, secure the site with SSL, and complete any other necessary tasks to keep your data safe.
Conclusions
You need to carefully evaluate any decision to take the company's cloud in-house. For those who prefer keeping company data locally rather than using an external cloud host, Nextcloud is a good alternative.
Author: Steven Spencer
Contributors: Ezequiel Bruni, Ganna Zhyrnova