Private DNS server with bind
Prerequisites and assumptions
- A server running Rocky Linux
- Several internal servers that need only local access, not over the Internet
- Several workstations that need access to these same servers that exist on the same network
- A healthy comfort level with entering commands from command line
- Familiarity with a command line editor (using vi in this example)
- Able to use firewalld for creating firewall rules
Introduction
External, or public, DNS servers map hostnames to IP addresses and, in the case of PTR (known as "pointer" or "reverse") records, map the IP addresses to the hostname. This is an essential part of the Internet. It makes your mail server, web server, FTP server, or many other servers and services work as expected no matter where you are.
On a private network, particularly one for developing many systems, you can use your Rocky Linux workstation's /etc/hosts file to map a name to an IP address.
This will work for your workstation, but not for any other machine on your network. The best method to make things universally applied is to take some time out and create a local, private DNS server to handle this for all your machines.
Suppose you were creating production-level public DNS servers and resolvers. In that case, this author recommends the more robust PowerDNS authoritative and recursive DNS, which is installable on Rocky Linux servers. However, this document is for a local network that will not expose its DNS servers to the outside world. That is why the author chose bind for this example.
The DNS server components explained
DNS separates services into authoritative and recursive servers. These services are now recommended to be separate on separate hardware or containers.
The authoritative server is the storage area for all IP addresses and host names, and the recursive server looks up addresses and host names. In the case of our private DNS server, the authoritative and the recursive server services will run together.
Installing and enabling bind
The first step is to install packages:
dnf install bind bind-utils
bind's service daemon is named. Enable this to start on boot:
systemctl enable named
Start named:
systemctl start named
Configuration
Before making changes to any configuration file, create a backup copy of the original installed working file, named.conf:
cp /etc/named.conf /etc/named.conf.orig
That will help in the future if the introduction of errors into the configuration file occurs. It is always a good idea to make a backup copy before making changes.
Edit the named.conf file. The author is using vi , but you can substitute your favorite command line editor:
vi /etc/named.conf
Turn off listening on the localhost. Do this by remarking with a "#" sign, these two lines in the "options" section. This shuts down any connection to the outside world.
This is helpful, particularly when you add this DNS to our workstations because you want the DNS server to only respond when the IP address requesting the service is local and not react if the server or service is on the Internet.
This way, the other configured DNS servers will take over nearly immediately to look up the Internet based services:
options {
#       listen-on port 53 { 127.0.0.1; };
#       listen-on-v6 port 53 { ::1; };
Finally, skip down to the bottom of the named.conf file and add a section for your network. Our example is "ourdomain", so sub in what you want to call your LAN hosts:
# primary forward and reverse zones
//forward zone
zone "ourdomain.lan" IN {
     type master;
     file "ourdomain.lan.db";
     allow-update { none; };
    allow-query {any; };
};
//reverse zone
zone "1.168.192.in-addr.arpa" IN {
     type master;
     file "ourdomain.lan.rev";
     allow-update { none; };
    allow-query { any; };
};
Save your changes (for vi, Shift+:+W+Q+!)
The forward and reverse records
You need to create two files in /var/named. You will edit these files if you add machines to your network to include them in the DNS.
The first is the forward file to map our IP address to the hostname. Again, our examples is "ourdomain" here. Note that the IP of our local DNS is 192.168.1.136. Add hosts at the bottom of this file.
vi /var/named/ourdomain.lan.db
The file will look something like this when completed:
$TTL 86400
@ IN SOA dns-primary.ourdomain.lan. admin.ourdomain.lan. (
    2019061800 ;Serial
    3600 ;Refresh
    1800 ;Retry
    604800 ;Expire
    86400 ;Minimum TTL
)

;Name Server Information
@ IN NS dns-primary.ourdomain.lan.

;IP for Name Server
dns-primary IN A 192.168.1.136

;A Record for IP address to Hostname
wiki IN A 192.168.1.13
www IN A 192.168.1.14
devel IN A 192.168.1.15
Add all the hosts and IP addresses you need and save your changes.
You need a reverse file to map our hostname to the IP address. In this case, the only part of the IP that you need is the last octet (in an IPv4 address each number separated by a "." is an octet) of the host, the PTR, and hostname.
vi /var/named/ourdomain.lan.rev
When completed, the file will look something like this:
$TTL 86400
@ IN SOA dns-primary.ourdomain.lan. admin.ourdomain.lan. (
    2019061800 ;Serial
    3600 ;Refresh
    1800 ;Retry
    604800 ;Expire
    86400 ;Minimum TTL
)
;Name Server Information
@ IN NS dns-primary.ourdomain.lan.

;Reverse lookup for Name Server
136 IN PTR dns-primary.ourdomain.lan.

;PTR Record IP address to HostName
13 IN PTR wiki.ourdomain.lan.
14 IN PTR www.ourdomain.lan.
15 IN PTR devel.ourdomain.lan.
Add all of the hostnames that are in the forward file and save your changes.
What all this means
Since you have all of this added in, and are preparing to restart our bind DNS server, let us explore some of the terminologies used in these two files.
Just making things work is not good enough if you do not know what each term means, right?
- TTL stands for "Time To Live". TTL tells the DNS server how long to keep its cache before requesting a fresh copy. In this case, the TTL is the default setting for all records unless you manually enter a specific TTL. The default here is 86400 seconds or 24 hours.
- IN stands for Internet. In this case, the Internet is not used. Think of this as the Intranet instead.
- SOA stands for "Start Of Authority" or what the primary DNS server is for the domain
- NS stands for "name server"
- Serial is the value used by the DNS server to verify that the contents of the zone file are up-to-date
- Refresh specifies how often a slave DNS server will request a zone transfer from the master
- Retry specifies the length of time in seconds to wait before trying again on a failed zone transfer
- Expire specifies how long a slave server will wait to answer a query when the master is unreachable
- A Is the host address or forward record and is only in the forward file
- PTR The pointer record better known as the "reverse" and is only in our reverse file
Testing configurations
When you have all of your files created, you need to ensure that the configuration files and zones are in good working order before you start the bind service again.
Check the main configuration:
named-checkconf
This will return an empty result if everything is OK.
Check the forward zone:
named-checkzone ourdomain.lan /var/named/ourdomain.lan.db
This will return something like this if all is well:
zone ourdomain.lan/IN: loaded serial 2019061800
OK
Finally, check the reverse zone:
named-checkzone 192.168.1.136 /var/named/ourdomain.lan.rev
Which will return something like this if all is well:
zone 192.168.1.136/IN: loaded serial 2019061800
OK
Assuming that everything looks good, go ahead and restart bind:
systemctl restart named
9 using IPv4 on your LAN
To use ONLY IPv4 on your LAN, you need to make one change in /etc/sysconfig/named:
vi /etc/sysconfig/named
OPTIONS="-4"
Save those changes.
9 Testing machines
You need to add the DNS server (in our example 192.168.1.136) to each machine that you want to have access to the servers that you added to your local DNS. The author only shows an example of how to do this on a Rocky Linux workstation. Similar methods exist for other Linux distributions, Windows, and Mac machines.
You will want to add the DNS servers to the list, not replace what is currently there, as you will still need Internet access, which will require your presently assigned DNS servers. DHCP (Dynamic Host Configuration Protocol) services generally assign these or they are statically assigned.
You will add our local DNS with nmcli and then restart the connection.
Stupid Profile Names
In NetworkManager, the connections are not modified by the name of the device but by the name of the profile. This can be things like "Wired connection 1" or "Wireless connection 1". You can see the profile by running nmcli without any parameters:
nmcli
This will show you output such as:
enp0s3: connected to Wired Connection 1
"Intel 82540EM"
ethernet (e1000), 08:00:27:E4:2D:3D, hw, mtu 1500
ip4 default
inet4 192.168.1.140/24
route4 192.168.1.0/24 metric 100
route4 default via 192.168.1.1 metric 100
inet6 fe80::f511:a91b:90b:d9b9/64
route6 fe80::/64 metric 1024

lo: unmanaged
    "lo"
    loopback (unknown), 00:00:00:00:00:00, sw, mtu 65536

DNS configuration:
    servers: 192.168.1.1
    domains: localdomain
    interface: enp0s3

Use "nmcli device show" to get complete information about known devices and
"nmcli connection show" to get an overview on active connection profiles.
Before we even start modifying the connection, you should name this something sane, like the name of the interface (note the "\" below escapes the spaces in the name):
nmcli connection modify Wired\ connection\ 1 con-name enp0s3
When done, run nmcli by itself again and you will see something like this:
enp0s3: connected to enp0s3
"Intel 82540EM"
ethernet (e1000), 08:00:27:E4:2D:3D, hw, mtu 1500
ip4 default
inet4 192.168.1.140/24
route4 192.168.1.0/24 metric 100
route4 default via 192.168.1.1 metric 100
...
This will make the remaining configuration for the DNS much easier!
Assuming that your connection profile name is "enp0s3", we will include the already configured DNS but add our local DNS server first:
nmcli con mod enp0s3 ipv4.dns '192.168.1.138,192.168.1.1'
You can have more DNS servers. For a machine configured with public DNS servers, say Google's open DNS, you may have this instead:
nmcli con mod enp0s3 ipv4.dns '192.168.1.138,8.8.8.8,8.8.4.4'
Once you have added the DNS servers that you want to the connection, you should be able to resolve hosts in ourdomain.lan, as well as Internet hosts.
8 Using IPv4 on your LAN
You need to make two changes if you are using only IPv4 on your LAN. The first is in /etc/named.conf and the second is in /etc/sysconfig/named
First, get back into the named.conf file again with vi /etc/named.conf. We need to add the following option anywhere in the options section.
filter-aaaa-on-v4 yes;
Shown below:
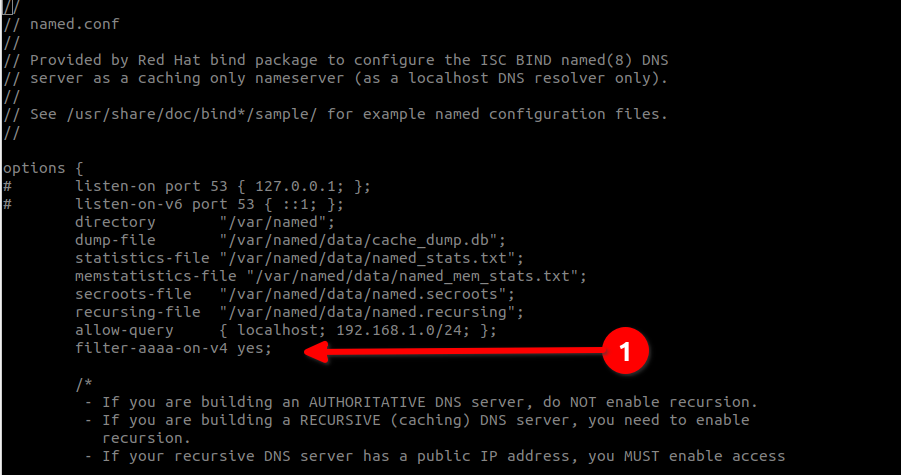
Once you make this change, save it and exit the named.conf (for vi, Shift+:+W+Q+!)
You need to make a similar change to /etc/sysconfig/named:
vi /etc/sysconfig/named
Add this to the bottom of the file:
OPTIONS="-4"
Save those changes (again, for vi, Shift+:+W+Q+!)
8 Testing machines
You need to add the DNS server (in our example 192.168.1.136) to each machine that you want to have access to the servers that you added to your local DNS. The author only shows an example of how to do this on a Rocky Linux workstation. Similar methods exist for other Linux distributions, Windows, and Mac machines.
You will want to add the DNS server to the list, as you will still need Internet access, which will require your currently assigned DNS servers. DHCP (Dynamic Host Configuration Protocol) generally assigns these, or they are statically assigned.
On a Rocky Linux workstation where the enabled network interface is eth0, use:
vi /etc/sysconfig/network-scripts/ifcfg-eth0
If your enabled network interface differs, you will need to substitute that interface name. The configuration file that you open will look something like this for a statically assigned IP (not DHCP as mentioned above). In the example below, our machine's IP address is 192.168.1.151:
DEVICE=eth0
BOOTPROTO=none
IPADDR=192.168.1.151
PREFIX=24
GATEWAY=192.168.1.1
DNS1=8.8.8.8
DNS2=8.8.4.4
ONBOOT=yes
HOSTNAME=tender-kiwi
TYPE=Ethernet
MTU=
You want to substitute in our new DNS server for the primary (DNS1) and move each of the other DNS servers down one:
DEVICE=eth0
BOOTPROTO=none
IPADDR=192.168.1.151
PREFIX=24
GATEWAY=192.168.1.1
DNS1=192.168.1.136
DNS2=8.8.8.8
DNS3=8.8.4.4
ONBOOT=yes
HOSTNAME=tender-kiwi
TYPE=Ethernet
MTU=
After completing the changes, restart the machine or restart networking with:
systemctl restart network
You will now be able to get to anything in the ourdomain.lan domain from your workstations, plus still be able to resolve and get to Internet addresses.
Firewall rules - firewalld
firewalld By Default
With Rocky Linux 9.0 and above, using iptables rules is deprecated. You should use firewalld instead.
The author is not making any assumptions about the network or services that you might need, except for turning on SSH access and DNS access for our LAN network only. For this, you will use firewalld's built-in zone, "trusted". You will have to make service changes to the "public" zone to limit SSH access to the LAN.
The first step is to add our LAN network to the "trusted" zone:
firewall-cmd --zone=trusted --add-source=192.168.1.0/24 --permanent
Add our two services to the "trusted" zone:
firewall-cmd --zone=trusted --add-service=ssh --permanent
firewall-cmd --zone=trusted --add-service=dns --permanent
Remove the SSH service from our "public" zone, which is on by default:
firewall-cmd --zone=public --remove-service=ssh --permanent
Reload the firewall and list out the zones that you made changes to:
firewall-cmd --reload
firewall-cmd --zone=trusted --list-all
Which will show that you have correctly added the services and the source network:
trusted (active)
    target: ACCEPT
    icmp-block-inversion: no
    interfaces:
    sources: 192.168.1.0/24
    services: dns ssh
    ports:
    protocols:
    forward: no
    masquerade: no
    forward-ports:
    source-ports:
    icmp-blocks:
    rich rules:
Listing out the "public" zone will show that SSH access is no-longer allowed:
firewall-cmd --zone=public --list-all
Shows:
public
    target: default
    icmp-block-inversion: no
    interfaces:
    sources:
    services: cockpit dhcpv6-client
    ports:
    protocols:
    forward: no
    masquerade: no
    forward-ports:
    source-ports:
    icmp-blocks:
    rich rules:
These rules will get you DNS resolution on your private DNS server from hosts on the 192.168.1.0/24 network. In addition, you will be able to SSH from any of those hosts into your private DNS server.
Conclusions
Changing /etc/hosts on an individual workstation will get you access to a machine on your internal network, but you can only use it on that one machine. A private DNS server that is uses bind will allow you to add hosts to the DNS and, provided the workstations have access to that private DNS server, they will be able to get to these local servers.
If you do not need machines to resolve on the Internet, but do need local access from several machines to local servers, then consider a private DNS server instead.
Author: Steven Spencer
Contributors: Ezequiel Bruni, k3ym0, Ganna Zhyrnova