Overview
This document aims to provide the reader with a detailed understanding of the various components of an email system, including its installation and basic configuration.
All commands in this document are executed using root(uid=0).
List of basic information
| Role played | OS | IP address | version |
|---|---|---|---|
| Mysql Dadabase | RL 8.8 | 192.168.100.5/24 | 8.0.33 |
| E-mail system | RL 8.8 | 192.168.100.6/24 | postfix: 3.5.8 dovecot: 2.3.16 |
bind DNS | RL 8.8 | 192.168.100.7/24 | 9.11.36 |
Info
Postfix and Dovecot can still work for a small installation without a database.
Install and configure bind
First, install BIND:
Shell(192.168.100.7) > dnf -y install bind bind-utils
Next, edit /etc/named.conf:
options {
    listen-on port 53 { 192.168.100.7; };
    ...
    allow-query     { any; };
    ...
};
...
include "/etc/named.rfc1912.zones";
include "/etc/named.root.key";
Check if the BIND configuration is correct.
Shell(192.168.100.7) > named-checkconf /etc/named.conf
Now, edit /etc/named.rfc1912.zones:
zone "rockylinux.me" IN {
        type master;
        file "rockylinux.localhost";
        allow-update { none; };
};
Question
What is a DNS zone? A DNS zone is a portion of the DNS namespace hosted on a DNS server. A DNS zone contains resource records, and a DNS server responds to queries for records in that namespace. A DNS server can have multiple DNS zones. Simply put, a DNS zone is analogous to a book catalog.
First, initialize BIND:
Shell(192.168.100.7) > cp -p /var/named/named.localhost /var/named/rockylinux.localhost
Shell(192.168.100.7) > vim /var/named/rockylinux.localhost
$TTL 1D
@       IN SOA   rockylinux.me. rname.invalid. (
                                        0       ; serial
                                        1D      ; refresh
                                        1H      ; retry
                                        1W      ; expire
                                        3H )    ; minimum
        NS      dns.rockylinux.me.
        MX 2    mail.rockylinux.me.
dns     A       192.168.100.7
mail    A       192.168.100.6

Shell(192.168.100.7) > named-checkzone  rockylinux.me  /var/named/rockylinux.localhost
zone rockylinux.me/IN: loaded serial 0
OK
Now, start BIND:
Shell(192.168.100.7) > systemctl start named.service
We can test if our server's DNS resolution is working:
Shell(192.168.100.7) > systemctl start named.service
Shell(192.168.100.7) > nmcli connection modify ens160 ipv4.dns "192.168.100.7,8.8.8.8"
Shell(192.168.100.7) > systemctl restart NetworkManager.service

Shell(192.168.100.7) > dig mail.rockylinux.me
...
;mail.rockylinux.me.            IN      A

;; ANSWER SECTION:
mail.rockylinux.me.     86400   IN      A       192.168.100.6

;; AUTHORITY SECTION:
rockylinux.me.          86400   IN      NS      dns.rockylinux.me.

;; ADDITIONAL SECTION:
dns.rockylinux.me.      86400   IN      A       192.168.100.7
...
Info
Our domain name cannot be our server's hostname.
Install and configure MySQL
First, install MySQL from the source:
Shell(192.168.100.5) > groupadd mysql && useradd -r -g mysql -s /sbin/nologin mysql
Shell(192.168.100.5) > id mysql
uid=995(mysql) gid=1000(mysql) groups=1000(mysql)
Shell(192.168.100.5) > dnf config-manager --enable powertools
Shell(192.168.100.5) > dnf -y install libaio ncurses-compat-libs ncurses-devel make cmake gcc bison git libtirpc-devel openssl  openssl-devel rpcgen wget tar gzip bzip2 zip unzip  gcc-toolset-12-gcc gcc-toolset-12-gcc-c++ gcc-toolset-12-binutils gcc-toolset-12-annobin-annocheck gcc-toolset-12-annobin-plugin-gcc
Shell(192.168.100.5) > wget https://dev.mysql.com/get/Downloads/MySQL-8.0/mysql-boost-8.0.33.tar.gz  && tar -zvxf mysql-boost-8.0.33.tar.gz  -C /usr/local/src/

Shell(192.168.100.5) > cd /usr/local/src/mysql-8.0.33 && mkdir build && cd build && cmake .. \
-DDEFAULT_CHARSET=utf8mb4 \
-DDEFAULT_COLLATION=utf8mb4_0900_ai_ci \
-DCMAKE_INSTALL_PREFIX=/usr/local/mysql \
-DCMAKE_BUILD_TYPE=RelWithDebInfo \
-DENABLED_LOCAL_INFILE=1 \
-DMYSQL_TCP_PORT=3306 \
-DWITH_BOOST=/usr/local/src/mysql-8.0.33/boost/ \
-DMYSQL_DATADIR=/usr/local/mysql/data \
&& make && make install
Next, let's initialize MySQL:
Shell(192.168.100.5) > chown -R mysql:mysql /usr/local/mysql
Shell(192.168.100.5) > chmod -R 755 /usr/local/mysql
Shell(192.168.100.5) > /usr/local/mysql/bin/mysqld  --initialize  --user=mysql  --basedir=/usr/local/mysql  --datadir=/usr/local/mysql/data
2023-07-14T14:46:49.474684Z 0 [System] [MY-013169] [Server] /usr/local/mysql/bin/mysqld (mysqld 8.0.33) initializing of server in progress as process 42038
2023-07-14T14:46:49.496908Z 1 [System] [MY-013576] [InnoDB] InnoDB initialization has started.
2023-07-14T14:46:50.210118Z 1 [System] [MY-013577] [InnoDB] InnoDB initialization has ended.
2023-07-14T14:46:51.305307Z 6 [Note] [MY-010454] [Server] A temporary password is generated for root@localhost: pkqaXRuTn1/N
Then, edit the /etc/my.cnf configuration as follows:
[client]
port=3306
socket=/tmp/mysql.sock

[mysqld]
bind-address=192.168.100.5
port=3306
socket=/tmp/mysql.sock
basedir=/usr/local/mysql
datadir=/usr/local/mysql/data
user=mysql
log-error=/usr/local/mysql/data/mysql_log.error
Now, enable and log into MySQL:
Shell(192.168.100.5) > /usr/local/mysql/bin/mysqld_safe  --user=mysql &
Shell(192.168.100.5) > /usr/local/mysql/bin/mysql -u root --password="pkqaXRuTn1/N"
Then, let's add our domain entries in MySQL:
Mysql > ALTER USER 'root'@'localhost' IDENTIFIED BY 'rockylinux.me';

Mysql > create user 'mailrl'@'%' identified by 'mail.rockylinux.me';

Mysql > grant all privileges on *.* to 'mailrl'@'%' with grant option;
Info
You can also install MySQL from a dnf repository or container.
Create tables and insert data
Let's now create the MySQL tables required for Dovecot:
Shell(192.168.100.5) >  /usr/local/mysql/bin/mysql -u mailrl --password="mail.rockylinux.me"

Mysql > create database mailserver;

Mysql > use mailserver;

Mysql > create table if not exists virtual_domains (
        id int(11) primary key  auto_increment,
        name varchar(50) not null
);

Mysql > create table if not exists virtual_users (
        id int(11) primary key auto_increment,
        email varchar(128) NOT NULL unique,
        password varchar(150) not null,
        domain_id int(11) not null,
        FOREIGN KEY (domain_id) REFERENCES virtual_domains(id) ON DELETE CASCADE
);

Mysql > create table if not exists virtual_aliases (
        id int(11) primary key auto_increment,
        domain_id int(11) NOT NULL,
        source varchar(100) NOT NULL,
        destination varchar(100) NOT NULL,
        FOREIGN KEY (domain_id) REFERENCES virtual_domains(id) ON DELETE CASCADE
);

Mysql > insert into virtual_domains(id,name) values(1,'mail.rockylinux.me'),(2,'rockylinux.me');

Mysql > insert into virtual_aliases(id,domain_id,source,destination) values(1,1,'all@mail.rockylinux.me','frank@mail.rockylinux.me');

Mysql > insert into virtual_aliases(id,domain_id,source,destination) values(2,1,'all@mail.rockylinux.me','leeo@mail.rockylinux.me');
The password entries for the relevant email users are not shown here, as it requires using doveadm pw -s SHA512-crypt -p twotestandtwo command.
Knowledge of SHA512 (SHA-2)
The main password hashing algorithms are:
- SHA-0
- SHA-1
- SHA-2: includes SHA-224, SHA-256, SHA-384, SHA-512, SHA-512/224, and SHA-512/256
- SHA-3
In the SHA-2 hashing standard, the number in the algorithm refers to the digest length in bits.
It is well known that in Rocky Linux 8 and other RHEL 8 variants, the default algorithm used to encrypt user passwords is SHA-512. To fetch the set algorithm:
Shell(192.168.100.5) > grep -i method /etc/login.defs
ENCRYPT_METHOD SHA512
We can see its structure in the /etc/shadow file:
Shell(192.168.100.5) > grep -i root /etc/shadow | cut -f 2 -d ":"
$6$8jpmvCw8RqNfHYW4$pOlsEZG066eJuTmNHoidtvfWHe/6HORrKkQPwv4eyFxqGXKEXhep6aIRxAtv7FDDIq/ojIY1SfWAQkk7XACeZ0
The information shown in the hash (separated by $) is as follows:
- 6: It means id. The SHA-512 encryption algorithm is fixed at 6.
- 8jpmvCw8RqNfHYW4: Also known as "salt". Its main function is to increase security and improve the difficulty of cracking. The system can randomly generate it, or it can be specified manually.
- pOlsEZG066eJuTmNHoidtvfWHe/6HORrKkQPwv4eyFxqGXKEXhep6aIRxAtv7FDDIq/ojIY1SfWAQkk7XACeZ0: 86 fixed number of characters. Refers to ciphertext passwords generated by using encryption algorithms.
Install and configure postfix
Now, we will install Postfix:
Shell(192.168.100.6) > dnf -y install postfix postfix-mysql
After installing Postfix, the following files need to be changed:
/etc/postfix/main.cf. The main and most important configuration file/etc/postfix/master.cf. Used to set runtime parameters for each component. This file is used if we want to enable spam filtering or other SMTP ports./etc/postfix/access. Access control file for SMTP./etc/postfix/transport. Maps email addresses to relay hosts.
You need to know these binary executable files:
/usr/sbin/postalias: this program generates the alias database in/etc/aliases.dbbased on the /etc/aliases file./usr/sbin/postcatviews the mail content in the mail queue./usr/sbin/postconfqueries the Postfix configuration./usr/sbin/postfixis the main daemon. It can be used as follows:postfix checkpostfix startpostfix stoppostfix reloadpostfix status
Tip
If your server has more than one MTA, you can specify the default MTA using the alternatives -config mta command.
Explanation of the /etc/postfix/main.cf file
The Postfix configuration file can be viewed:
Shell(192.168.100.6) > egrep -v "^#|^$" /etc/postfix/main.cf
compatibility_level = 2
queue_directory = /var/spool/postfix
command_directory = /usr/sbin
daemon_directory = /usr/libexec/postfix
data_directory = /var/lib/postfix
mail_owner = postfix
inet_interfaces = localhost
inet_protocols = all
mydestination = $myhostname, localhost.$mydomain, localhost
unknown_local_recipient_reject_code = 550
alias_maps = hash:/etc/aliases
alias_database = hash:/etc/aliases
debug_peer_level = 2
debugger_command =
         PATH=/bin:/usr/bin:/usr/local/bin:/usr/X11R6/bin
         ddd $daemon_directory/$process_name $process_id & sleep 5
sendmail_path = /usr/sbin/sendmail.postfix
newaliases_path = /usr/bin/newaliases.postfix
mailq_path = /usr/bin/mailq.postfix
setgid_group = postdrop
html_directory = no
manpage_directory = /usr/share/man
sample_directory = /usr/share/doc/postfix/samples
readme_directory = /usr/share/doc/postfix/README_FILES
smtpd_tls_cert_file = /etc/pki/tls/certs/postfix.pem
smtpd_tls_key_file = /etc/pki/tls/private/postfix.key
smtpd_tls_security_level = may
smtp_tls_CApath = /etc/pki/tls/certs
smtp_tls_CAfile = /etc/pki/tls/certs/ca-bundle.crt
smtp_tls_security_level = may
meta_directory = /etc/postfix
shlib_directory = /usr/lib64/postfix
The explanation of these parameters is as follows:
compatibility_level = 2: Enables compatibility with Postfix 2.x configurations.data_directory = /var/lib/postfix. The Postfix cache directory.myhostname = host.domain.tld: Important: You need to change it to the hostname under your domain name.mydomain = domain.tld: Important: You need to change it to your domain name.myorigin = $myhostnameandmyorigin = $mydomain: Important: parameters that have been commented out. The main function is to complement the sender's mail suffix.$represents a reference parameter variable.inet_interfaces = localhost: The interfaces to listen to. This value is usually changed to "all".inet_protocols = all: Enables IPv4, and IPv6 if an address is found.mydestination = \$myhostname, localhost.\$mydomain, localhost: Indicates the mail server's destination hosts.unknown_local_recipient_reject_code = 550: The error code returned when receiving an email to an unknown destination or rejecting an email.mynetworks =: Sets which networks we should accept emails from.relay_domains = $mydestination: Sets which domains we should relay emails from.alias_maps = hash:/etc/aliases: List of our email server's aliases.alias_database = hash:/etc/aliases: The database is to be used by aliases.home_mailbox = Maildir/: Important: Out local mailbox location.debug_peer_level = 2: Level of log records.setgid_group = postdrop: The Unix group for managing Postfix queues.
Except for the parameter items mentioned or displayed above, some parameters are hidden and can be viewed through the postconf command. The most notable parameters are:
message_size_limit = 10240000. Maximum size for a single message in bytes.mailbox_size_limit = 1073741824: Maximum size of a user's mailbox.smtpd_sasl_type = cyrus: The IMAP server software used for SASL authentication. You can usepostconf -ato view.smtpd_sasl_auth_enable = no: Whether to enable SASL authentication.smtpd_sasl_security_options = noanonymous. Security options for SASL. Anonymous authentication is off by default.smtpd_sasl_local_domain =. The local domain name.smtpd_recipient_restrictions. Recipient filtering options. The default value is empty.
Modify /etc/postfix/main.cf
With the packages installed, you need to configure Postfix. Make the following changes in /etc/postfix/main.cf:
myhostname = mail.rockylinux.me
mydomain = rockylinux.me
myorigin = $myhostname
inet_interfaces = 192.168.100.6
inet_protocols = ipv4
mydestination =
biff = no
append_dot_mydomain = no
smtpd_sasl_type = dovecot
smtpd_sasl_path = private/auth
smtpd_sasl_auth_enable = yes
smtpd_sasl_local_domain = $myhostname
virtual_transport = lmtp:unix:private/dovecot-lmtp
virtual_mailbox_domains = mysql:/etc/postfix/mysql-virtual-mailbox-domains.cf
virtual_mailbox_maps = mysql:/etc/postfix/mysql-virtual-mailbox-maps.cf
virtual_alias_maps = mysql:/etc/postfix/mysql-virtual-alias-maps.cf,mysql:/etc/postfix/mysql-virtual-email2email.cf
The final configuration should look like this:
compatibility_level = 2
queue_directory = /var/spool/postfix
command_directory = /usr/sbin
daemon_directory = /usr/libexec/postfix
data_directory = /var/lib/postfix
mail_owner = postfix
myhostname = mail.rockylinux.me
mydomain = rockylinux.me
myorigin = $myhostname
inet_interfaces = 192.168.100.6
inet_protocols = ipv4
mydestination =
biff = no
append_dot_mydomain = no
smtpd_sasl_type = dovecot
smtpd_sasl_path = private/auth
smtpd_sasl_auth_enable = yes
smtpd_sasl_local_domain = $myhostname
virtual_transport = lmtp:unix:private/dovecot-lmtp
virtual_mailbox_domains = mysql:/etc/postfix/mysql-virtual-mailbox-domains.cf
virtual_mailbox_maps = mysql:/etc/postfix/mysql-virtual-mailbox-maps.cf
virtual_alias_maps = mysql:/etc/postfix/mysql-virtual-alias-maps.cf,mysql:/etc/postfix/mysql-virtual-email2email.cf
unknown_local_recipient_reject_code = 550
alias_maps = hash:/etc/aliases
alias_database = hash:/etc/aliases
debug_peer_level = 2
debugger_command =
         PATH=/bin:/usr/bin:/usr/local/bin:/usr/X11R6/bin
         ddd $daemon_directory/$process_name $process_id & sleep 5
sendmail_path = /usr/sbin/sendmail.postfix
newaliases_path = /usr/bin/newaliases.postfix
mailq_path = /usr/bin/mailq.postfix
setgid_group = postdrop
html_directory = no
manpage_directory = /usr/share/man
sample_directory = /usr/share/doc/postfix/samples
readme_directory = /usr/share/doc/postfix/README_FILES
smtpd_tls_cert_file = /etc/pki/tls/certs/postfix.pem
smtpd_tls_key_file = /etc/pki/tls/private/postfix.key
smtpd_tls_security_level = may
smtp_tls_CApath = /etc/pki/tls/certs
smtp_tls_CAfile = /etc/pki/tls/certs/ca-bundle.crt
smtp_tls_security_level = may
meta_directory = /etc/postfix
shlib_directory = /usr/lib64/postfix
Create and edit the following files:
In /etc/postfix/mysql-virtual-mailbox-domains.cf:
user = mailrl
password = mail.rockylinux.me
hosts = 192.168.100.5
dbname = mailserver
query = SELECT 1 FROM virtual_domains WHERE name='%s'
In /etc/postfix/mysql-virtual-mailbox-maps.cf:
user = mailrl
password = mail.rockylinux.me
hosts = 192.168.100.5
dbname = mailserver
query = SELECT 1 FROM virtual_users WHERE email='%s'
In /etc/postfix/mysql-virtual-alias-maps.cf:
user = mailrl
password = mail.rockylinux.me
hosts = 192.168.100.5
dbname = mailserver
query = SELECT destination FROM virtual_aliases WHERE source='%s'
In /etc/postfix/mysql-virtual-email2email.cf:
user = mailrl
password = mail.rockylinux.me
hosts = 192.168.100.5
dbname = mailserver
query = SELECT email FROM virtual_users WHERE email='%s'
Warning
If you encounter this kind of error after running systemctl start postfix.service: fatal: open lock file /var/lib/postfix/master.lock: unable to set exclusive lock: Resource temporarily unavailable. Please delete the existing /var/lib/postfix/master.lock file
Testing our Postfix configuration:
Shell(192.168.100.6) > systemctl start postfix.service
Shell(192.168.100.6) > postfix check
Shell(192.168.100.6) > postfix status

# If the command return 1, it is successful.
Shell(192.168.100.6) > postmap -q mail.rockylinux.me mysql:/etc/postfix/mysql-virtual-mailbox-domains.cf
Shell(192.168.100.6) > echo $?
1

Shell(192.168.100.6) > postmap -q frank@mail.rockylinux.me mysql:/etc/postfix/mysql-virtual-mailbox-maps.cf
Shell(192.168.100.6) > echo $?
1

Shell(192.168.100.6) > postmap -q all@mail.rockylinux.me mysql:/etc/postfix/mysql-virtual-alias-maps.cf
frank@mail.rockylinux.me,leeo@mail.rockylinux.me
Modify /etc/postfix/master.cf
The modified /etc/postfix/master.cf file looks like this:
smtp      inet  n       -       n       -       -       smtpd
submission inet n       -       n       -       -       smtpd
  -o syslog_name=postfix/submission
  -o smtpd_tls_security_level=encrypt
  -o smtpd_sasl_auth_enable=yes
  -o smtpd_tls_auth_only=yes
  -o smtpd_reject_unlisted_recipient=no
  -o smtpd_client_restrictions=$mua_client_restrictions
  -o smtpd_helo_restrictions=$mua_helo_restrictions
  -o smtpd_sender_restrictions=$mua_sender_restrictions
  -o smtpd_recipient_restrictions=
  -o smtpd_relay_restrictions=permit_sasl_authenticated,reject
  -o milter_macro_daemon_name=ORIGINATING
smtps     inet  n       -       n       -       -       smtpd
  -o syslog_name=postfix/smtps
  -o smtpd_tls_wrappermode=yes
  -o smtpd_sasl_auth_enable=yes
  -o smtpd_reject_unlisted_recipient=no
  -o smtpd_client_restrictions=$mua_client_restrictions
  -o smtpd_helo_restrictions=$mua_helo_restrictions
  -o smtpd_sender_restrictions=$mua_sender_restrictions
  -o smtpd_recipient_restrictions=
  -o smtpd_relay_restrictions=permit_sasl_authenticated,reject
  -o milter_macro_daemon_name=ORIGINATING
Finally, run systemctl restart postfix.service. At this point, we configured Postfix.
Install and configure dovecot
Shell(192.168.100.6) > dnf config-manager --enable devel && dnf -y install dovecot dovecot-devel dovecot-mysql
Without changing any files, the default Dovecot directory structure is as follows:
Shell(192.168.100.6) > tree /etc/dovecot/
/etc/dovecot/
├── conf.d
│   ├── 10-auth.conf
│   ├── 10-director.conf
│   ├── 10-logging.conf
│   ├── 10-mail.conf
│   ├── 10-master.conf
│   ├── 10-metrics.conf
│   ├── 10-ssl.conf
│   ├── 15-lda.conf
│   ├── 15-mailboxes.conf
│   ├── 20-imap.conf
│   ├── 20-lmtp.conf
│   ├── 20-pop3.conf
│   ├── 20-submission.conf
│   ├── 90-acl.conf
│   ├── 90-plugin.conf
│   ├── 90-quota.conf
│   ├── auth-checkpassword.conf.ext
│   ├── auth-deny.conf.ext
│   ├── auth-dict.conf.ext
│   ├── auth-ldap.conf.ext
│   ├── auth-master.conf.ext
│   ├── auth-passwdfile.conf.ext
│   ├── auth-sql.conf.ext
│   ├── auth-static.conf.ext
│   └── auth-system.conf.ext
└── dovecot.conf
As with Postfix, enter the doveconf command to view the complete configuration.
The file description is as follows:
dovecot.confis the main Dovecot configuration file.- Load other configuration files via
!include conf.d/*.conf. - The numeral prefix of the sub-configuration file facilitates human understanding of its parsing order.
- Due to historical reasons, some config files are still separate, typically named
*.conf.ext. - In the configuration file, you can use variables divided into Global variables and User variables, starting with
%. See the Dovecot site regarding this here.
- Load other configuration files via
10-auth.conf: Authentication configuration.10-logging.conf. Logging configuration.10-mail.conf. Configuration of mailbox locations and namespaces. By default, the value of the user's mailbox location is empty, which means that Dovecot automatically looks for the mailbox location. When the user does not have any mail, you must explicitly tell Dovecot the location of all mailboxes.10-metrics.conf. Statistics configuration.15-mailboxes.conf. Configuration of mailboxes.auth-sql.conf.ext. SQL user configuration.
Some important configuration file parameters
protocols = imap pop3 lmtp submission: List of protocols to be used.listen = *, ::: A comma-separated list of IPs or hosts where to listen in for connections.*listens in all IPv4 interfaces,::listens in all IPv6 interfaces.disable_plaintext_auth = yes: Whether to turn off plaintext authentication.auth_mechanisms =: The type of authentication mechanism to be used. Multiple values can be specified and separated by spaces. Values: plain, login, digest-md5, cram-md5, ntlm, rpa, apop, anonymous, gssapi, otp, skey, gss-spnego.login_trusted_networks =: Which IP networks are allowed to use Dovecot. It can be a single IP address, a network segment, or both. As an example:login_trusted_networks = 10.1.1.0/24 192.168.100.2mail_location =: For an empty value, Dovecot attempts to find the mailboxes automatically (looking at~/Maildir,/var/mail/username,~/mail, and~/Mail, in that order). However, auto-detection commonly fails for users whose mail directory hasn’t yet been created, so you should explicitly state the full location here, if possible.mail_privileged_group =: This group is enabled temporarily for privileged operations. This is used only with the INBOX when its initial creation or dotlocking fails. Typically, this is set tomailto access/var/mail.
Modify multiple files
First, edit the Dovecot configuration in /etc/dovecot/dovecot.conf:
protocols = imap pop3 lmtp
listen = 192.168.100.6
Subsequently, edit the mail storage configuration in /etc/dovecot/conf.d/10-mail.conf:
# %u - username
# %n - user part in user@domain, same as %u if there's no domain
# %d - domain part in user@domain, empty if there's no domain
# %h - home directory
mail_location = maildir:/var/mail/vhosts/%d/%n
mail_privileged_group = mail
Create the mail directory:
Shell(192.168.100.7) > mkdir -p /var/mail/vhosts/rockylinux.me
rockylinux.me refers to the domain name you are hosting.
Add the Dovecot user and home directory:
Shell(192.168.100.7) > groupadd -g 2000 vmail
Shell(192.168.100.7) > useradd -g vmail -u 2000 -d /var/mail/ vmail
Change owner and group:
Shell(192.168.100.7) > chown -R vmail:vmail /var/mail/
Enable the username and password databases in /etc/dovecot/conf.d/auth-sql.conf.ext:
passdb {
    driver = sql
    args = /etc/dovecot/dovecot-sql.conf.ext
}
userdb {
    driver = static
    args = uid=vmail gid=vmail home=/var/mail/vhosts/%d/%n
}
Warning
Don't write the above grammar in one line, such as userdb {driver = sql args = uid=vmail gid=vmail home=/var/mail/vhosts/%d/%n}. Otherwise, it won't work.
Edit the /etc/dovecot/dovecot-sql.conf.ext file with the following contents:
driver = mysql
connect = host=192.168.100.5 dbname=mailserver user=mailrl password=mail.rockylinux.me
default_pass_scheme = SHA512-CRYPT
password_query = SELECT password FROM virtual_users WHERE email='%u'
Now change the owner and group:
Shell(192.168.100.7) > chown -R vmail:dovecot /etc/dovecot
Then change folder permissions:
Shell(192.168.100.7) > chmod -R 770 /etc/dovecot
Now, in the /etc/dovecot/conf.d/10-auth.conf configuration, add the following:
disable_plaintext_auth = yes
auth_mechanisms = plain login
!include auth-sql.conf.ext
In /etc/dovecot/conf.d/10-master.conf, add:
service lmtp {
  unix_listener /var/spool/postfix/private/dovecot-lmtp {
    mode = 0600
    user = postfix
    group = postfix
  }
}
service auth {
  unix_listener auth-userdb {
    mode = 0600
    user = vmail
    group = vmail
  }
  unix_listener /var/spool/postfix/private/auth {
    mode = 0660
    user = postfix
    group = postfix
  }
  user = dovecot
}

service auth-worker {
  user = vmail
}
Now, enable Dovecot:
Shell(192.168.100.7) > systemctl enable --now dovecot
Info
During the Dovecot initialization, the /usr/libexec/dovecot/mkcert.sh file is executed to generate a self-signed certificate.
You can check the listening ports using the following command:
Shell(192.168.100.6) > ss -tulnp
Netid    State     Recv-Q    Send-Q                           Local Address:Port       Peer Address:Port   Process
udp      UNCONN    0         0                                    127.0.0.1:323             0.0.0.0:*       users:(("chronyd",pid=715,fd=5))
udp      UNCONN    0         0                                        [::1]:323                [::]:*       users:(("chronyd",pid=715,fd=6))
udp      UNCONN    0         0            [fe80::20c:29ff:fe6f:8666]%ens160:546                [::]:*       users:(("NetworkManager",pid=710,fd=24))
tcp      LISTEN    0         128                                    0.0.0.0:22              0.0.0.0:*       users:(("sshd",pid=732,fd=3))
tcp      LISTEN    0         100                              192.168.100.6:25              0.0.0.0:*       users:(("master",pid=4066,fd=13))
tcp      LISTEN    0         100                              192.168.100.6:993             0.0.0.0:*       users:(("dovecot",pid=3808,fd=39))
tcp      LISTEN    0         100                              192.168.100.6:995             0.0.0.0:*       users:(("dovecot",pid=3808,fd=22))
tcp      LISTEN    0         100                              192.168.100.6:587             0.0.0.0:*       users:(("master",pid=4066,fd=17))
tcp      LISTEN    0         100                              192.168.100.6:110             0.0.0.0:*       users:(("dovecot",pid=3808,fd=21))
tcp      LISTEN    0         100                              192.168.100.6:143             0.0.0.0:*       users:(("dovecot",pid=3808,fd=38))
tcp      LISTEN    0         100                              192.168.100.6:465             0.0.0.0:*       users:(("master",pid=4066,fd=20))
tcp      LISTEN    0         128                                       [::]:22                 [::]:*       users:(("sshd",pid=732,fd=4))
In the above output, the ports being used are:
- By Postfix: 25, 587, 465
- By Dovecot: 993, 995, 110, 143
You can use the doveadm command to generate the relevant ciphertext password and insert it into the virtual_users table.
Shell(192.168.100.6) > doveadm pw -s SHA512-crypt -p onetestandone
{SHA512-CRYPT}$6$dEqUVsCirHzV8kHw$hgC0x0ufah.N0PzUVvhLEMnoww5lo.JBmeLSsRNDkgWVylC55Gk6zA1KWsn.SiIAAIDEqHxtugGZWHl1qMex..

Shell(192.168.100.6) > doveadm pw -s SHA512-crypt -p twotestandtwo
{SHA512-CRYPT}$6$TF7w672arYUk.fGC$enDafylYnih4q140B2Bu4QfEvLCQAiQBHXpqDpHQPHruil4j4QbLXMvctWHdZ/MpuwvhmBGHTlNufVwc9hG34/
Insert the relevant data on the 192.168.100.5 host:
Shell(192.168.100.5) > /usr/local/mysql/bin/mysql -u root --password="pkqaXRuTn1/N"
Mysql > use mailserver;

Mysql > insert into virtual_users(id,email,password,domain_id) values(1,'frank@mail.rockylinux.me','$6$dEqUVsCirHzV8kHw$hgC0x0ufah.N0PzUVvhLEMnoww5lo.JBmeLSsRNDkgWVylC55Gk6zA1KWsn.SiIAAIDEqHxtugGZWHl1qMex..',1);

Mysql > insert into virtual_users(id,email,password,domain_id) values(2,'leeo@mail.rockylinux.me','$6$TF7w672arYUk.fGC$enDafylYnih4q140B2Bu4QfEvLCQAiQBHXpqDpHQPHruil4j4QbLXMvctWHdZ/MpuwvhmBGHTlNufVwc9hG34/',1);
Test
User's authentication
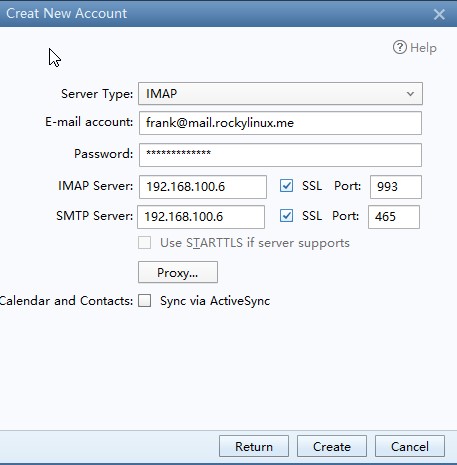
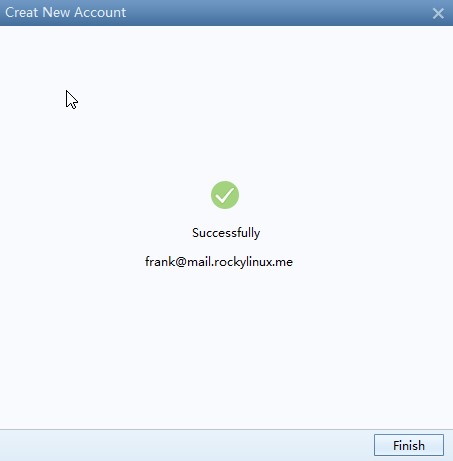
Use a client machine and change its preferred DNS to 192.168.100.7. The author uses Foxmail on Windows 10 as the mail client here.
On the main screen, select Other Mailbox --> Manual --> Enter the relevant fields and then select Create:
Send an email
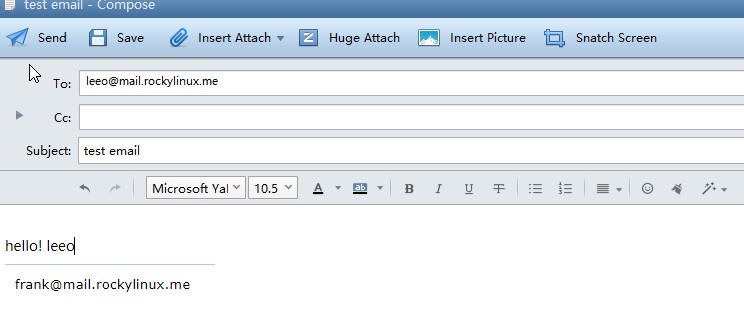
Use the frank user to attempt to send an email to the leeo user.
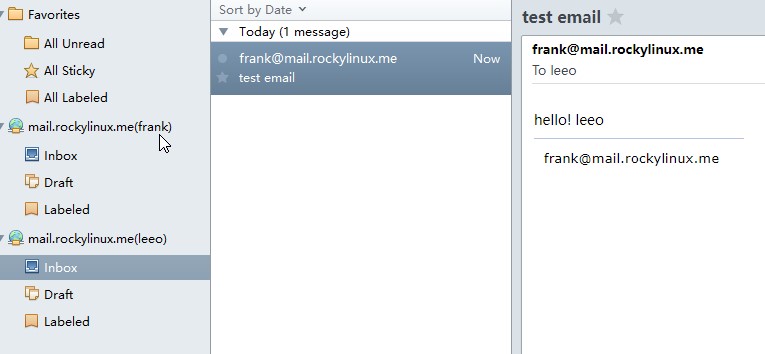
Receive mail
Additional description
- You must have a domain name or an internal DNS entry with MX records pointing to your server.
- You should get a SSL certificate via Let's Encrypt or another source.
Author: tianci li
Contributors: Ganna Zhyrnova, Neel Chauhan