User Management
In this chapter you will learn how to manage users.
Objectives: In this chapter, future Linux administrators will learn how to:
 add, delete or modify a group; add, delete or modify a user; understand the files associated with users and groups and learn how to manage them; change the owner or the group owner of a file; secure user accounts; change identity.
 users
users
Knowledge: 
Complexity:
Reading time: 30 minutes
General
Each user must have a group called the user's primary group.
Several users can be part of the same group.
Groups other than the primary group are called the user's supplementary groups.
Note
Each user has a primary group and can be invited into one or more supplementary groups.
Groups and users are managed by their unique numerical identifiers GID and UID.
UID: User IDentifier. Unique user ID.GID: Group IDentifier. Unique group identifier.
The kernel recognizes Both UID and GID, meaning that the Super Admin is not necessarily the root user, as long as the uid=0 user is the Super Admin.
The files related to users/groups are:
- /etc/passwd
- /etc/shadow
- /etc/group
- /etc/gshadow
- /etc/skel/
- /etc/default/useradd
- /etc/login.defs
Danger
You should always use the administration commands instead of manually editing the files.
Note
Some commands in this chapter require administrator rights.
By convention, we will specify the command sudo when commands are to be run with administrator rights.
For the examples to work properly, please ensure your account has the right to use the sudo command.
Group management
Modified files, added lines:
/etc/group/etc/gshadow
groupadd command
The groupadd command adds a group to the system.
groupadd [-f] [-g GID] group
Example:
sudo groupadd -g 1012 GroupeB
| Option | Description |
|---|---|
-g GID | Defines the GID of the group to create. |
-f | The system chooses a GID if the one specified by the -g option already exists. |
-r | Creates a system group with a GID between SYS_GID_MIN and SYS_GID_MAX. These two variables are defined in /etc/login.defs. |
Group naming rules:
- No accents or special characters;
- Different from the name of an existing user or system files.
Note
Under Debian, the administrator should use, except in scripts intended to be portable to all Linux distributions, the addgroup and delgroup commands as specified in the man:
$ man addgroup
DESCRIPTION
adduser and addgroup add users and groups to the system according to command line options and configuration information
in /etc/adduser.conf. They are friendlier front ends to the low-level tools like useradd, groupadd and usermod programs,
by default, choosing Debian policy conformant UID and GID values, creating a home directory with skeletal configuration,
running a custom script, and other features.
Command groupmod
The groupmod command allows you to modify an existing group on the system.
groupmod [-g GID] [-n nom] group
Example:
sudo groupmod -g 1016 GroupP

sudo groupmod -n GroupC GroupB
| Option | Description |
|---|---|
-g GID | New GID of the group to modify. |
-n name | New name. |
It is possible to change the name of a group, its GID, or both simultaneously.
After modification, the files belonging to the group have an unknown GID. They must be reassigned to the new GID.
sudo find / -gid 1002 -exec chgrp 1016 {} \;
groupdel command
The groupdel command deletes an existing group on the system.
groupdel group
Example:
sudo groupdel GroupC
Tip
When deleting a group, two conditions can occur:
- If a user has a unique primary group and you issue the
groupdelcommand on that group, you will be prompted that there is a specific user under the group and it cannot be deleted. - If a user belongs to a supplementary group (not the primary group for the user) and that group is not the primary group for another user on the system, then the
groupdelcommand will delete the group without any additional prompts.
Examples:
$ sudo useradd test
$ id test
uid=1000(test) gid=1000(test) group=1000(test)
$ sudo groupdel test
groupdel: cannot remove the primary group of user 'test'

$ sudo usermod -g users -G test test
$ id test
uid=1000(test) gid=100(users) group=100(users),1000(test)
$ sudo groupdel test
Tip
When you delete a user using the userdel -r command, the corresponding primary group is also deleted. The primary group name is usually the same as the username.
Tip
Each group has a unique GID. Multiple users can use a group as a supplementary group. By convention, The GID of the super administrator is 0. The GIDS reserved for some services or processes is 201-999, called system groups or pseudo-user groups. The GID for users is usually greater than or equal to 1000. These are related to /etc/login.defs, which we will talk about later.
# Comment line ignored
shell > cat  /etc/login.defs
MAIL_DIR        /var/spool/mail
UMASK           022
HOME_MODE       0700
PASS_MAX_DAYS   99999
PASS_MIN_DAYS   0
PASS_MIN_LEN    5
PASS_WARN_AGE   7
UID_MIN                  1000
UID_MAX                 60000
SYS_UID_MIN               201
SYS_UID_MAX               999
GID_MIN                  1000
GID_MAX                 60000
SYS_GID_MIN               201
SYS_GID_MAX               999
CREATE_HOME     yes
USERGROUPS_ENAB yes
ENCRYPT_METHOD SHA512
Tip
Since a user is necessarily part of a group, it is best to create the groups before adding the users. Therefore, a group may not have any members.
/etc/group file
This file contains the group information (separated by :).
$ sudo tail -1 /etc/group
GroupP:x:516:patrick
  (1)  (2)(3)   (4)
- 1: Name of the group.
- 2: The group password is identified by
x. The group password is stored in/etc/gshadow. - 3: GID.
- 4: Supplementary users in the group (excluding the unique primary user).
Note
Each line in the /etc/group file corresponds to a group. The primary user info is stored in /etc/passwd.
/etc/gshadow file
This file contains the security information about the groups (separated by :).
$ sudo grep GroupA /etc/gshadow
GroupA:$6$2,9,v...SBn160:alain:rockstar
   (1)      (2)            (3)      (4)
- 1: Name of the group.
- 2: Encrypted password.
- 3: Name of the group administrator.
- 4: Supplementary users in the group (excluding the unique primary user).
Warning
The name of the group in /etc/group and /etc/gshadow must correspond one by one. That is, each line in the /etc/group file must have a corresponding line in the /etc/gshadow file.
An ! in the password indicates it is locked.
Thus, no user can use the password to access the group (since group members do not need it).
User management
Definition
A user is defined as follows in the /etc/passwd file:
- 1: Login name;
- 2: Password identification,
xindicates that the user has a password, the encrypted password is stored in the second field of/etc/shadow; - 3: UID;
- 4: GID of the primary group;
- 5: Comments;
- 6: Home directory;
- 7: Shell (
/bin/bash,/bin/nologin, ...).
There are three types of users:
- root(uid=0): the system administrator;
- system users(uid is one of the 201~999): Used by the system to manage application access rights;
- regular user(uid>=1000): Other account to log in to the system.
Modified files, added lines:
/etc/passwd/etc/shadow
useradd command
The useradd command adds a user.
useradd [-u UID] [-g GID] [-d directory] [-s shell] login
Example:
sudo useradd -u 1000 -g 1013 -d /home/GroupC/carine carine
| Option | Description |
|---|---|
-u UID | UID of the user to create. |
-g GID | GID of the primary group. The GID here can also be a group name. |
-G GID1,[GID2]... | GID of the supplementary groups. The GID here can also be a group name. It is possible to specify many supplementary groups separated by commas. |
-d directory | Creates the home directory. |
-s shell | Specifies the user's shell. |
-c COMMENT | Adds a comment. |
-U | Adds the user to a group with the same name created simultaneously. If not specified, the creation of a group with the same name occurs when creating the user. |
-M | Does not create the user's home directory. |
-r | Creates a system account. |
At creation, the account has no password and is locked.
The user must assign a password to unlock the account.
When invoking the useradd command without any options, the following default settings are set for the new user:
- A home directory with the same name as the username is created;
- A primary group with the same name as the username is created;
- A default shell that points to
/bin/bashis assigned to the user; - The user's UID and primary group GID values are automatically deduced. This is usually a unique value between 1000 and 60,000.
Note
The default settings and values are obtained from the following configuration files:
/etc/login.defs and /etc/default/useradd
$ sudo useradd test1

$ tail -n 1 /etc/passwd
test1:x:1000:1000::/home/test1:/bin/bash

$ tail -n 1 /etc/shadow
test1:!!:19253:0:99999:7:::

$ tail -n 1 /etc/group ; tail -n 1 /etc/gshadow
test1:x:1000:
test1:!::
Account naming rules:
- Lowercase letters, numbers, and underscores are allowed; other special characters such as asterisks, percent signs, and full-width symbols are not accepted.
- Although you can use an uppercase user name in RockyLinux, we do not recommend it;
- It is not recommended to start with numbers and underscores, although you may be allowed to do so;
- Different from the name of an existing group or system file;
- The user name can contain up to 32 characters.
Warning
The user must create the home directory, except for the last directory.
The last directory is created by the useradd command, which takes the opportunity to copy the files from /etc/skel into it.
A user can belong to several groups besides their primary group.
Example:
sudo useradd -u 1000 -g GroupA -G GroupP,GroupC albert
Note
Under Debian, you will have to specify the -m option to force the creation of the login directory or set the CREATE_HOME variable in the /etc/login.defs file. In all cases, the administrator should use the adduser and deluser commands as specified in the man, except in scripts intended to be portable to all Linux distributions:
$ man useradd
DESCRIPTION
    **useradd** is a low-level utility for adding users. On Debian, administrators should usually use **adduser(8)**
     instead.
Default value for user creation
Modification of the file /etc/default/useradd.
useradd -D [-b directory] [-g group] [-s shell]
Example:
sudo useradd -D -g 1000 -b /home -s /bin/bash
| Option | Description |
|---|---|
-D | Sets the default values for user creation. |
-b base_directory | Defines the base directory for the user's home directory. If you do not specify this option, use the HOME variable in the /etc/default/useradd file or /home/ |
-g group | Sets the default group. |
-s shell | Sets the default shell. |
-f | Sets the number of days after the password expires before disabling the account. |
-e | Sets the date for disabling the account. |
usermod command
The usermod command allows to modify a user.
usermod [-u UID] [-g GID] [-d directory] [-m] login
Example:
sudo usermod -u 1044 carine
Options identical to the useradd command.
| Option | Description |
|---|---|
-m | Associated with the -d option. Moves the contents of the old login directory to the new one. If the old home directory does not exist, creation of a new home directory does not occur; Creation of the new home directory occurs when it does not exist. |
-l login | Modifies the login name. After you modify the login name, you also need to modify the name of the home directory to match it. |
-e YYYY-MM-DD | Modifies the account expiration date. |
-L | Locks the account permanently. That is, it adds an ! at the beginning of the /etc/shadow password field. |
-U | Unlocks the account. |
-a | Appends the user's supplementary groups, which must be used together with the -G option. |
-G | Modifies the user's supplementary groups and overwrites previous supplementary groups. |
Tip
To be modified, a user must be disconnected and have no running processes.
After changing the identifier, the files belonging to the user have an unknown UID. It must be reassigned to the new UID.
Where 1000 is the old UID and 1044 is the new one. Examples are as follows:
sudo find / -uid 1000 -exec chown 1044: {} \;
Locking and unlocking of user accounts. Examples are as follows:
$ usermod -L test1
$ grep test1 /etc/shadow
test1:!$6$n.hxglA.X5r7X0ex$qCXeTx.kQVmqsPLeuvIQnNidnSHvFiD7bQTxU7PLUCmBOcPNd5meqX6AEKSQvCLtbkdNCn.re2ixYxOeGWVFI0:19259:0:99999:7:::

$ usermod -U test1
The difference between the -aG option and the -G option can be explained by the following example:
$ sudo useradd test1
$ sudo passwd test1
$ sudo groupadd groupA ; sudo groupadd groupB ; sudo groupadd groupC ; sudo groupadd groupD
$ id test1
uid=1000(test1) gid=1000(test1) groups=1000(test1)

$ sudo gpasswd -a test1 groupA
$ id test1
uid=1000(test1) gid=1000(test1) groups=1000(test1),1002(groupA)

$ sudo usermod -G groupB,groupC test1
$ id test1
uid=1000(test1) gid=1000(test1) groups=1000(test1),1003(groupB),1004(groupC)

$ sudo usermod -aG groupD test1
$ id test1
uid=1000(test1) gid=1000(test1) groups=1000(test1),1003(groupB),1004(groupC),1005(groupD)
userdel command
The userdel command lets you delete a user's account.
sudo userdel -r carine
| Option | Description |
|---|---|
-r | Deletes the user's home directory and mail files located in the /var/spool/mail/ directory |
Tip
To be deleted, a user must be logged out and have no running processes.
The userdel command removes the corresponding lines in /etc/passwd, / etc/shadow, /etc/group, /etc/gshadow. As mentioned above, userdel -r will also delete the corresponding primary group of the user.
/etc/passwd file
This file contains user information (separated by :).
$ sudo head -1 /etc/passwd
root:x:0:0:root:/root:/bin/bash
(1)(2)(3)(4)(5)  (6)    (7)
- 1: Login name;
- 2: Password identification,
xindicates that the user has a password, the encrypted password is stored in the second field of/etc/shadow; - 3: UID;
- 4: GID of the primary group;
- 5: Comments;
- 6: Home directory;
- 7: Shell (
/bin/bash,/bin/nologin, ...).
/etc/shadow file
This file contains the users' security information (separated by :).
$ sudo tail -1 /etc/shadow
root:$6$...:15399:0:99999:7:::
 (1)    (2)  (3) (4) (5) (6)(7,8,9)
- 1: Login name.
- 2: Encrypted password. Uses the SHA512 encryption algorithm, defined by the
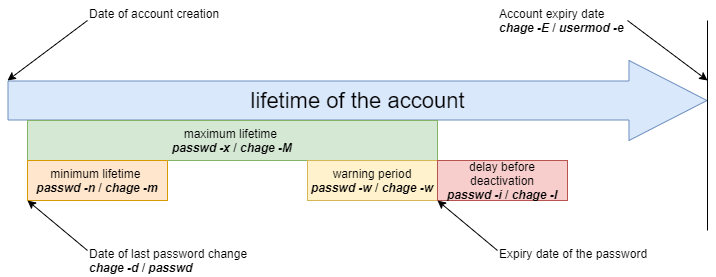
ENCRYPT_METHODof/etc/login.defs. - 3: The time when the password was last changed, the timestamp format, in days. The so-called timestamp is based on January 1, 1970 as the standard time. Every time one day goes by, the timestamp is +1.
- 4: Minimum lifetime of the password. That is, the time interval between two password changes (related to the third field), in days. Defined by the
PASS_MIN_DAYSof/etc/login.defs, the default is 0, that is, when you change the password for the second time, there is no restriction. However, if it is 5, it means that it is not allowed to change the password within 5 days, and only after 5 days. - 5: Maximum lifetime of the password. That is, the validity period of the password (related to the third field). Defined by the
PASS_MAX_DAYSof/etc/login.defs. - 6: The number of warning days before the password expires (related to the fifth field). The default is 7 days, defined by the
PASS_WARN_AGEof/etc/login.defs. - 7: Number of days of grace after password expiration (related to the fifth field).
- 8: Account expiration time, the timestamp format, in days. Note that an account expiration differs from a password expiration. In case of an account expiration, the user shall not be allowed to login. In case of a password expiration, the user is not allowed to login using her password.
- 9: Reserved for future use.
Danger
For each line in the /etc/passwd file there must be a corresponding line in the /etc/shadow file.
For time stamp and date conversion, please refer to the following command format:
# The timestamp is converted to a date, "17718" indicates the timestamp to be filled in.
$ date -d "1970-01-01 17718 days"

# The date is converted to a timestamp, "2018-07-06" indicates the date to be filled in.
$ echo $(($(date --date="2018-07-06" +%s)/86400+1))
File owners
Danger
All files necessarily belong to one user and one group.
By default, the primary group of the user creating the file is the group that owns the file.
Modification commands
chown command
The chown command allows you to change the owners of a file.
chown [-R] [-v] login[:group] file
Examples:
sudo chown root myfile

sudo chown albert:GroupA myfile
| Option | Description |
|---|---|
-R | Recursively changes the owners of the directory and all files under the directory. |
-v | Displays the changes. |
To change only the owner user:
sudo chown albert file
To modify only the owner group:
sudo chown :GroupA file
Changing the user and owner group:
sudo chown albert:GroupA file
In the following example the group assigned will be the primary group of the specified user.
sudo chown albert: file
Change the owner and group of all files in a directory
sudo chown -R albert:GroupA /dir1
chgrp command
The chgrp command allows you to change the owner group of a file.
chgrp [-R] [-v] group file
Example:
sudo chgrp group1 file
| Option | Description |
|---|---|
-R | Recursively changes the groups of the directory and all files under the directory. |
-v | Displays the changes. |
Note
It is possible to apply to a file an owner and an owner group by taking as reference those of another file:
chown [options] --reference=RRFILE FILE
For example:
chown --reference=/etc/groups /etc/passwd
Guest management
gpasswd command
The command gpasswd allows to manage a group.
gpasswd [option] group
Examples:
$ sudo gpasswd -A alain GroupA
[alain]$ gpasswd -a patrick GroupA
| Option | Description |
|---|---|
-a USER | Adds the user to the group. For the added user, this group is a supplementary group. |
-A USER,... | Sets the list of administrative users. |
-d USER | Removes the user from the group. |
-M USER,... | Sets the list of group members. |
The command gpasswd -M acts as a modification, not an addition.
# gpasswd GroupeA
New Password:
Re-enter new password:
Note
In addition to using gpasswd -a to add users to a group, you can also use the usermod -G or usermod -aG mentioned earlier.
id command
The id command displays the group names of a user.
id USER
Example:
$ sudo id alain
uid=1000(alain) gid=1000(GroupA) groupes=1000(GroupA),1016(GroupP)
newgrp command
The newgrp command can select a group from the user's supplementary groups as the user's new temporary primary group. The newgrp command every time you switch a user's primary group, there will be a new child shell(child process). Be careful! child shell and sub shell are different.
newgrp [secondarygroups]
Example:
$ sudo useradd test1
$ sudo passwd test1
$ sudo groupadd groupA ; sudo groupadd groupB
$ sudo usermod -G groupA,groupB test1
$ id test1
uid=1000(test1) gid=1000(test1) groups=1000(test1),1001(groupA),1002(groupB)
$ echo $SHLVL ; echo $BASH_SUBSHELL
1
0

$ su - test1
$ touch a.txt
$ ll
-rw-rw-r-- 1 test1 test1 0 10月  7 14:02 a.txt
$ echo $SHLVL ; echo $BASH_SUBSHELL
1
0

# Generate a new child shell
$ newgrp groupA
$ touch b.txt
$ ll
-rw-rw-r-- 1 test1 test1  0 10月  7 14:02 a.txt
-rw-r--r-- 1 test1 groupA 0 10月  7 14:02 b.txt
$ echo $SHLVL ; echo $BASH_SUBSHELL
2
0

# You can exit the child shell using the `exit` command
$ exit
$ logout
$ whoami
root
Securing
passwd command
The passwd command manages a password.
passwd [-d] [-l] [-S] [-u] [login]
Examples:
sudo passwd -l albert

sudo passwd -n 60 -x 90 -w 80 -i 10 patrick
| Option | Description |
|---|---|
-d | Permanently removes the password. For root (uid=0) use only. |
-l | Permanently locks the user account. For root (uid=0) use only. |
-S | Displays the account status. For root (uid=0) use only. |
-u | Permanently unlocks user account. For root (uid=0) use only. |
-e | Permanently expires the password. For root (uid=0) use only. |
-n DAYS | Defines the minimum password lifetime. Permanent change. For root (uid=0) use only. |
-x DAYS | Defines the maximum password lifetime. Permanent change. For root (uid=0) use only. |
-w DAYS | Defines the warning time before expiration. Permanent change. For root (uid=0) use only. |
-i DAYS | Defines the delay before deactivation when the password expires. Permanent change. For root (uid=0) use only. |
Use password -l, that is, add "!!" at the beginning of the password field of the user corresponding to /etc/shadow.
Example:
- Alain changes his password:
[alain]$ passwd
- root changes Alain's password
sudo passwd alain
Note
Users logged in to the system can use the passwd command to change their passwords (this process requires requesting the user's old password). The root(uid=0) user can change the password of any user.
Changing passwords requires compliance with prescribed security policies, which involves PAM (Pluggable Authentication Modules) knowledge.
When managing user accounts by shell script, setting a default password after creating the user may be useful.
This can be done by passing the password to the passwd command.
Example:
sudo echo "azerty,1" | passwd --stdin philippe
Warning
The password is entered in clear text, passwd encrypts it.
chage command
The chage command is to change user password expiry information.
chage [-d date] [-E date] [-I days] [-l] [-m days] [-M days] [-W days] [login]
Example:
sudo chage -m 60 -M 90 -W 80 -I 10 alain
| Option | Description |
|---|---|
-I DAYS | Defines the days to delay before deactivation, password expired. Permanent change. |
-l | Displays the policy details. |
-m DAYS | Defines the minimum lifetime of the password. Permanent change. |
-M DAYS | Defines the maximum lifetime of the password. Permanent change. |
-d LAST_DAY | Defines the number of days since the password was last changed. You can use the days' timestamp style or the YYYY-MM-DD style. Permanent change. |
-E EXPIRE_DATE | Defines the account expiration date. You can use the days' timestamp style or the YYYY-MM-DD style. Permanent change. |
-W WARN_DAYS | Defines the number of days warning time before expiration. Permanent change. |
Examples:
# The `chage` command also offers an interactive mode.
$ sudo chage philippe

# The `-d` option changes the password when logging in.
$ sudo chage -d 0 philippe
Advanced management
Configuration files:
/etc/default/useradd/etc/login.defs/etc/skel
Note
Editing the /etc/default/useradd file is done with the useradd command.
The other files are to be modified with a text editor.
/etc/default/useradd file
This file contains the default data settings.
Tip
If the options are not specified when creating a user, the system uses the default values defined in /etc/default/useradd.
This file is modified by the command useradd -D (useradd -D entered without any other option displays the contents of the /etc/default/useradd file).
Shell > grep -v ^# /etc/default/useradd
GROUP=100
HOME=/home
INACTIVE=-1
EXPIRE=
SHELL=/bin/bash
SKEL=/etc/skel
CREATE_MAIL_SPOOL=yes
| Parameters | Comment |
|---|---|
GROUP | Defines the default primary group GID. |
HOME | Defines the directory path of the upper level of the common user's home directory. |
INACTIVE | Defines the number of days of grace after password expiration. Corresponds to the 7th field of the /etc/shadow file. -1 value means that the grace period feature is turned off. |
EXPIRE | Defines the account expiration date. Corresponds to the 8th field of the /etc/shadow file. |
SHELL | Defines the command interpreter. |
SKEL | Defines the skeleton directory of the login directory. |
CREATE_MAIL_SPOOL | Defines the mailbox creation in /var/spool/mail/. |
If you do not need a primary group with the same name when creating users, you can do this:
Shell > useradd -N test2
Shell > id test2
uid=1001(test2) gid=100(users) groups=100(users)
Note
GNU/Linux has two group mechanisms:
- Public group, its primary group is GID=100
- Private group, that is, when adding users, a group with the same name is created as its primary group. This group mechanism is commonly used by RHEL and related downstream distributions.
/etc/login.defs file
# Comment line ignored
shell > cat  /etc/login.defs
MAIL_DIR        /var/spool/mail
UMASK           022
HOME_MODE       0700
PASS_MAX_DAYS   99999
PASS_MIN_DAYS   0
PASS_MIN_LEN    5
PASS_WARN_AGE   7
UID_MIN                  1000
UID_MAX                 60000
SYS_UID_MIN               201
SYS_UID_MAX               999
GID_MIN                  1000
GID_MAX                 60000
SYS_GID_MIN               201
SYS_GID_MAX               999
CREATE_HOME     yes
USERGROUPS_ENAB yes
ENCRYPT_METHOD SHA512
UMASK 022: This means that the permission to create a file is 755 (rwxr-xr-x). However, for security, GNU/Linux does not have x permission for newly created files. This restriction applies to root(uid=0) and ordinary users(uid>=1000). For example:
Shell > touch a.txt
Shell > ll
-rw-r--r-- 1 root root     0 Oct  8 13:00 a.txt
HOME_MODE 0700: The permissions of an ordinary user's home directory. Does not work for root's home directory.
Shell > ll -d /root
dr-xr-x---. 10 root root 4096 Oct  8 13:12 /root

Shell > ls -ld /home/test1/
drwx------ 2 test1 test1 4096 Oct  8 13:10 /home/test1/
USERGROUPS_ENAB yes: "When you delete a user using the userdel -r command, the corresponding primary group is also deleted." Why? That's the reason.
/etc/skel directory
When a user is created, their home directory and environment files are created. You can think of the files in the /etc/skel/ directory as the file templates you need to create users.
These files are automatically copied from the /etc/skel directory.
.bash_logout.bash_profile.bashrc
All files and directories placed in this directory will be copied to the user tree when created.
Identity change
su command
The su command allows you to change the identity of the connected user.
su [-] [-c command] [login]
Examples:
$ sudo su - alain
[albert]$ su - root -c "passwd alain"
| Option | Description |
|---|---|
- | Loads the user's complete environment. |
-c command | Executes the command under the user's identity. |
If the login is not specified, it will be root.
Standard users will have to type the password for the new identity.
Tip
You can use the exit/logout command to exit users who have been switched. It should be noted that after switching users, there is no new child shell or sub shell, for example:
$ whoami
root
$ echo $SHLVL ; echo $BASH_SUBSHELL
1
0

$ su - test1
$ echo $SHLVL ; echo $BASH_SUBSHELL
1
0
Attention please! su and su - are different, as shown in the following example:
$ whoami
test1
$ su root
$ pwd
/home/test1

$ env
...
USER=test1
PWD=/home/test1
HOME=/root
MAIL=/var/spool/mail/test1
LOGNAME=test1
...
$ whoami
test1
$ su - root
$ pwd
/root

$ env
...
USER=root
PWD=/root
HOME=/root
MAIL=/var/spool/mail/root
LOGNAME=root
...
So, when you want to switch users, remember not to lose the -. Because the necessary environment variable files are not loaded, there may be problems running some programs.