Part 5.3 Squid
Squid
This chapter will teach you about Squid, the HTTP proxy cache.
Objectives: You will learn how to:
install squid
configure it to be a proxy and cache HTTP content.
squid, proxy, HTTP
Knowledge:
Complexity:
Reading time: 20 minutes
Generalities
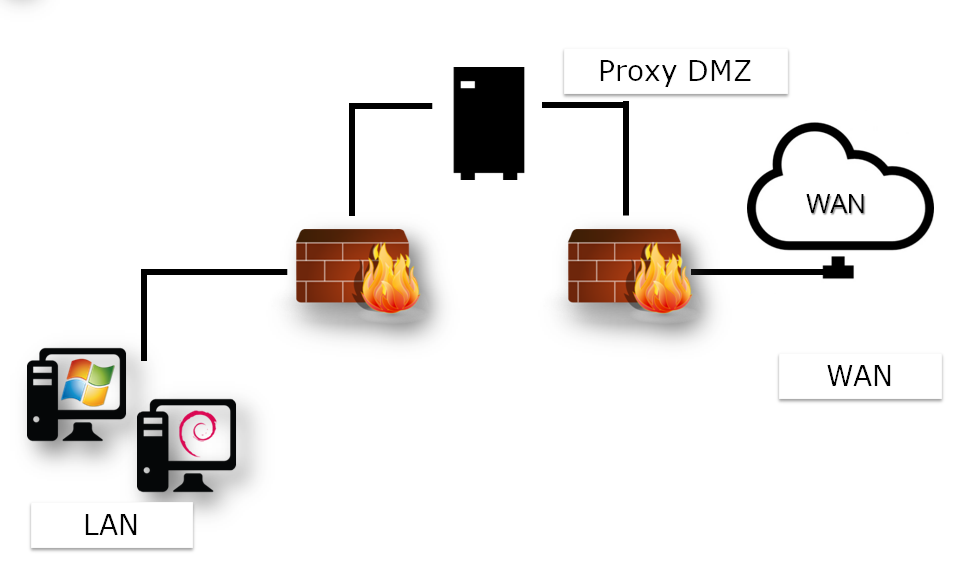
Setting up a proxy server involves choosing between two types of architecture:
- A standard proxy architecture requiring specific configuration of each client and their web browsers
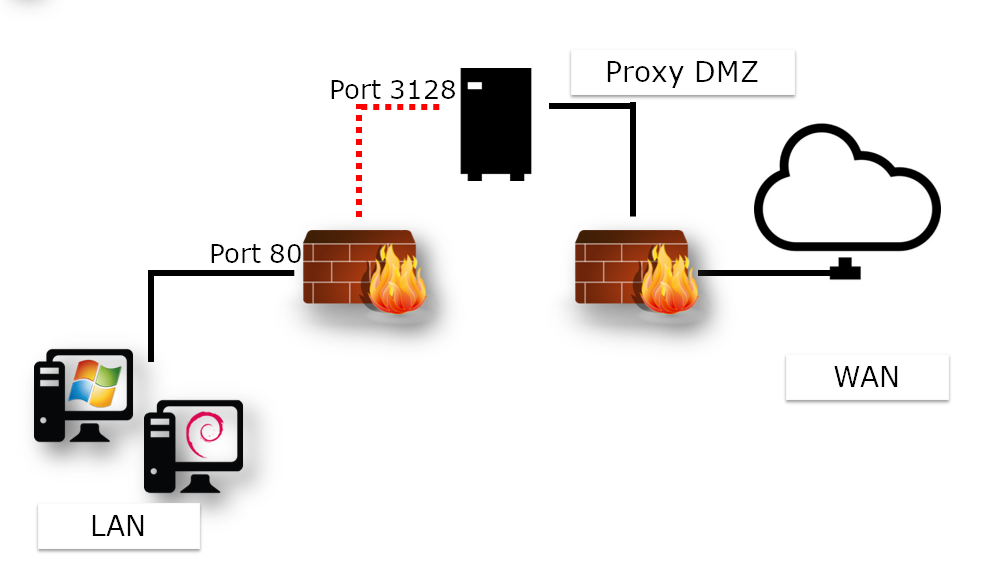
- Captive proxy architecture, which involves intercepting the frames sent by the client and rewriting them to the proxy server
In either case, a break in the network occurs: A client can no longer physically address a remote server directly without going through a proxy server.
Two firewalls protect the client workstation but never communicate directly with the outside network.

Note
This architecture requires browser configuration on the client workstation.
You don't need to configure all client workstations with a captive proxy.
The configuration occurs at the gateway level, where it receives client requests and transparently rewrites the frames to send them to the proxy.

Note
This architecture requires a specific configuration on the router.
In the case of standard proxy or captive proxy architecture, one of the primary interests of this type of service is to act as a cache.
In this way, a file downloaded once from the WAN (potentially from a slower link than the LAN) stores itself in memory in the proxy cache for subsequent clients to use. This optimizes bandwidth on the slow link.
As you will see later, there are other uses for a proxy.
Deploying a proxy can:
- Deny access to specific resources based on various parameters
- Set up authentication and monitoring of clients' Internet activities
- Set up a hierarchy of distributed caches
- Hide the LAN architecture from a WAN point of view (how many clients are there on the LAN?)
Among the advantages are the following:
- Anonymity on the Internet
- Authentication
- Client activity logging
- Filtering
- Limiting access
- Bandwidth optimization
- Security
Note
Implementing authentication blocks many of the malicious effects of viruses on the LAN.
Warning
The proxy service becomes a critical service requiring high availability.
When operating a Squid Proxy server, the administrator must exploit the logs. Therefore, it is essential to know the main HTTP response codes.
| Code | Categories |
|---|---|
| 1XX | Info |
| 2XX | Success |
| 3XX | Redirection |
| 4XX | Customer request error |
| 5XX | Server error |
Examples:
- 200: ok
- 301: Moved Permanently
- 302: Moved Temporarily
- 304: Not modified
- 400: Bad request
- 401: Unauthorized
- 404: Not found
About Squid
Squid supports HTTP and FTP protocols.
The advantages of installing a solution based on the Squid server:
- Hardware solutions are expensive
- Developed since 1996
- Released under GNU/GPL license
Sizing
- Ensure high availability
- Use fast hard disks for caching
- RAM and CPU should be correctly sized
Note
Allow 14MB of RAM per GB of disk cache.
Installation
Install the squid package:
sudo dnf install squid
Warning
Take care not to start the service until the cache has been initialized!
Squid server tree and files
The single configuration file is /etc/squid/squid.conf.
Service logs (stop and restart) are in /var/log/squid.cache.log, while client requests are in /var/log/squid/access.log. By default, cache files are in /var/spool/squid/.
The squid command
The squid command controls the squid server.
Syntax of the command:
squid [-z|-s|-k parse|-k rotate]
| Option | Description |
|---|---|
-z | Initializes cache directories |
-s | Enables syslog logging |
-k parse | Test configuration file |
-k rotate | Rotates logs |
Logging client requests can quickly lead to storing large amounts of data.
It is a good idea to regularly create a new log file and archive the old one in compressed format.
You can do this either manually, with the -k rotate option of the squid command, or automatically with the dedicated Linux service logrotate.
Configuration
Configure Squid in /etc/squid/squid.conf.
- Proxy port number (listening port)
http_port
http_port num_port
Note
The port number is set to 3128 by default but frequently changes to 8080. Remember to open the corresponding firewall port!
When the service restarts, the Squid server will listen on the port defined by the http_port directive.
- RAM reservation
cache_mem
cache_mem taille KB|taille MB|taille GB
For example:
cache_mem 1 GB
Tip
Best practice: 1/3 of total RAM allocated
- Internet Cache Protocol (ICP)
icp_port
The Internet Cache Protocol (ICP) enables neighboring Squid servers to exchange requests. It is common practice to propose a hierarchy of proxies that share their information bases.
The icp_port directive defines the port number Squid uses to send and receive ICP requests from neighboring Squid servers.
Tip
Set to 0 to deactivate.
- Anonymous FTP user
ftp_user
The ftp_user directive associates an FTP user with anonymous FTP connections. The user must have a valid e-mail address.
ftp_user bob@rockylinux.lan
- Set up Access Control Lists
ACL syntax:
acl name type argument
http_access allow|deny aclname
Example:
acl LUNCHTIME time 12:00-14:00
http_access deny LUNCHTIME
A more extensive discussion of ACLs is in the "Advanced configuration" section.
- Maximum size of a cached object
maximum_object_size
maximum_object_size directive syntax:
maximum_object_size size
Example:
maximum_object_size 32 MB
The object is not cached if the object size is greater than the maximum_object_size limit.
- Proxy server name
visible_hostname
Syntax of visible_hostname directive:
visible_hostname name
Example:
visible_hostname proxysquid
Note
The value supplied may be different from the hostname.
- Define a cache for squid
cache_ufs
cache_ufs format path size nbFolderNiv1 nbFolderNiv2
IDefining multiple caches on different file systems to optimize access times is possible.
Example:
cache_dir ufs /var/spool/squid/ 100 16 256
| Option | Description |
|---|---|
| ufs | Unix File System |
| 100 | Size in mega |
| 16 | 16 top-level folders |
| 256 | 256 second-level folders |
When the service launches for the first time, it generates the cache directory:
sudo squid -z
sudo systemctl start squid
Advanced configuration
Les Access Control List (ACL)
Syntax of the http_access directive
http_access allow|deny [!]acl_name
Example:
http_access allow LUNCHTIME
http_access deny !LUNCHTIME
The !acl_name ACL is the opposite of the acl_name ACL.
Syntax of the acl directive:
acl name type argument
The order of ACLs is cumulative. Several ACLs with the same name represent a single ACL.
Examples:
Lunchtime authorization:
acl LUNCHTIME time 12:00-14:00
http_access allow LUNCHTIME
Ban videos:
acl VIDEOS rep_mime_type video/mpeg
acl VIDEOS rep_mime_type video/avi
http_access deny VIDEOS
Managing IP addresses:
acl XXX src 192.168.0.0/255.255.255.0
acl XXX dst 10.10.10.1
FQDN management:
acl XXX srcdomain .rockylinux.org
acl XXX dstdomain .linux.org
Port management:
acl XXX port 80 21
Protocol management:
acl XXX proto HTTP FTP
Caching algorithms
Different cache algorithms exist with different characteristics:
- LRU - Least Recently Used: removes the oldest objects from the RAM
- LRU-THOLD: copies an object to the cache according to its size
- MRU: Most Recently Used: deletes the least requested data
- GDSF: Greedy Dual Size Frequency: deletes according to original size and access time with the smallest retained
- LFUDA: Least Frequently Used With Dynamic Aging: same as GDSF, but without the notion of size. Useful for caches with large files
Client authentication
Squid relies on external programs to manage authentication. It can be based on a simple flat file such as htpasswd or on LDAP, SMB, PAM, or other services.
Authentication can also be a legal necessity. Remember to get your users to sign a usage charter!
Tools
The squidclient command
Use the squidclient command to test a request to the squid server.
squidclient command syntax:
squidclient [-s] [-h target] [-p port] url
Example:
squidclient -s -h localhost -p 8080 http://localhost/
| Option | Description |
|---|---|
-s | Silent mode (displays nothing in the console) |
-h | Defines target proxy |
-p | Listening port (default 3128) |
-r | Forces the server to reload the object |
Analyze logs
You can monitor Squid's log records with the command:
tail -f /var/log/squid/access.log
Decomposition of a log line:
| Option | Description |
|---|---|
| Date | Log timestamp |
| Response time | Response time for request |
| @client | Client IP address |
| Status code | HTTP response code |
| Size | Transfer size |
| Method | HTTP method (Put / Get / Post / etc.) |
| URL | Request URL |
| Peer Code | Inter-proxy response code |
| File type | Mime type of request target |
Security
The firewall should be open for the listening port:
sudo firewall-cmd --add-port=3128/tcp --permanent
sudo firewall-cmd --reload
Workshop
In this workshop, you will install Squid on your server and use it to download updates.
Task 1: Install and configure Squid
Install Squid:
sudo dnf install squid
sudo systemctl enable squid
sudo firewall-cmd --add-port=3128/tcp --permanent
sudo firewall-cmd --reload
Remove the comment in this line of the /etc/squid/squid.conf file to create a cache directory on disk:
cache_dir ufs /var/spool/squid 100 16 512
Adjust the cache size as required.
Create the cache directories and start the service.
sudo squid -z
sudo systemctl start squid
Task 2: Use your proxy with curl
Open a new terminal on your proxy server to follow the proxy's access.
sudo tail -f /var/log/squid/access.log
On the second terminal, use curl to access a web page through the proxy:
$ curl -I --proxy "http://192.168.1.10:3128" https://docs.rockylinux.org
HTTP/1.1 200 Connection established

HTTP/2 200
content-type: text/html
...
As you can see, two HTTP connections exist. The first is with the proxy, and the second is from the proxy to the remote server.
You can see the trace on your second terminal:
1723793294.548 77 192.168.1.10 TCP_TUNNEL/200 3725 CONNECT docs.rockylinux.org:443 - HIER_DIRECT/151.101.122.132 -
The content is not cached here as you request an https connection to the remote server.
Task 3: Configure DNS to use your proxy server
Edit the /etc/dnf/dnf.conf file to use the proxy squid:
[main]
gpgcheck=1
installonly_limit=3
clean_requirements_on_remove=True
best=True
skip_if_unavailable=False
proxy=http://192.168.1.10:3128
Clean your dnf cache and try an update:
sudo dnf clean all
sudo dnf update
Verify on your terminal that the dnf connection uses your proxy to download its update. Note that the "URL of repository" in the line that follows will be replaced with the actual mirror URL:
1723793986.725     20 192.168.1.10 TCP_MISS/200 5238 GET "URL of repository"/9.4/extras/x86_64/os/repodata/7d78a729-8e9a-4066-96d4-ab8ed8f06ee8-FILELISTS.xml.gz - HIER_DIRECT/193.106.119.144 application/x-gzip
...
1723794176.255      1 192.168.1.10 TCP_HIT/200 655447 GET "URL of repository"/9.4/AppStream/x86_64/os/repodata/1af312c9-7139-43ed-8761-90ba3cd55461-UPDATEINFO.xml.gz - HIER_NONE/- application/x-gzip
In this example, you can see one connection with a TCP_MISS (not present in the cache) and another with TCP_HIT (use the cache to answer the client).
Conclusion
You now know how to install Squid on your local network. This will enable you to centralize your outgoing connections to the Internet and secure your local network.
Check your Knowledge
What is the port listened to by a squid server per default?
- 8080
- 1234
- 443
- 3128
What Squid is?
- A reverse proxy cache
- A proxy cache
Author: Antoine Le Morvan
Contributors: Ganna Zhyrnova