Backup Solution - rsnapshot
Prerequisites
- Know how to install additional repositories and snapshots from the command-line
- Know about mounting file systems external to your machine (external drive, remote file system, and so on.)
- Know how to use an editor (using
vihere, but you can use your favorite editor) - Know a little BASH scripting
- Know how to change the
crontabfor the root user - Knowledge of SSH public and private keys (only if you plan to run remote backups from another server)
Introduction
rsnapshot is a powerful backup utility with installation options on any Linux-based machine. It can either back up a machine locally, or you can back up multiple machines, say servers for instance, from a single machine.
rsnapshot uses rsync and is written entirely in Perl with no library dependencies. No unusual requirements exist for installation. In the case of Rocky Linux, you can install rnapshot by using the EPEL repository. After the initial release of Rocky Linux 9.0, there was a time when the EPEL did not contain the rsnapshot package. That is no longer the case, but these instructions include a method of installing from source just in case this happens again.
This documentation covers the installation of rsnapshot on Rocky Linux only.
Installing rsnapshot
Calling all commands here from the command line unless otherwise noted.
Installing The EPEL repository
You need the EPEL software repository from Fedora. To install the repository, just use this command:
sudo dnf install epel-release -y
The repository will now be active.
Install the rsnapshot package
Install rsnapshot and some other needed tools:
sudo dnf install rsnapshot openssh-server rsync
If there are any missing dependencies, those will show up and you simply need to answer the prompt to continue. For example:
dnf install rsnapshot
Last metadata expiration check: 0:00:16 ago on Mon Feb 22 00:12:45 2021.
Dependencies resolved.
========================================================================================================================================
Package                           Architecture                 Version                              Repository                    Size
========================================================================================================================================
Installing:
rsnapshot                         noarch                       1.4.3-1.el8                          epel                         121 k
Installing dependencies:
perl-Lchown                       x86_64                       1.01-14.el8                          epel                          18 k
rsync                             x86_64                       3.1.3-9.el8                          baseos                       404 k

Transaction Summary
========================================================================================================================================
Install  3 Packages

Total download size: 543 k
Installed size: 1.2 M
Is this ok [y/N]: y
Installing rsnapshot from source
Installing rsnapshot from source is not difficult. It does come with a downside, however, in that if there is a new version released, it will require a fresh install from source to update the version, whereas the EPEL installation method would keep you up-to-date with a simple dnf upgrade.
Installing Development Tools and downloading the source
As stated, the first step here is to install the 'Development Tools' group:
dnf groupinstall 'Development Tools'
You also need a few other packages:
dnf install wget unzip rsync openssh-server
Next you will need to download the source files from the GitHub repository. You can do this multiple ways, but the easiest in this case is probably just to download the ZIP file from the repository.
- Go to https://github.com/rsnapshot/rsnapshot
- Click on the Green "Code" button on the right

- Right-click on the "Download ZIP" and copy the link location
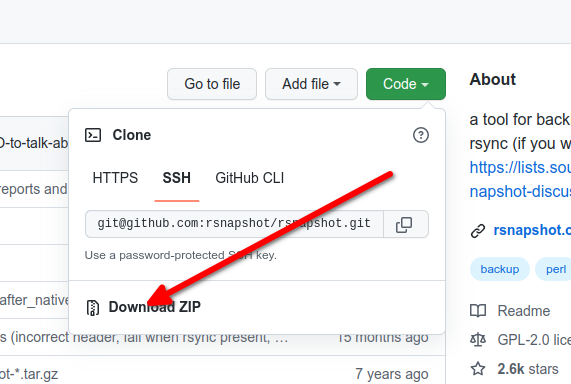
- Use
wgetorcurlto download the copied link. Example:wget https://github.com/rsnapshot/rsnapshot/archive/refs/heads/master.zip - Unzip the
master.zipfileunzip master.zip
Building the source
Now that you have got everything on our machine, the next step is to build. When you unzipped the master.zip file, you ended up with an rsnapshot-master directory. You will need to change into this for our build procedure. Note that your build is using all of the package defaults, so if you want something else, you will need to do a little investigation. Also, these steps are directly taken from the GitHub Installation page:
cd rsnapshot-master
Run the authogen.sh script to generate the configure script:
./autogen.sh
Tip
You may get several lines that look like this:
fatal: not a git repository (or any of the parent directories): .git
These are not fatal.
Next, you need to run configure with the configuration directory set:
./configure --sysconfdir=/etc
Finally, run make install:
sudo make install
During all of this, the rsnapshot.conf file will be created as rsnapshot.conf.default. You need to copy this over to rsnapshot.conf and then edit it to fit what you need on our system.
sudo cp /etc/rsnapshot.conf.default /etc/rsnapshot.conf
This covers copying the configuration file over. The section below on "Configuring rsnapshot" will cover the changes needed in this configuration file.
Mounting a drive or file system for backup
In this step, we show how to mount a drive, such as an external USB drive, used to back up your system. This particular step is only necessary if you are backing up a single machine or server, as seen in our first example.
- Plugin the USB drive.
- Type
dmesg | grep sdwhich will show you the drive you want to use. In this case, it is sda1.
Example:EXT4-fs (sda1): mounting ext2 file system using the ext4 subsystem. - Unfortunately (or fortunately depending on your opinion) most modern Linux desktop operating systems automount the drive if they can. This means that, depending on various factors,
rsnapshotmight lose track of the drive. You want the drive to "mount" or make its files available in the same place every time.
To do that, take the drive information revealed in thedmesgcommand and entermount | grep sda1, which will show this:/dev/sda1 on /media/username/8ea89e5e-9291-45c1-961d-99c346a2628a - Type
sudo umount /dev/sda1to unmount your external drive. - Next, create a mount point for the backup:
sudo mkdir /mnt/backup - Mount the drive to your backup folder location:
sudo mount /dev/sda1 /mnt/backup - Type
mount | grep sda1again, and you will see this:/dev/sda1 on /mnt/backup type ext2 (rw,relatime) - Next create a directory that must exist for the backup to continue on the mounted drive. You use a folder called "storage" for this example:
sudo mkdir /mnt/backup/storage
Note that for a single machine, you will have to either repeat the umount and mount steps each time the drive is attached, or each time the system reboots, or automate these commands with a script.
Automation is recommended.
Configuring rsnapshot
This is the most important step. It is possible to make a mistake when making changes to the configuration file. The rsnapshot configuration requires tabs for any separation of elements, and a warning to that effect is at the top of the configuration file.
A space character will cause the entire configuration—and your backup—to fail. For instance, near the top of the configuration file is a section for the # SNAPSHOT ROOT DIRECTORY #. If you were adding this from scratch, you would type snapshot_root then TAB and then type /whatever_the_path_to_the_snapshot_root_will_be/
The best thing is that the default configuration included with rsnapshot only needs minor changes to make it work for a backup of a local machine. It is always a good idea, though, to make a backup copy of the configuration file before you start editing:
cp /etc/rsnapshot.conf /etc/rsnapshot.conf.bak
Basic machine or single server backup
In this case, rsnapshot will run locally to back up a particular machine. In this example, The configuration file breakdown shows you exactly what you need to change.
You will need to use vi (or edit with your favorite editor) to open the /etc/rsnapshot.conf file.
The first thing to change is the snapshot_root setting. The default has this value:
snapshot_root /.snapshots/
You need to change this to your mount point that you created and add in "storage".
snapshot_root /mnt/backup/storage/`
You also want to tell the backup not to run if the drive is not mounted. To do this, remove the "#" sign (also called a remark, number sign, hash symbol, and so on.) next to no_create_root which looks this way:
no_create_root 1
Next go down to the section titled # EXTERNAL PROGRAM DEPENDENCIES # and remove the comment (again, the "#" sign) from this line:
#cmd_cp /usr/bin/cp
It now reads:
cmd_cp /usr/bin/cp
While you do not need cmd_ssh for this particular configuration, you will need it for our other option and it does not hurt to have it enabled. Find the line that says:
#cmd_ssh /usr/bin/ssh
Remove the "#" sign:
cmd_ssh /usr/bin/ssh
Next you need to skip down to the section titled # BACKUP LEVELS / INTERVALS #
Earlier versions of rsnapshot had hourly, daily, monthly, yearly but are now alpha, beta, gamma, delta. It is a bit confusing. What you need to do is add a remark to any interval(s) that you will not use. In the configuration, delta is already remarked out.
In this example, you are not going to be running any other increments other than a nightly backup. Just add a remark to alpha and gamma. When completed, your configuration file will be:
#retain  alpha   6
retain  beta    7
#retain  gamma   4
#retain delta   3
Skip down to the logfile line, which by default is:
#logfile /var/log/rsnapshot
Remove the remark:
logfile /var/log/rsnapshot
Finally, skip down to the ### BACKUP POINTS / SCRIPTS ### section and add any directories that you want to add in the # LOCALHOST section, remember to use Tab rather than Space between elements!
For now write your changes (Shift+:+wq! for vi) and exit the configuration file.
Checking the configuration
You want to ensure that you did not add spaces or any other glaring errors to our configuration file while you were editing it. To do this, you run rsnapshot against our configuration with the configtest option:
rsnapshot configtest will show Syntax OK if no errors exist.
Get into the habit of running configtest against a particular configuration. The reason for that will be more evident when you get into the Multiple Machine or Multiple Server Backups section.
To run configtest against a particular configuration file, run it with the -c option to specify the configuration:
rsnapshot -c /etc/rsnapshot.conf configtest
Running the backup the first time
With configtest verifying everything is OK, it is now time to run the backup for the first time. You can run this in test mode first so that you can see what the backup script is going to do.
Again, to do this you do not necessarily have to specify the configuration in this case, but it is a good idea to get into the habit of doing so:
rsnapshot -c /etc/rsnapshot.conf -t beta
Which will return something similar to this, showing you what will happen when the backup is actually run:
echo 1441 > /var/run/rsnapshot.pid
mkdir -m 0755 -p /mnt/backup/storage/beta.0/
/usr/bin/rsync -a --delete --numeric-ids --relative --delete-excluded \
    /home/ /mnt/backup/storage/beta.0/localhost/
mkdir -m 0755 -p /mnt/backup/storage/beta.0/
/usr/bin/rsync -a --delete --numeric-ids --relative --delete-excluded /etc/ \
    /mnt/backup/storage/beta.0/localhost/
mkdir -m 0755 -p /mnt/backup/storage/beta.0/
/usr/bin/rsync -a --delete --numeric-ids --relative --delete-excluded \
    /usr/local/ /mnt/backup/storage/beta.0/localhost/
touch /mnt/backup/storage/beta.0/
When the test meets your expectations, run it manually the first time without the test:
rsnapshot -c /etc/rsnapshot.conf beta
When the backup finishes, browse to /mnt/backup and examine the directory structure that it creates there. There will be a storage/beta.0/localhost directory, followed by the directories that you specified to backup.
Further explanation
Each time the backup runs, it will create another beta increment, 0-6, or 7 days worth of backups. The newest backup will always be beta.0 whereas yesterday's backup will always be beta.1.
The size of each of these backups will appear to take up the same amount (or more) of disk space, but this is because of the hard links used by rsnapshot. To restore files from yesterday's backup, you just copy them back from beta.1's directory structure.
Each backup is only an incremental backup from the previous run, BUT, because of the use of hard links, each backup directory, contains either the file or the hard-link to the file in whichever directory it was actually backed up in.
To restore files, you do not have to decide the directory or increment to restore them from, just what time stamp of the backup that you are restoring. It is a great system and uses far less disk space than many other backup solutions.
Setting the backup to run automatically
With testing completed and secure in the knowledge that things will work without issue, the next step is to set up the crontab for the root user to automate the process every day:
sudo crontab -e
If you have not run this before, choose "vim.basic" as your editor or your own editor preference when the Select an editor line comes up.
You are going to set your backup to automatically run at 11 PM, so you will add this to the crontab:
## Running the backup at 11 PM
00 23 *  *  *  /usr/bin/rsnapshot -c /etc/rsnapshot.conf beta`
Multiple machine or multiple server backups
Doing backups of multiple machines from a machine with a RAID array or large storage capacity, on-premise or from on an Internet connection elsewhere works well.
If running these backups over the Internet, you need to ensure that each location has adequate bandwidth for the backups to occur. You can use rsnapshot to synchronize an on-site server with an off-site backup array or backup server to improve data redundancy.
Assumptions
Running rsnapshot from a machine remotely, on-premise. Running this exact configuration is possible remotely off-premise also.
In this case, you will want to install rsnapshot on the machine that is doing all of the backups. Other assumptions are:
- That the servers you will be backing up to, have a firewall rule that allows the remote machine to SSH into it
- That each server that you will be backing up has a recent version of
rsyncinstalled. For Rocky Linux servers, rundnf install rsyncto update your system's version ofrsync. - That you have connected to the machine as the root user, or that you have run
sudo -sto switch to the root user
SSH public or private keys
For the server that will be running the backups, you need to generate an SSH key-pair for use during the backups. For our example, you will be creating RSA keys.
If you already have a set of keys generated, you can skip this step. You can find out by doing an ls -al .ssh and looking for an id_rsa and id_rsa.pub key pair. If none exists, use the following link to set up keys for your machine and the server(s) that you want to access:
rsnapshot configuration
The configuration file needs to be nearly the same as the one we created for the Basic Machine or Single Server Backup , except that you need to change some of the options.
The snapshot root is the default:
snapshot_root /.snapshots/
Comment this line out:
no_create_root 1
#no_create_root 1
The other difference here is that each machine will have its own configuration. When you get used to this, you will just copy one of your existing configuration files over to a different name and change it to fit any additional machines that you want to backup.
For now, you want to change the configuration file just (as shown above), and save it. Copy that file as a template for our first server:
cp /etc/rsnapshot.conf /etc/rsnapshot_web.conf
You want to change the configuration file and create the log and lockfile with the machine's name:
logfile /var/log/rsnapshot_web.log
lockfile        /var/run/rsnapshot_web.pid
Next, you want to change rsnapshot_web.conf to include the directories you want to back up. The only thing that is different here is the target.
Here is an example of the "web.ourdomain.com" configuration:
### BACKUP POINTS / SCRIPTS ###
backup  root@web.ourourdomain.com:/etc/     web.ourourdomain.com/
backup  root@web.ourourdomain.com:/var/www/     web.ourourdomain.com/
backup  root@web.ourdomain.com:/usr/local/     web.ourdomain.com/
backup  root@web.ourdomain.com:/home/     web.ourdomain.com/
backup  root@web.ourdomain.com:/root/     web.ourdomain.com/
Checking the configuration and running the initial backup
You can now check the configuration to ensure it is syntactically correct:
rsnapshot -c /etc/rsnapshot_web.conf configtest
You are looking for the Syntax OK message. If all is well, you can run the backup manually:
/usr/bin/rsnapshot -c /etc/rsnapshot_web.conf beta
Assuming that everything works, you can create the configuration files for the mail server (rsnapshot_mail.conf) and portal server (rsnapshot_portal.conf), test them, and do a trial backup.
Automating the backup
Automating backups for the multiple machine or server version is slightly different. You want to create a bash script to call the backups in order. When one finishes the next will start. This script will look similar to:
vi /usr/local/sbin/backup_all
With the content:
#!/bin/bash/
# script to run rsnapshot backups in succession
/usr/bin/rsnapshot -c /etc/rsnapshot_web.conf beta
/usr/bin/rsnapshot -c /etc/rsnapshot_mail.conf beta
/usr/bin/rsnapshot -c /etc/rsnapshot_portal.conf beta
Save the script to /usr/local/sbin and make the script executable:
chmod +x /usr/local/sbin/backup_all
Create the crontab for root to run the backup script:
crontab -e
Add this line:
## Running the backup at 11 PM
00 23 *  *  *  /usr/local/sbin/backup_all
Reporting the backup status
To ensure that everything is backing up according to plan, you might want to send the backup log files to your email. If you are running multiple machine backups using rsnapshot, each log file will have its own name, which you can send to your email for review by Using the postfix For Server Process Reporting procedure.
Restoring a backup
Restoring a few files or an entire backup involves copying the files you want from the directory with the date that you want to restore from back to your machine.
Conclusions and other resources
Getting the setup right with rsnapshot is a little daunting at first, but can save you loads of time backing up your machines or servers.
rsnapshot is powerful, fast, and economical on disk space usage. You can find more on rsnapshot, by visiting the rsnapshot github.
Author: Steven Spencer
Contributors: Ezequiel Bruni, Ganna Zhyrnova