LibreNMS monitoring server
LibreNMS documentation not updated past Rocky Linux 8
While the LibreNMS project still seems alive and well, based on commits and changes to the LibreNMS GitHub site, the instructions for installing and running (found here and basically unchanged on LibreNMS' site) do not work as written for Rocky Linux 10. For now, the recommendation is to hold off on a Rocky Linux 10 install until all of the changes are fully investigated.
Introduction
Network and systems administrators almost always need some form of monitoring. This can include graphing bandwidth usage at router end points, monitoring the status of services running on various servers, and much more. Many monitoring options exist, but one good option with many, if not all, of the monitoring components available under one roof, is LibreNMS.
This document is just a starting point for LibreNMS. The author will point you to the project's excellent (and extensive) documentation for more options. The author has used many other monitoring solutions, Nagios and Cacti being two, but LibreNMS offers what those two projects offer individually in one spot.
The installation will closely follow the official install instructions. Explanations and minor changes to that procedure, make this procedure preferable to that excellent document.
Prerequisites, assumptions, and conventions
- A server or container (yes, LibreNMS will run in a container. If you have a great deal to monitor, your best bet would be to install on stand-alone hardware) running Rocky Linux. All commands assume a fresh install of Rocky Linux.
- Assumption: that you can run commands as root or can sudo to elevate privileges
- Working knowledge of command-line tools, including text editors such as vi
- Assumption: the use of SNMP v2. If you want to use SNMP v3, LibreNMS supports it and will work. You will need to switch up the SNMP configuration and options on your devices to match up to v3.
- Included here is the SELinux procedure. The container the author uses in the lab does not include it by default. For this reason, the SELinux procedure has not been lab tested.
- Throughout this document, the examples use the vi editor. When the document says to save your changes and exit, use Shift+:+W+Q+!.
- The procedure requires some troubleshooting skills, including log monitoring, web testing, and more
Installing packages
Enter these commands as the root user. Before starting, note that this installation procedure focuses on httpd, rather than nginx. If you prefer the latter, follow the Librenms Install Instructions and guide there.
First, install the EPEL repository (Extra Packages for Enterprise Linux):
dnf install -y epel-release
The current version of LibreNMS requires a minimum PHP version of 8.1. Rocky Linux 9.0 has PHP 8.0. Enable a third-party repository (also in Rocky Linux 8.6) for this newer version.
The version of the repository you install will depend on the version of Rocky Linux you are running. The assumption is version 9, but change this accordingly for the version you are running:
dnf install http://rpms.remirepo.net/enterprise/remi-release-9.rpm
Then set the dnf to use remi packages instead of the regular packages
dnf module reset php
dnf module enable php:8.1
Once both the EPEL and REMI repositories are installed, it is time to install the packages:
dnf install bash-completion cronie fping git httpd ImageMagick mariadb-server mtr net-snmp net-snmp-utils nmap php-fpm php-cli php-common php-curl php-gd php-gmp php-json php-mbstring php-process php-snmp php-xml php-zip php-mysqlnd python3 python3-PyMySQL python3-redis python3-memcached python3-pip python3-systemd rrdtool unzip wget
All of these packages represent some portion of the LibreNMS feature set.
Setting up the 'librenms' user
Copy and paste (or enter) the following:
useradd librenms -d /opt/librenms -M -r -s "$(which bash)"
This command sets the default directory for the user to /opt/librenms however the -M option says "do not create the directory." The reason is that this happens upon LibreNMS's installation. The -r says to make this user a system account and the -s says to set the shell (in this case, to "bash").
Download LibreNMS and set permissions
Git facilitates the Download. You might be familiar with the process. First, switch over to the /opt directory:
cd /opt
Clone the repository:
git clone https://github.com/librenms/librenms.git
Change permissions for the directory:
chown -R librenms:librenms /opt/librenms
chmod 771 /opt/librenms
setfacl -d -m g::rwx /opt/librenms/rrd /opt/librenms/logs /opt/librenms/bootstrap/cache/ /opt/librenms/storage/
setfacl -R -m g::rwx /opt/librenms/rrd /opt/librenms/logs /opt/librenms/bootstrap/cache/ /opt/librenms/storage/
The setfacl command stands for "set file access control lists" and is another way of securing directories and files.
Install PHP dependencies as librenms
The PHP dependencies within LibreNMS need installation with the librenms user. To do this, run:
su - librenms
Enter the following:
./scripts/composer_wrapper.php install --no-dev
Exit back to root:
exit
Failure Of PHP dependency install workaround
LibreNMS documentation says that the above procedure might fail when you are behind a proxy server. It can fail for other reasons also. For this reason, a procedure for installing Composer comes later.
Set timezone
You need to ensure the correct setting for the system and PHP. You can find a list of valid timezone settings for PHP here. For instance, for the Central timezone, a common entry is "America/Chicago". Start by editing the php.ini file:
vi /etc/php.ini
Find the date.timezone line and modify it. Note that it is remarked out, so remove the ";" from the beginning of the line and add your timezone after the "=" sign. For the Central timezone example use:
date.timezone = America/Chicago
Save your changes and exit the php.ini file.
You also need to ensure that the system timezone is correct. Using the Central timezone example, do this with:
timedatectl set-timezone America/Chicago
MariaDB setup
Before starting the database requirements for LibreNMS, run through the MariaDB procedure, specifically the section for "Securing mariadb-server", and return here for these specific settings. Change the mariadb-server.cnf file:
vi /etc/my.cnf.d/mariadb-server.cnf
Add these lines to the "[Mysqld]" section:
innodb_file_per_table=1
lower_case_table_names=0
Then enable and restart the mariadb server:
systemctl enable mariadb
systemctl restart mariadb
Access mariadb as the root user. Remember to use the password that you created when following the "Securing mariadb-server" section performed earlier:
mysql -u root -p
Make some specific changes for LibreNMS. With the command below, remember to change the password "password" to something secure and document what that is in a safe spot.
At the mysql prompt run:
CREATE DATABASE librenms CHARACTER SET utf8mb4 COLLATE utf8mb4_unicode_ci;
CREATE USER 'librenms'@'localhost' IDENTIFIED BY 'password';
GRANT ALL PRIVILEGES ON librenms.* TO 'librenms'@'localhost';
FLUSH PRIVILEGES;
Enter "exit" to exit out of mariadb.
Configure PHP-FPM
This not changed from the official documentation except for the path to the files. First, copy the www.conf:
Change the librenms.conf file:
cp /etc/php-fpm.d/www.conf /etc/php-fpm.d/librenms.conf
vi /etc/php-fpm.d/librenms.conf
Change "[www]" to ["librenms]"
Change the user and group to "librenms":
user = librenms
group = librenms
Change the "listen" line to reflect a unique name:
listen = /run/php-fpm-librenms.sock
Save your changes and exit the file. If this is the only web service that will be running on this machine, you can remove the old
rm -f /etc/php-fpm.d/www.conf
Configure httpd
Start by creating this file:
vi /etc/httpd/conf.d/librenms.conf
Enter the following in that file:
<VirtualHost *:80>
  DocumentRoot /opt/librenms/html/
  ServerName  librenms.example.com

  AllowEncodedSlashes NoDecode
  <Directory "/opt/librenms/html/">
    Require all granted
    AllowOverride All
    Options FollowSymLinks MultiViews
  </Directory>

  # Enable http authorization headers
  <IfModule setenvif_module>
    SetEnvIfNoCase ^Authorization$ "(.+)" HTTP_AUTHORIZATION=$1
  </IfModule>

  <FilesMatch ".+\.php$">
    SetHandler "proxy:unix:/run/php-fpm-librenms.sock|fcgi://localhost"
  </FilesMatch>
</VirtualHost>
You should remove the old default site, welcome.conf:
rm /etc/httpd/conf.d/welcome.conf
Enable httpd and php-fpm:
systemctl enable --now httpd
systemctl enable --now php-fpm
SELinux
If you do not plan to use SELinux, skip to the next section. This might also apply to you if you use LibreNMS on a container that does not support SELinux at the container level, or does not include it by default.
To setup everything with SELinux, you will need an additional package installed:
dnf install policycoreutils-python-utils
Configure LibreNMS contexts
You will need to set the following contexts for LibreNMS to work properly with SELinux:
semanage fcontext -a -t httpd_sys_content_t '/opt/librenms/html(/.*)?'
semanage fcontext -a -t httpd_sys_rw_content_t '/opt/librenms/(logs|rrd|storage)(/.*)?'
restorecon -RFvv /opt/librenms
setsebool -P httpd_can_sendmail=1
setsebool -P httpd_execmem 1
chcon -t httpd_sys_rw_content_t /opt/librenms/.env
Allow fping
Create a file called http_fping.tt anywhere. It does not matter where. Installing this happens next. The contents of this file are:
module http_fping 1.0;

require {
type httpd_t;
class capability net_raw;
class rawip_socket { getopt create setopt write read };
}

#============= httpd_t ==============
allow httpd_t self:capability net_raw;
allow httpd_t self:rawip_socket { getopt create setopt write read };
Install this file with the following commands:
checkmodule -M -m -o http_fping.mod http_fping.tt
semodule_package -o http_fping.pp -m http_fping.mod
semodule -i http_fping.pp
If you run into problems and you suspect it might be due to an SELinux issue, run the following:
audit2why < /var/log/audit/audit.log
firewalld configuration
The firewalld instructions follow the official documentation.
The command to use for firewalld allow rules are as follows:
firewall-cmd --zone public --add-service http --add-service https
firewall-cmd --permanent --zone public --add-service http --add-service https
The author has problems with this simplistic firewalld rule set. This rule allows your web services to be open to the world, but is that what you want for a monitoring server?
This is usually not the case. If you would like a more granular approach to using firewalld, review this document and then make changes to your firewalld rules accordingly.
Enable symbolic link And tab-autocomplete For lnms commands
First, you need a symbolic link on your lnms command so it is possible to run from anywhere:
ln -s /opt/librenms/lnms /usr/bin/lnms
Next, set it up for autocomplete:
cp /opt/librenms/misc/lnms-completion.bash /etc/bash_completion.d/
Configure snmpd
SNMP stands for "Simple Network Management Protocol" and is in use by many monitoring programs for pulling data. Version 2, used here, requires a "community string" which is specific to your environment.
Assign this "community string" to your network devices you want to monitor, so that snmpd (the "d" here stands for the daemon) will be able to find it. You might already have a "community string" in use if your network is not new.
Copy the snmpd.conf file from LibreNMS:
cp /opt/librenms/snmpd.conf.example /etc/snmp/snmpd.conf
Edit this file and change the community string from "RANDOMSTRINGGOESHERE" to whatever your community string is or will be. In the example, this is "LABone":
vi /etc/snmp/snmpd.conf
Change this line:
com2sec readonly default RANDOMSTRINGGOESHERE
to
com2sec readonly default LABone
Save your changes and exit.
Automating with a cron job
Run the following commands to set up the cron jobs:
cp /opt/librenms/librenms.nonroot.cron /etc/cron.d/librenms
The poller must run once, even though nothing is there to poll, before running the web setup procedure. It saves some troubleshooting trying to figure out what is wrong when you get poller errors in the validation section later on.
The poller runs with the "librenms" user, and though it is possible to switch to this user and run the cron files, it is really better to let the poller do it on its own. Ensure that at least 5 minutes have passed to allow the cron to run and then continue the "Web Setup" section.
Log rotation
LibreNMS will create a large set of logs over time. You will need to setup log rotation for this to conserve disk space. To do this, run this command:
cp /opt/librenms/misc/librenms.logrotate /etc/logrotate.d/librenms
Installing composer (workaround)
PHP Composer is a requirement for the current installation (mentioned in the earlier procedure). If the install you ran earlier failed, you will need to do this.
Before starting, you need to link your current version of the php binary to a location in the path. This procedure used the REMI installation to get the correct version of PHP, and it is not installed within the path.
This is fixable with a symbolic link and will make your life much easier as you run the remaining steps:
ln -s /opt/remi/php81/root/usr/bin/php /usr/bin/php
Go to the Composer website and ensure that the following steps have not changed. Then run these commands somewhere on the machine. You will move composer when this is done:
php -r "copy('https://getcomposer.org/installer', 'composer-setup.php');"
php -r "if (hash_file('sha384', 'composer-setup.php') === '55ce33d7678c5a611085589f1f3ddf8b3c52d662cd01d4ba75c0ee0459970c2200a51f492d557530c71c15d8dba01eae') { echo 'Installer verified'; } else { echo 'Installer corrupt'; unlink('composer-setup.php'); } echo PHP_EOL;"
php composer-setup.php
php -r "unlink('composer-setup.php');"
Move it to a spot within the path. Use /usr/local/bin/ for this:
mv composer.phar /usr/local/bin/composer
Web setup
With all of the components installed and configured, your next step is to finish the installation via the web. In the lab version, you have no hostname setup. To finish the setup, you need to go to the web server by IP address.
The IP of the lab machine is 192.168.1.140. Navigate to the following address in a web browser to finish the install:
http://192.168.1.140/librenms
A redirection to the pre-install checks follows if all is working correctly. If these are all marked in green, you can continue.
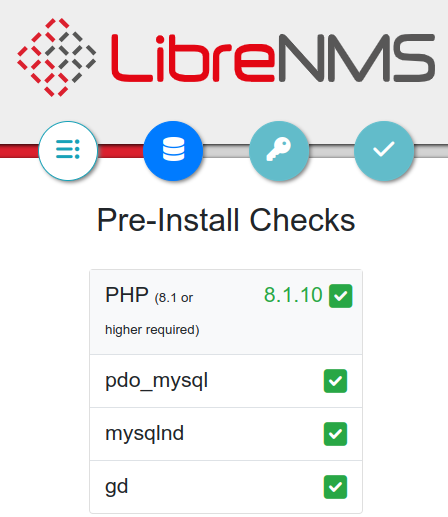
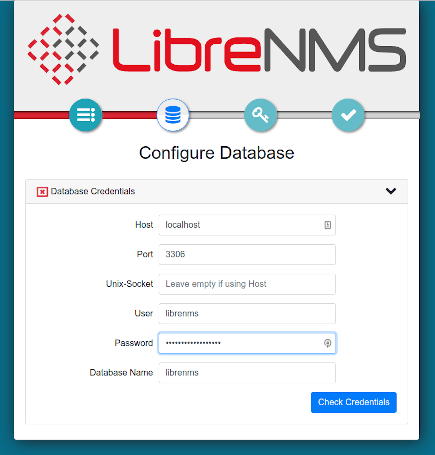
Four buttons are beneath the LibreNMS logo. The first button on the left is for the pre-checks. The next button over is for the database. You will need the password you set for the database user "librenms" earlier.
If you have been following along, then you have that saved in a safe place. Click on the "Database" button. The "User" and "Password" are all that is necessary here. When you do that, click the "Check Credentials" button.
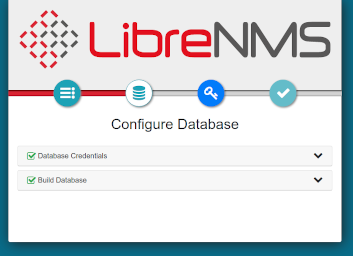
Click the "Build Database" button if it comes back green.
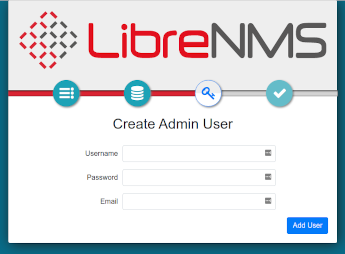
The "Create Admin User" button will be active now. Click this. A prompt for an admin user name is next. In the lab it is "admin." Create a password for this user.
Ensure the password is secure and log it somewhere safe, such as a password manager. You will also need to add the email address for the administrative user. When completed, click the "Add User" button.
You will now see a screen for "Finish Install." There will only be one item left to finish the installation, a line that asks you to "validate your install".
Click the link. A redirect occurs to the login page. Login with your administrative user and password.
Adding devices
Again, one of the assumptions was that you are using SNMP v2. Remember that each device you add must be a member of your community string. Here the author uses two device examples, An Ubuntu workstation and a CentOS server.
You will likely have managed switches, routers, and other devices to add. The author can tell you from experience that adding switches and routers is easier than adding workstations and servers.
Ubuntu workstation setup
First, install snmpd on the workstation and update packages just to be safe:
sudo update && sudo apt-get upgrade && sudo apt-get install snmpd
Next, you need to change the snmpd.conf file:
sudo vi /etc/snmpd/snmpd.conf
Find the lines that describe your workstation and change them to things that identify the workstation:
sysLocation    Desktop
sysContact     Username <user@mydomain.com>
When you install snmpd on Ubuntu, it only binds to the local address. It does not listen on your machine IP address. This will not allow LibreNMS to connect to it. You need to remark out this line:
agentaddress 127.0.0.1,[::1]
Add a new line: (In this example, the IP address of your workstation is 192.168.1.122 and the UDP port you are setting is "161")
agentAddress udp:127.0.0.1:161,udp:192.168.1.122:161
You need to specify the read-only access community string. Find the below lines and remark them out as shown:
#rocommunity public default -V systemonly
#rocommunity6 public default -V systemonly
Add a line:
rocommunity LABone
Save your changes and exit.
Enable and start snmpd:
sudo systemctl enable snmpd
sudo systemctl start snmpd
If you are running a firewall on your internal workstations, you will need to change the firewall to allow UDP traffic from the monitoring server or from the network. LibreNMS also wants to be able to "ping" your device. Ensure that ICMP port 8 from the server is not filtered.
CentOS or Rocky Linux server setup
The assumption is you are root or that you can sudo to elevate privileges. You need to install some packages:
dnf install net-snmp net-snmp-utils
Create a snmpd.conf file. Rather than try to navigate the included file, move this file to rename it, and create a brand new empty file:
mv /etc/snmp/snmpd.conf /etc/snmp/snmpd.conf.orig
and
vi /etc/snmp/snmpd.conf
Copy this into the new file:
# Map 'LABone' community to the 'AllUser'
# sec.name source community
com2sec AllUser default LABone
# Map 'ConfigUser' to 'ConfigGroup' for SNMP Version 2c
# Map 'AllUser' to 'AllGroup' for SNMP Version 2c
# sec.model sec.name
group AllGroup v2c AllUser
# Define 'SystemView', which includes everything under .1.3.6.1.2.1.1 (or .1.3.6.1.2.1.25.1)
# Define 'AllView', which includes everything under .1
# incl/excl subtree
view SystemView included .1.3.6.1.2.1.1
view SystemView included .1.3.6.1.2.1.25.1.1
view AllView included .1
# Give 'ConfigGroup' read access to objects in the view 'SystemView'
# Give 'AllGroup' read access to objects in the view 'AllView'
# context model level prefix read write notify
access AllGroup "" any noauth exact AllView none none
CentOS and Rocky use a mapping convention to direct things. The shown file has comments to define what is happening, but does not include all of the clutter of the original file.
When you have made the changes, save them and exit the file.
Enable and start snmpd:
systemctl enable snmpd
systemctl start snmpd
Firewall
If you are running a server, then you are running a firewall, right? If you are running firewalld the assumption is that you use the "trusted" zone and you just want to allow all traffic from your monitoring server, 192.168.1.140:
firewall-cmd --zone=trusted --add-source=192.168.1.140 --permanent
If the "trusted" zone is incorrect for your environment, change this to suite your needs. Consider your rules and their effect before adding them in.
Adding the devices in Librenms
With your sample devices configured to accept SNMP traffic from the LibreNMS server, the next step is adding those devices to LibreNMS. With the web interface for LibreNMS open, click to add a device:
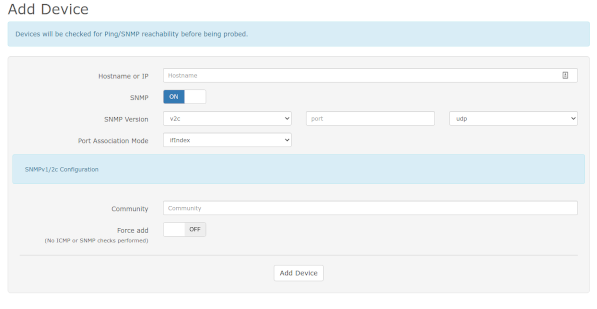
Put in the information used for your test devices. Enter the IP for the Ubuntu workstation to start. In the example that is 192.168.1.122. Add the "LABone" community string in the "Community" field.
Click the "Add Device" button. Assuming everything is correct, this process will complete successfully.
If you run into a "failure to add" error, review the SNMP setup for the workstation or the firewall if it exists. Repeat the "Add Device" process for your CentOS server.
Getting alerts
As noted from the start, this document will only get you started with LibreNMS. A large number of additional configuration items exist, an extensive API (Application Programming Interface), an alerts system that provides a huge number of options for delivery, called "Transports", and much more.
This document does not contain any alert rules creation procedures. Instead, you will edit the built-in alert rule "Device Down! Due to no ICMP response" that is pre-configured out of the box. For "Transports" use "Mail", which is just email. Know that you are not limited to this alert.
Mail must be working to use email for transport. Use this Postfix Procedure to get this going.
Transports
You need a way to send your alerts. As noted earlier, LibreNMS supports a huge number of transports. Email alert defined as "Mail" transport, is in use here. To set up the transport:
- Go to the dashboard
- Let your mouse hover over "Alerts"
- Go down to "Alert Transports" and click on it
- Click on the "Create alert transport" button (Note the "Create transport group" button. You can use this to have alerts go to several individuals)
- In the "Transport name:" field, enter "Alert By Email"
- In the "Transport type:" field, use the drop down to select "Mail"
- Ensure the "Default alert:" field is "On"
- In the "Email:" field, enter the email address of the administrator
Organizing devices into groups
The best way to set up alerts is to organize your devices logically. Currently, you have a workstation and a server in devices. Normally you would not combine the two, as done here.
This example is also redundant, as an "All Devices" group exists that will work for this as well. To set up a device group:
- Go to the dashboard
- Let your mouse hover over "Devices"
- Go down to "Manage Groups" and click on it
- Click on the "+ New Device Group" button
- In the "Name" field, enter "ICMP Group"
- In the description field enter what ever you think will help describe the group
- Change the "Type" field from "Dynamic" to "Static"
- Add each device to the "Select Devices" field and save your changes
Setting up the alert rules
Configure the alert rule next. By default, LibreNMS has several alert rules already created for you:
- Go to the dashboard
- Let your mouse hover over "Alerts"
- Go down to "Alert Rules" and click on it
- The top active rule here will be "Device Down! Due to no ICMP response." Go over to the "Action" (far right column) and click on the pencil icon to edit the rule.
- Leave all the fields at the top with defaults. In the "Match devices, groups and locations list:" field, click inside the field.
- Select "ICMP Group" from the list
- Ensure the "All devices except in list:" field is "Off"
- Click inside the "Transports:" field and select "Mail: Alert By Email" and save your rule.
Before saving, your rule will be:
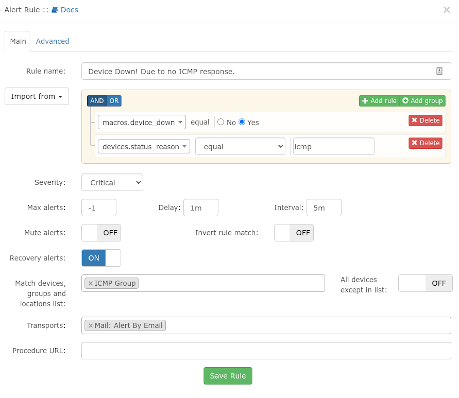
These two devices will now alert you by email if they are down, and upon recovery.
Conclusion
LibreNMS is a powerful monitoring tool with a full set of features in one application. This document has just scratched the surface on its capabilities. Some of the simpler screens are not shown.
When you add devices, assuming that all of the SNMP properties are correctly set, you will start to receive bandwidth, memory utilization, and CPU utilization graphs on each device. This lab has not shown you the wealth of transports available besides "Mail".
This document has shown you enough to get a good start monitoring your environment. LibreNMS takes some time to master all of the elements. You should visit the project's excellent documentation for additional information.
Author: Steven Spencer
Contributors: Ezequiel Bruni, Ganna Zhyrnova