vale in NvChad (Neovim)
Introduction
vale.sh is one of the foremost open source projects for technical writers looking to improve their voice and style consistency. It can be used with a number of editors on nearly every major OS platform (Linux, macOS, Windows). You can find out more about the project by heading up to the vale.sh website. This guide is going to walk you through adding vale to NvChad. Since it is included in the Mason packages used for install, the process is not too difficult, although it does involve some minor editing and configuration to get things going. To be clear, NvChad is really the configuration manager for the editor Neovim, so from this point forward, the reference will be nvim.
Prerequisites
- Familiarity with NvChad 2.0 is helpful
- Ability to change files from the command line by using your favorite editor. (
vior your favorite) - The nvim-lint plugin is correctly installed in NvChad.
Installation of nvim-lint
The nvim-lint plugin provides support for inserting linters into the editor by correcting code or content for both the syntactic and semantic parts.
To install the nvim-lint plugin, simply create a nvim-lint.lua file in the lua/plugins folder; when the Neovim instance is next started, this will be integrated into the configuration.
The contents of the file are as follows:
return {
 {
  "mfussenegger/nvim-lint",
  enabled = true,
  event = "VeryLazy",
  config = function()
   require("lint").linters_by_ft = {
    markdown = { "markdownlint", "vale" },
    yaml = { "yamllint" },
   }

   vim.api.nvim_create_autocmd({ "BufWritePost" }, {
    callback = function()
     require("lint").try_lint()
    end,
   })
  end,
 },
}
This configuration file is set to work with markdown code but can be modified or extended with those available on the project site.
Once the changes are complete exit and re-enter NvChad to install the plugin and import the configuration.
Installing vale using Mason
Installing vale from within NvChad using Mason, will keep the package up-to-date with just a few extra steps. Running Mason periodically from within nvim will show you if there are updates that need to be installed and allow you to update them from there. This includes vale once it is installed. Let us start by running nvim to pull up an empty file and then get into the command mode by using Shift + : + Mason, which should show an interface similar to this one:
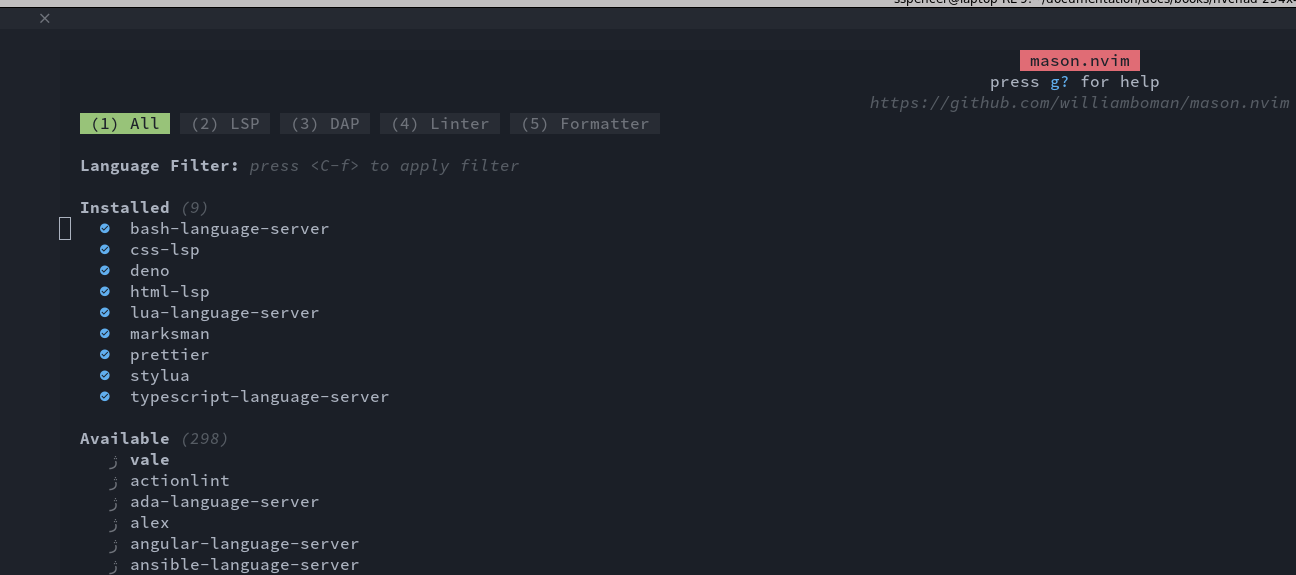
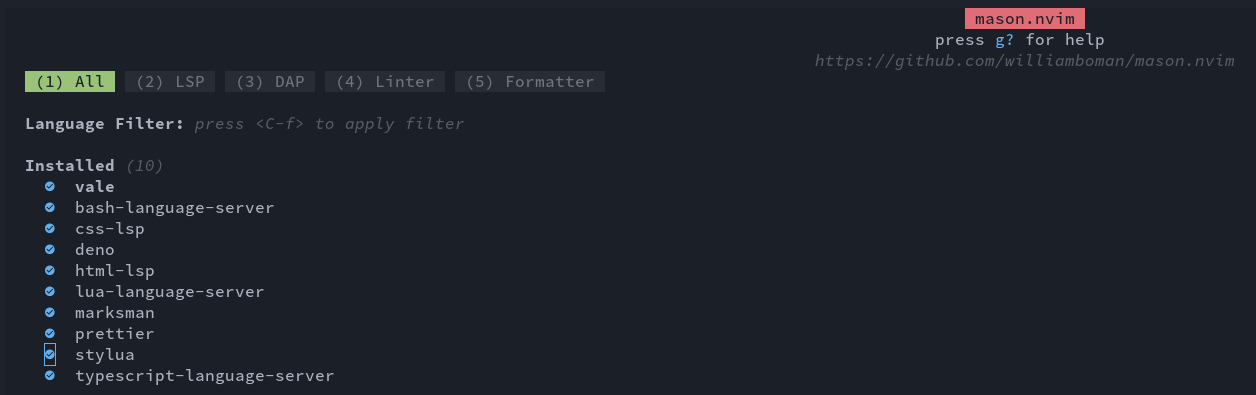
Rather than looking at the entire list of packages, let us use menu item 4 to limit the listing to linters. Press 4 and scroll down in the list until you find vale and with your cursor on that line, press i to install. Your listing should now show vale installed:
Configuring and initializing vale
There are two methods you can use to configure vale. You can pick your favorite from the two options below. One will have you create the configuration files from within the path of the vale binary, then move them to your home folder, and the other will have you create the configuration files directly in your home folder. They work equally well. The second option has fewer manual steps, but requires the long path to the vale binary.
Tip
If you want to hide your "styles" folder (below), modify the contents of the .vale.ini slightly during creation by changing the "StylesPath" option from "styles" to something hidden such as ".styles" or ".vale_styles." Example:
StylesPath = .vale_styles
Just having vale installed is not enough. You need a couple of additional items. First, you need a .vale.ini file that will live in the root of your home folder. Next, you will need to generate the "styles" directory using vale sync.
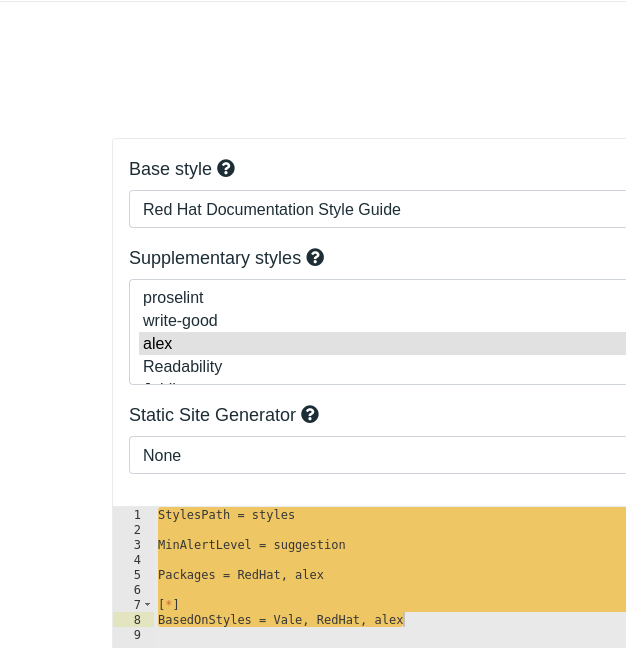
If you are in the path of the vale binary here: ~/.local/share/nvim/mason/packages/vale/ you can simply create the .vale.ini file here, generate the "styles" directory, and then move both of them to your home root ~/. Creating the .vale.ini file is easy using the configuration utility from the vale.sh website. Here, choose "Red Hat Documentation Style Guide" for the base style and "alex" for the supplementary style. Using 'alex' is optional, but helps you catch and fix gendered, polarizing, or race-related words, etc., which is important. If you choose those options, your screen should look like this:
Simply copy the contents at the bottom, create the .vale.ini file with your favorite editor, and paste what you copied in.
You need to create the "styles" folder. Do this by running the vale binary with the sync command. Again, if you are doing this from the ~/.local/share/nvim/mason/packages/vale/ directory, just do:
./vale sync
This will show the following when done:

Copy the .vale.ini and the styles folder to the root of your home folder:
cp .vale.ini ~/
cp -rf styles ~/
If you prefer not to have to copy the files and just want to create them in your home directory, you can use this command from ~/:
First, create the .vale.ini in your home folder using the vale.sh website. Again, choose "Red Hat Documentation Style Guide" for your base style and "alex" for the supplementary style. Then copy the contents into the .vale.ini file.
Next, run the vale sync command. Since you are in your home directory, you will need the entire path to the binary:
~/.local/share/nvim/mason/packages/vale/vale sync
In this case, there is no need to copy the files as they will be created in your home directory root.
The lint.lua file changes
There is one final step needed. You need to change the lint.lua file found in ~/.config/nvim/lua/configs/ and add the vale linter.
Using the example shown above to add vale to the linter available for markdown files it will be necessary to add the new linter to the string already present:
markdown = { "markdownlint", "vale" },
Your file will look something like this when completed:
require("lint").linters_by_ft = {
  markdown = { "markdownlint", "vale" },
  yaml = { "yamllint" },
}

vim.api.nvim_create_autocmd({ "BufWritePost" }, {
  callback = function()
    require("lint").try_lint()
  end,
})
Conclusions and final thoughts
Starting nvim normally will now invoke vale, and your documents will now be compared against your preferred style. Opening an existing file will start vale and show you any flagged items, while starting a new file will not show you anything in insert mode. When you exit insert mode, your file will then be checked. This keeps the screen from being too cluttered. vale is an excellent open source product with great integration into many editors. NvChad is no exception, and while getting it up and running does take a few steps, it is not a difficult procedure.
Author: Steven Spencer
Contributors: Franco Colussi, Krista Burdine, Serge, Ganna Zhyrnova