Network Configuration
Introduction
You cannot do much with a computer these days without network connectivity. Whether you need to update the packages on a server or browse external websites from your laptop, you will need network access. This guide aims to provide Rocky Linux users with the basic knowledge on setting up network connectivity.
Much has changed with network configuration as of Rocky Linux 10. One of the major changes is the removal of Network-Scripts (deprecated in Rocky Linux 9) and the switch to Network Manager and key files. NetworkManager as of 10, insists on keyfiles over the previous ifcfg files. This guide aims to walk you through using Network Manager and the latest changes in Rocky Linux 10.
Prerequisites
- A certain amount of comfort operating from the command line
- Elevated or administrative privileges on the system (for example, root,
sudo, and so on) - Optional: familiarity with networking concepts
Using NetworkManager service
At the user level, network stack management is handled by NetworkManager. This tool runs as a service. You can check its state with the following command:
systemctl status NetworkManager
Configuration files
As noted at the beginning, the configuration files are now key files by default. You can see how NetworkManager prioritizes these files by running the following command:
NetworkManager --print-config
This gives you this or similar output:
[main]
# plugins=keyfile
# rc-manager=auto
# auth-polkit=true
# iwd-config-path=
dhcp=dhclient
configure-and-quit=no

[logging]
# backend=journal
# audit=false

[device]
# wifi.backend=wpa_supplicant

# no-auto-default file "/var/lib/NetworkManager/no-auto-default.state"
Note the reference to' keyfile' at the top of the configuration file. Whenever you run any of the NetworkManager tools to configure an interface (e.g., nmcli or nmtui), they will automatically build or update key files.
Configuration Storage Location
In Rocky Linux 10, the default location for key files is /etc/NetworkManager/system-connections.
The primary (but not the only) utility used for configuring a network interface is the nmtui command. You can also do this with the nmcli command, but it is much less intuitive. You can show the interface as it is currently configured using nmcli with:
nmcli device show enp0s3
GENERAL.DEVICE:                         enp0s3
GENERAL.TYPE:                           ethernet
GENERAL.HWADDR:                         08:00:27:BA:CE:88
GENERAL.MTU:                            1500
GENERAL.STATE:                          100 (connected)
GENERAL.CONNECTION:                     enp0s3
GENERAL.CON-PATH:                       /org/freedesktop/NetworkManager/ActiveConnection/1
WIRED-PROPERTIES.CARRIER:               on
IP4.ADDRESS[1]:                         192.168.1.151/24
IP4.GATEWAY:                            192.168.1.1
IP4.ROUTE[1]:                           dst = 192.168.1.0/24, nh = 0.0.0.0, mt = 100
IP4.ROUTE[2]:                           dst = 0.0.0.0/0, nh = 192.168.1.1, mt = 100
IP4.DNS[1]:                             8.8.8.8
IP4.DNS[2]:                             8.8.4.4
IP4.DNS[3]:                             192.168.1.1
IP6.ADDRESS[1]:                         fe80::a00:27ff:feba:ce88/64
IP6.GATEWAY:                            --
IP6.ROUTE[1]:                           dst = fe80::/64, nh = ::, mt = 1024
Tips:
There are several mechanisms by which systems obtain their IP configuration information. The two most common methods are the Static IP configuration and Dynamic IP configuration schemes.
The static IP configuration scheme is very popular on server-class systems or networks.
The dynamic IP approach is popular on home and office networks, as well as on workstation- and desktop-class systems in a business environment. The dynamic scheme usually needs something extra that is locally available and that can supply proper IP configuration information to requesting workstations and desktops. This something is called the Dynamic Host Configuration Protocol (DHCP). On a home network, and even on most business networks, this service is provided by a DHCP Server configured for the purpose. This can be a separate server or part of a router configuration.
IP address
In the previous section, the displayed configuration for the interface enp0s3 generates from the .ini file /etc/NetworkManager/system-connections/enp0s3.nmconnection. This shows that the IP4.ADDRESS[1] is statically configured, rather than dynamically configured with DHCP. If you want to switch this interface back to a dynamically allocated address, the easiest way is to use the nmtui command.
-
First, run the
nmtuicommand at the command-line which should show you the following: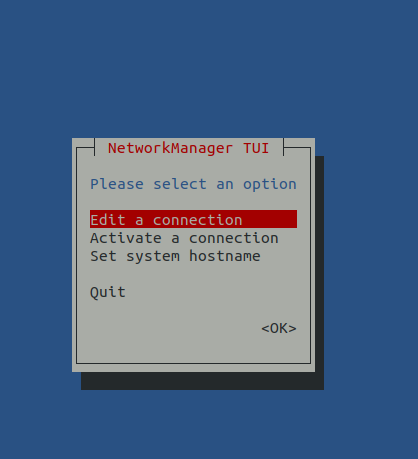
-
It is already on the selection you need "Edit a connection" so hit the Tab key until you see "OK" highlighted and hit Enter.
-
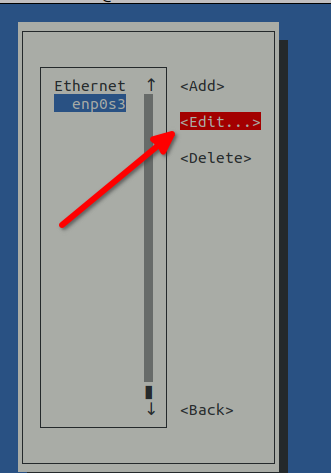
This brings up a screen showing the Ethernet connections on the machine and lets you choose one. In this case, there is ONLY one, so it is already highlighted. You need to hit the Tab key until you see "Edit" highlighted and then hit Enter.
-
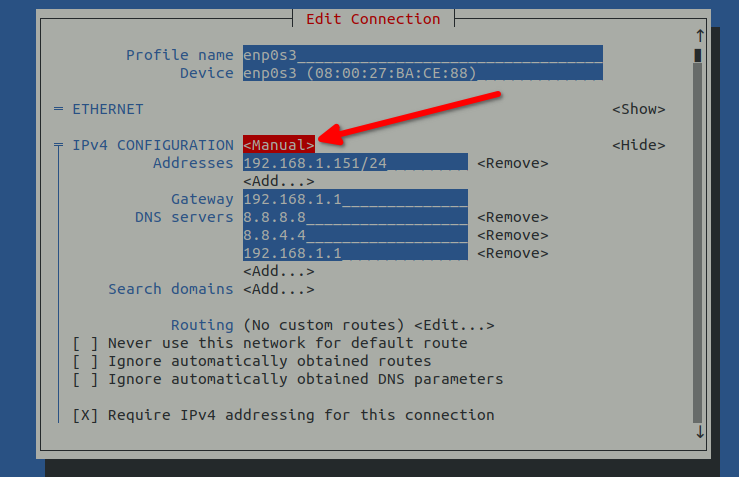
Once completed, you will be on the screen showing your current configuration. What you need to do is switch from "Manual" to "Automatic", so hit the Tab key several times until you see "Manual" highlighted, and then hit Enter.
-
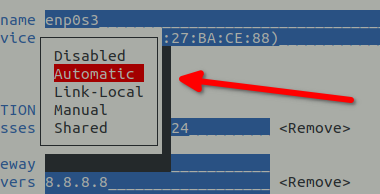
Arrow up until you see highlighting of "Automatic" and then hit Enter.
-
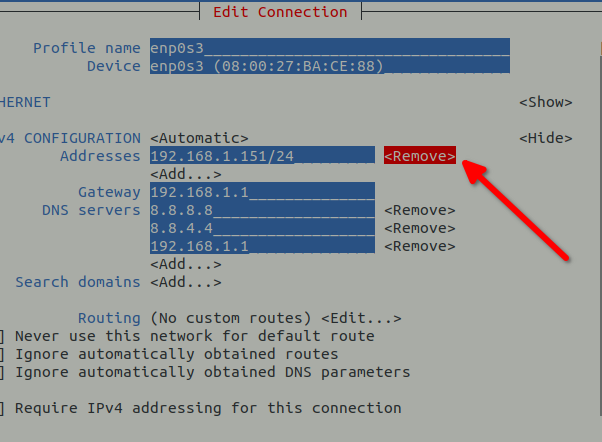
Once you have switched the interface over to "Automatic", you need to remove the statically assigned IP. Hit the Tab key until you see the highlighting of "Remove" next to the IP address and hit Enter.
-
Finally, hit the Tab key several times until you get to the bottom of the
nmtuiscreen showing the highlighting of "OK" and hit Enter.
You can deactivate and reactivate your interface with nmtui, but let's do it with nmcli instead. In this way, you can string the deactivation of the interface and the reactivation of the interface so that the interface is never down for long:
nmcli con down enp0s3 && nmcli con up enp0s3
Think of this as the equivalent of the old ifdown enp0s3 && ifup enp0s3 used in older versions of the operating system.
To verify that it worked, go ahead and check using either the ip addr command or the nmcli device show enp0s3 command used earlier.
ip addr
If successful, you should now see that the removal of the static IP and the addition of a dynamically allocated address, similar to this:
2: enp0s3: <BROADCAST,MULTICAST,UP,LOWER_UP> mtu 1500 qdisc fq_codel state UP group default qlen 1000
link/ether 08:00:27:ba:ce:88 brd ff:ff:ff:ff:ff:ff
inet 192.168.1.137/24 brd 192.168.1.255 scope global dynamic noprefixroute enp0s3
    valid_lft 6342sec preferred_lft 6342sec
inet6 fe80::a00:27ff:feba:ce88/64 scope link noprefixroute
    valid_lft forever preferred_lft forever
IP address changing with nmcli
Using nmtui is nice, but if you want to quickly reconfigure the network interface without all the time spent switching between screens, you probably want to use nmcli by itself. Examine the earlier example of a statically assigned IP and the steps to reconfigure the interface to DHCP using only nmcli.
Before starting, be aware that to reconfigure the interface to DHCP, you need to:
- Remove the IPv4 Gateway
- Remove the IPv4 Address that you statically assigned
- Change the IPv4 Method to automatic
- Down and Up the interface
Note too that you are not using examples that tell you to use -ipv4.address etc. These do not completely change the interface. To do that, you must set the IPv4.address and the IPv4.gateway to an empty string. Again, to save as much time as possible with your command, string them all together in one line:
nmcli con mod enp0s3 ipv4.gateway '' && nmcli con mod enp0s3 ipv4.address '' && nmcli con mod enp0s3 ipv4.method auto && nmcli con down enp0s3 && nmcli con up enp0s3
Running the ip addr command again should show you the same results as when you ran the changes with nmtui. You could also do everything in reverse (changing your DHCP address to a static one). To do this, you would run the commands in reverse order, starting with changing ipv4.method to manual, then setting ipv4.gateway, and finally setting ipv4.address. Since in all of these examples you are completely reconfiguring the interface and not adding or subtracting values to it, you would not use the examples that talk about +ipv4.method, +ipv4.gateway, and +ipv4.address. If you used these commands instead of the ones in the examples earlier, you would end up with an interface with BOTH a DHCP-assigned address and a statically assigned one. That said, this can be very handy at times. If you have a web service listening on one IP, let's say, and an sftp server listening on another IP. Having a way to assign multiple IPs to an interface is quite helpful.
DNS resolution
You can set the DNS servers with either nmtui or nmcli. While the nmtui interface is easy to navigate and much more intuitive, the process is much slower. Doing this with the nmcli is much faster. For DHCP-assigned addresses, it is usually not necessary to set DNS servers, as they are typically forwarded by the DHCP server. That said, you can statically add DNS servers to a DHCP interface. In the case of the statically assigned interface, you will HAVE to do this, as it will need to know how to resolve DNS and will not have an automatically assigned method.
Since the best example of all this is a statically assigned IP address, let's return to the example interface (enp0s3) and its statically assigned address. Before changing the DNS values, you need to check their current values.
To get proper name resolution, remove the existing DNS servers and add new ones. Currently, the ipv4.dns is 8.8.8.8,8.8.4.4,192.168.1.1. In this case, you do not need to set the ipv4.dns to an empty string. You can use the following command to replace your values:
nmcli con mod enp0s3 ipv4.dns '208.67.222.222,208.67.220.220,192.168.1.1'
Running nmcli con show enp0s3 | grep ipv4.dns should show you that you have successfully changed the DNS servers. To activate everything, bring your interface down and up again so that your changes are active:
nmcli con down enp0s3 && nmcli con up enp0s3
To test that you do have name resolution, try pinging a known host. Use google.com as an example:
ping google.com
PING google.com (172.217.4.46) 56(84) bytes of data.
64 bytes from lga15s46-in-f14.1e100.net (172.217.4.46): icmp_seq=1 ttl=119 time=14.5 ms
64 bytes from lga15s46-in-f14.1e100.net (172.217.4.46): icmp_seq=2 ttl=119 time=14.6 ms
64 bytes from lga15s46-in-f14.1e100.net (172.217.4.46): icmp_seq=3 ttl=119 time=14.4 ms
^C
Using the ip utility
The ip command (provided by the iproute2 package) is a powerful tool for getting information and configuring the network on a modern Linux system such as Rocky Linux.
In this example, the assumptions are the following parameters:
- interface name: enp0s3
- ip address: 192.168.1.151
- subnet mask: 24
- gateway: 192.168.1.1
Get general information
To see the detailed state of all interfaces, use
ip a
Pro tips:
- use the
-cflag to get a more readable coloured output:ip -c a. ipaccepts abbreviation soip a,ip addrandip addressare equivalent
Bring the interface up or down
Note
While it is still possible to use this method to bring the interface up and down in Rocky Linux 10, the command is much slower than simply using nmcli.
To bring the enp0s3 down and up again, you can just use:
ip link set enp0s3 down && ip link set enp0s3 up
Assign the interface a static address
Currently, your enp0s3 interface has an IP address of 192.168.1.151. To switch that to 192.168.1.152, you would remove the old IP with
ip addr delete 192.168.1.151/24 dev enp0s3 && ip addr add 192.168.1.152/24 dev enp0s3
If you wanted a second IP assigned to the interface instead of removing the 192.168.1.151 address, you would simply add the second address with:
ip addr add 192.168.1.152/24 dev enp0s3
You can verify the added IP address with:
ip a show dev enp0s3
This will output:
2: enp0s3: <BROADCAST,MULTICAST,UP,LOWER_UP> mtu 1500 qdisc fq_codel state UP group default qlen 1000
link/ether 08:00:27:ba:ce:88 brd ff:ff:ff:ff:ff:ff
inet 192.168.1.151/24 brd 192.168.1.255 scope global noprefixroute enp0s3
    valid_lft forever preferred_lft forever
inet 192.168.1.152/24 scope global secondary enp0s3
    valid_lft forever preferred_lft forever
inet6 fe80::a00:27ff:feba:ce88/64 scope link noprefixroute
    valid_lft forever preferred_lft forever
While bringing the interface down and up using the ip utility is much slower than nmcli, ip has a distinct advantage when setting new or additional IP addresses, as it happens in real time, without bringing the interface down and up.
Gateway configuration
Now that the interface has an address, you have to set its default route. You can do this with:
ip route add default via 192.168.1.1 dev enp0s3
You can display the kernel routing table with:
ip route
or ip r for short.
This should output something similar to this:
default via 192.168.1.1 dev enp0s3
192.168.1.0/24 dev enp0s3 proto kernel scope link src 192.168.1.151 metric 100
Checking network connectivity
Throughout this document's examples you have done some testing. Your best bet for testing is to start by pinging the default gateway. This should always work:
ping -c3 192.168.1.1
PING 192.168.1.1 (192.168.1.1) 56(84) bytes of data.
64 bytes from 192.168.1.1: icmp_seq=1 ttl=64 time=0.437 ms
64 bytes from 192.168.1.1: icmp_seq=2 ttl=64 time=0.879 ms
64 bytes from 192.168.1.1: icmp_seq=3 ttl=64 time=0.633 ms
Next, test to see if your LAN routing is working completely by pinging a host on your local network:
ping -c3 192.168.1.10
PING 192.168.1.10 (192.168.1.10) 56(84) bytes of data.
64 bytes from 192.168.1.10: icmp_seq=2 ttl=255 time=0.684 ms
64 bytes from 192.168.1.10: icmp_seq=3 ttl=255 time=0.676 ms
Test to ensure you can see a reachable host external to your network. For this test, the example uses Google's open DNS server:
ping -c3 8.8.8.8
PING 8.8.8.8 (8.8.8.8) 56(84) bytes of data.
64 bytes from 8.8.8.8: icmp_seq=1 ttl=119 time=19.8 ms
64 bytes from 8.8.8.8: icmp_seq=2 ttl=119 time=20.2 ms
64 bytes from 8.8.8.8: icmp_seq=3 ttl=119 time=20.1 ms
The final test is to ensure that DNS resolution is working. For this example, use google.com:
ping -c3 google.com
PING google.com (172.217.4.46) 56(84) bytes of data.
64 bytes from lga15s46-in-f14.1e100.net (172.217.4.46): icmp_seq=1 ttl=119 time=14.5 ms
64 bytes from lga15s46-in-f14.1e100.net (172.217.4.46): icmp_seq=2 ttl=119 time=15.1 ms
64 bytes from lga15s46-in-f14.1e100.net (172.217.4.46): icmp_seq=3 ttl=119 time=14.6 ms
If you have several interfaces on your machine and you want to test from a particular interface, use the -I option with ping:
ping -I enp0s3 -c3 192.168.1.10
Conclusion
There are many changes to the networking stack in Rocky Linux 10. Among these is the removal of Network-Scripts, and with it, the possibility of using ifcfg. Instead, Rocky Linux 10 uses keyfiles. This document focused on the use of Network Manager and the underlying tools, nmcli, and nmtui. In addition, this document shows the ip command along with examples of its use for network configuration.
Contributors: Steven Spencer, Hayden Young, Ganna Zhyrnova