Overview
In this guide, you will walk through the process of acquiring a kernel source tree, configuring it, compiling it, installing and booting it.
!!! warning "Kernel rebuilds are not recommended nor supported for Rocky Linux. This guide is best used for educational purposes only.
The kernel
Most often, when people say Linux, they are usually referring to a "Linux distribution" - for example, Rocky Linux and Debian are types of Linux distribution. A distribution comprises everything necessary to get Linux to exist as a functional operating system. Distributions make use of code from various open source projects that are independent of Linux.
Linux is The kernel. The kernel literally sits right at the heart of the [operating system] matter.
The only thing more fundamental than the kernel is the system hardware itself. Although the kernel is a small part of a complete Linux distribution, it is by far the most critical element. If the kernel fails or crashes, the rest of the system goes with it.
The kernel source code
The Rocky Linux distribution has the source code for the specific kernel version it supports available in one form or another. These could be in the form of a compiled binary (*.src.rpm), a source RPM (*.srpm), and so on.
If you need to download a different (possibly newer) version than the one your specific Rocky Linux distribution provides, the first place to look for the source code is at the official kernel website:
This site maintains a listing of websites mirroring the kernel source, and tons of other open source software, distributions, and general-purpose utilities.
The list of maintained mirrors is at:
Tip
The majority of the downloading, configuring and compiling of the Linux kernel done in the following sections can/should be done as an unprivileged user. However, the final steps that require actual installation or altering of system files and binaries need to be done with elevated privileges.
You are able to do most of the work as an unprivileged user because you will be using a special kernel build option, which allows you to specify a custom working or output directory. Specifically, you will use the O=~/build/kernel option for all applicable invocations of make.
Where ~/build/kernel is equivalent to /home/$USER/build/kernel or $HOME/build/kernel
Kernel versions and naming conventions
The website listing of kernels available will contain folders for v1.0, v2.5, v2.6, v3.0, v3.x, v4.x, v5.x, v6.x and so forth. Before you follow your natural inclination to get the latest version, make sure you understand how the Linux kernel versioning system works.
The current convention is to name and number major new kernel releases as “Linux 5.x” (also called the vanilla or mainline kernels). Thus, the first of this series will be Linux version 5.0 (same as 5.0.0), the next will be Linux version 5.1 (same as 5.1.0), followed by Linux version 5.2, and so on.
The third digit represents any minor changes or updates within each major release version. These are commonly referred to as stable point releases. Thus, the next stable point release for the 5.0.0 series kernel will be Linux version 5.0.1, followed by version 5.0.2, and so forth. Another way of stating this is to say, for example, that Linux version 5.0.4 is the fourth stable release based on the Linux 5.0.0 series.
Installing prerequisite tools and libraries
Not having all the requisite software available for compiling and building the mainline Linux Kernel is a common source of failure encountered during the kernel build process. You can install the missing tools and libraries with the DNF package manager on a Rocky Linux distribution. You can take care of that here.
-
On a Rocky Linux distribution, you can quickly get most of the necessary development tools installed by running this command:
sudo dnf -y groupinstall 'Development Tools' -
By installing the following packages, you will obtain the other libraries, header files, and applications needed. Type:
sudo dnf -y install ncurses-devel openssl-devel elfutils-libelf-devel python3 -
You need other utilities only available in special repositories. One such repository is the CRB (Code Ready Builder) repository. Enable that repository on our Rocky system with:
sudo dnf config-manager --set-enabled crb -
Finally, install one of the needed packages from the CRB repository with:
sudo dnf -y install dwarves
That is it for the prerequisite packages needed for actually building the kernel.
Downloading and unpacking the Linux kernel
The version of the kernel that you are going to build in the following section is version 6.5.7.
Let us begin the process.
-
First, download the kernel source into your current working directory using the following
curlcommand. Type:curl -L -o linux-6.5.7.tar.xz \ https://www.kernel.org/pub/linux/kernel/v6.x/linux-6.5.7.tar.xz -
The kernel source that you will download from the Internet is a compressed, tarred file. Therefore, you need to decompress and extract the source file to use the source.
Ensure you are in the directory containing the download of the Kernel tarball. Use the
tarcommand to unpack and decompress the file, by running:tar xvJf linux-6.*.tar.xz
Building the kernel
In this section, you are going to review the process of configuring and building a kernel. This is in contrast to macOS or Windows-based operating systems, which come pre-configured and therefore contain support for many features you might or might not want.
The Linux design philosophy allows the individual to decide on the important parts of the kernel. This individualized design has the important benefit of letting you thin down the feature list so that Linux can run as efficiently as possible.
This is also one of the reasons why it is possible to customize Linux to run in various hardware setups, from low-end systems, to embedded systems, to high-end systems.
Building the kernel requires two main steps:
- configuring
- compiling
The first step in building the kernel is configuring its features. Usually, you will base your feature list on whatever hardware you need to support. This means that you will need a list of that hardware.
On a system that is already running Linux, you can run commands such as – lspci, lshw, and so on, to help show detailed information about the exact hardware setup on your system. These utilities come from pciutils*.rpm and lshw*.rpm packages on RPM-based distributions.
Having a better understanding of what constitutes your underlying hardware can help you better determine what you need in your custom kernel. You are ready to start configuring the kernel.
Sanitizing the build environment
You can begin the actual configuration with a rough idea of the types of hardware and features that your new kernel needs to support. But first, some background information.
The Linux kernel source tree contains several files named Makefile (a makefile is simply a text file with directives and it also describes the relationships among the files in a program).
These makefiles help to glue together the thousands of other files that make up the kernel source. What is more important to you here is that the makefiles also contain targets. The targets are the commands, or directives, run by the make program.
warning: Avoid Needless Kernel Upgrades
Bear in mind that if you have a working system that is stable and well behaved, there is little reason to upgrade the kernel unless one of these conditions holds for you:
- A security or bug fix affects your system and must be applied
- You need a specific new feature in a stable release
In the case of a security fix, decide whether the risk really affects you - for example, if the security issue is found in a device driver that you do not use, then there may be no reason to upgrade. In the case of a bug fix release, read carefully through the release notes and decide if the bugs really affect you-if you have a stable system, upgrading the kernel with patches you never use may be pointless.
On production systems, the kernel should not simply be upgraded just to have “the latest kernel”; you should have a truly compelling reason to upgrade.
The Makefile in the root of the kernel source tree contains specific targets used in prepping the kernel build environment, configuring the kernel, compiling the kernel, installing the kernel, and so on. Some additional details regarding these targets are:
make mrproper-
This target cleans up the build environment of any stale files and dependencies that left over from a previous kernel build. It cleans (deletes) all previous kernel configurations from the build environment.
make clean-
This target does not do as thorough a job as the
mrpropertarget. It deletes only most generated files. It does not delete the kernel configuration file (.config). make menuconfig-
This target invokes a text-based editor interface with menus, option lists, and text-based dialog boxes for configuring the kernel.
make xconfig-
This GUI-based kernel configuration tool/target relies on the Qt graphical development libraries. KDE/Plasma-based applications use these libraries.
make gconfig-
This is also a GUI-based kernel configuration tool/target but relies on the GTK+ toolkit. This GTK+ toolkit is heavily used in the GNOME desktop world.
make olddefconfig-
This target uses the existing
.configfile in the current working directory, updates the dependencies, and automatically sets new symbols to their default values. make help-
This target will show you all the possible targets and serve as a quick online help system.
You will use only one of the targets to configure the kernel in this section. In particular, you will use the make menuconfig command. The menuconfig kernel configuration editor is a simple and popular text-based configuration utility that consists of menus, radio button lists, and dialogs.
It has a simple and clean interface that can be easily navigated with your keyboard and is almost intuitive to use.
You need to change (cd) into the kernel source directory, and then you can begin the kernel configuration.
Before beginning the actual kernel configuration, you should clean (prepare) the kernel build environment by using the make mrproper command:
cd linux-6.*/
make  O=~/build/kernel mrproper
Kernel configuration
Next, you will begin configuring a Linux 6.* series kernel. To explore some of the innards of this process, you will enable the support of a specific feature that you will pretend is a MUST have feature on the system. Once you understand how this works, you can apply the same procedure to add support for any new kernel feature you want. Specifically, you will enable support for the NTFS file system into our custom kernel.
Most modern Linux distributions ship with a kernel configuration file for the running kernel, available on the local file system as a compressed or regular file. On your sample Rocky system, this file resides in the /boot directory and is usually named something like config-*.
The configuration file contains a list of the options and features enabled for the particular kernel it represents. Your goal is to create a configuration file similar to this one through the process of configuring the kernel. The only difference between the file you will create and the ready-made one is that you will add further minor customization to yours.
Tip
Using a known, preexisting configuration file as a framework for creating your own custom file helps ensure that you do not waste too much time duplicating the efforts that other people have already put into finding what works and what does not work.
The following steps cover how to configure the kernel. You will be using a text-based kernel configuration utility. You can follow along in your terminal regardless of whether you are using a GUI desktop environment or not.
-
To begin, you will copy over and rename the preexisting configuration file from the
/bootdirectory into your kernel build environment:cp /boot/config-`uname -r` ~/build/kernel/.configYou use
uname -rhere to help you obtain the configuration file for the running kernel. Theuname -rcommand prints the running kernel’s release. Using it helps ensure that you are getting the exact version you want, just in case other versions are present.Note
The Linux kernel configuration editor starts explicitly looking for and generates a file named
.config(pronounced “dot config”) at the root of the kernel source tree. This file is hidden. -
Launch the graphical kernel configuration utility:
make O=~/build/kernel menuconfigA screen similar to this will appear:
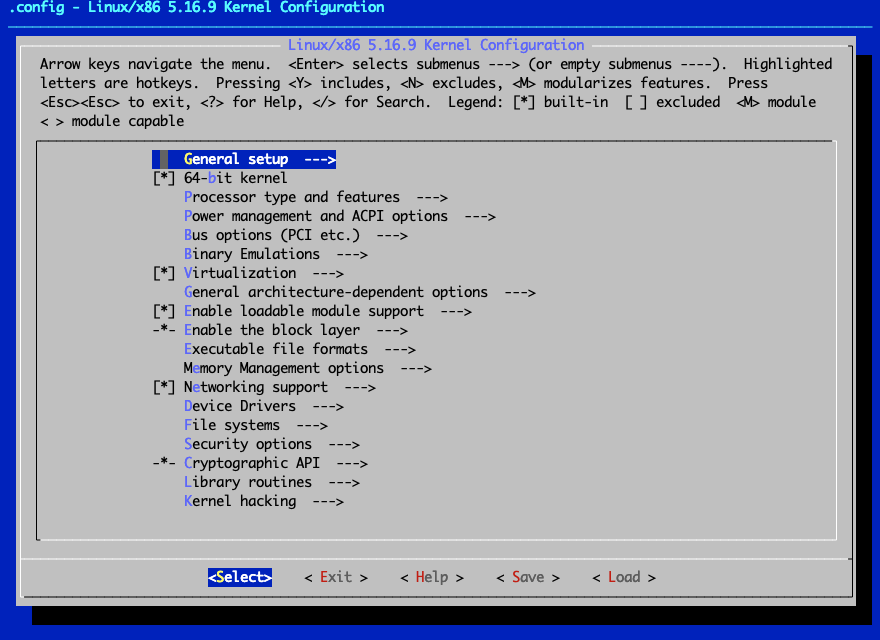
There are roughly three areas in the kernel configuration screen that is displayed. The top part shows helpful information, keyboard shortcuts, and legends to help you navigate the application. The main body of the screen shows an expandable tree-structured list of the overall configurable kernel options. You can further drill down into items with arrows in the parent to view or configure sub-menu (or child) items. Finally, the bottom of the screen displays the actions or options the user can select.
-
Next, you will add support for NTFS into your custom kernel for demonstration purposes.
While at the main configuration screen, use your arrow keys to navigate to and highlight the File systems item. With File systems selected, press enter to view the sub-menu or child items for File systems.
In the File Systems section, use your arrow keys to navigate to DOS/FAT/NT Filesystems. Press enter to see the child items for DOS/FAT/NT Filesystems.
-
In the DOS/FAT/NT Filesystems section, navigate to NTFS file system support.
Type M (uppercase) to enable modules to support for the NTFS file system.
Use the arrow keys to navigate down to NTFS debugging support (NEW) and then press y to include it.
Use the arrow keys to navigate down to NTFS write support and then press Y to include it. When done, the letter
Mor an asterisk symbol (*) should appear beside each option, as with the ones shown here: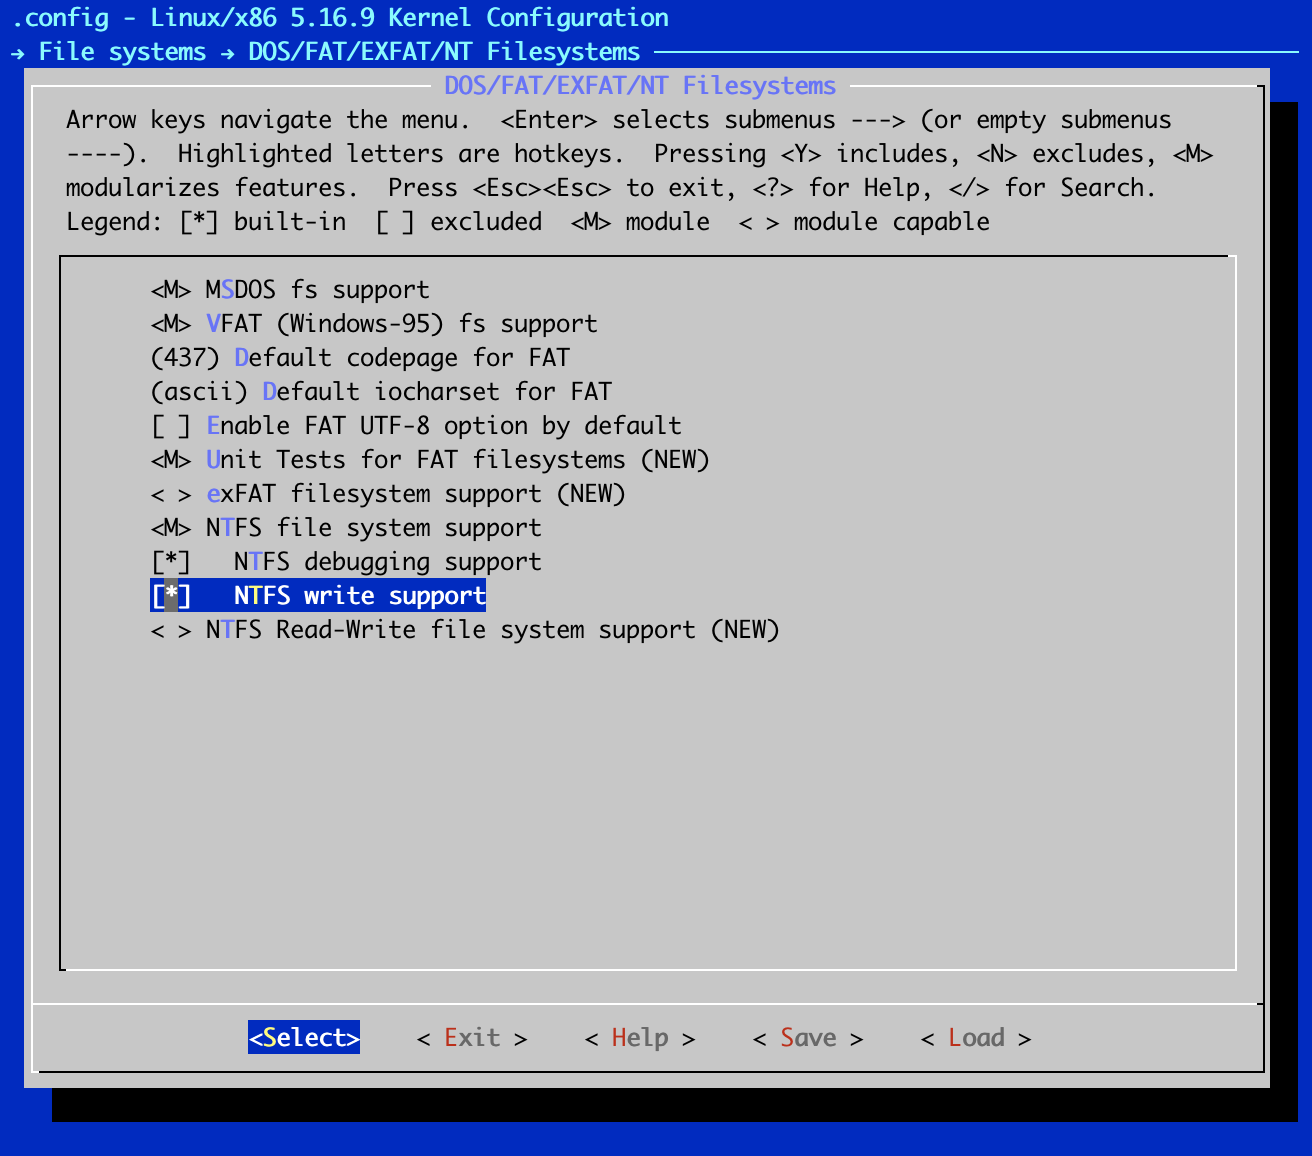
Tip
For each of the configurable options, in the kernel configuration utility, empty angle parentheses, <>, indicates that the feature in question is disabled. The letter
Min angle parentheses,, indicates that the feature is to be compiled as a module. And the asterisk symbol in angle parentheses, <*>, indicates that support for the feature will be directly built into the kernel. You can usually toggle through all the possible options using the spacebar on your keyboard.
-
Navigate back to the parent File Systems screen by pressing the Esc key twice on your keyboard in the DOS/FAT/NT Filesystems screen. Return to the main kernel configuration screen by pressing Esc twice again on your keyboard.
-
Finally, save your changes to the
.configfile in the root of your kernel source tree and exit the kernel configuration application after saving the file by pressing Esc twice again on your keyboard. -
A dialog box will appear prompting you to save your new configuration. Make sure that your selection is "Yes" and then press enter.
-
After the kernel configuration utility exits, you will be back to your shell-inside the kernel source tree. You are almost ready to build your kernel.
-
You need to complete a few more customizations on our Rocky distribution. Type:
sed -ri '/CONFIG_SYSTEM_TRUSTED_KEYS/s/=.+/=""/g' ~/build/kernel/.configTip
To view the results of some of the changes you made using the menuconfig tool, use the grep utility to view the
.configfile that you saved directly. For example, to view the effect of the NTFS file system support that you previously enabled, type the following:$ grep NTFS ~/build/kernel/.config CONFIG_NTFS_FS=m CONFIG_NTFS_DEBUG=y CONFIG_NTFS_RW=yA quick note on kernel modules
Loadable module support is a Linux kernel feature that allows kernel modules' dynamic loading (or removal).
Kernel modules are pieces of compiled code that can be dynamically inserted into the running kernel, rather than being permanently built into the kernel. Features not often used can thus be enabled, but they will not occupy any room in memory when they are not being used.
Thankfully, the Linux kernel can automatically determine what to load and when. Naturally, not every feature is eligible to be compiled as a module. The kernel must know a few things before it can load and unload modules, such as how to access the hard disk and parse through the file system where the loadable modules are stored. Some kernel modules are also commonly referred to as drivers.
Compiling the kernel
In the preceding section, you walked through the process of creating a configuration file for the custom kernel that you want to build. In this section, you will perform the actual build of the kernel. But before doing this, you will add one simple customization to the entire process.
The final customization will be to add an extra piece of information used in the final name of our kernel. This will help us be able to differentiate this kernel from any other kernel with the same version number. You will add the tag “custom” to the kernel version information. Do this by editing the main Makefile and appending the tag that you want to the EXTRAVERSION variable.
The compilation stage of the kernel-building process is by far the easiest, but it also takes the most time. Just run the make command, which will then automatically generate and take care of any dependency issues, compile the kernel itself, and compile any features (or drivers) enabled as loadable modules.
Because of the amount of code compilation needed, prepare to wait a few minutes at the very least, depending on your system's processing power. Let us dig into the specific steps required to compile your new kernel.
-
First, you will add an extra piece to the identification string for the kernel you are about to build. While still in the root of the kernel source tree, you will use the
sedutility to edit the Makefile in place. The variable you want to change is close to the top of the file. You want to change the line in the file that looks like this:EXTRAVERSION =To this:
EXTRAVERSION = -customUse the following
sedcommand to make the change. Type:sed -i 's/^EXTRAVERSION.*/EXTRAVERSION = -custom/' MakefileYou can also use any text editor that you are comfortable with to make the change. Just remember to save your changes to the file.
-
Pass the kernelversion target to the make command to view the full version of the kernel that you just customized:
make O=~/build/kernel kernelversionTip
You can take advantage of all that extra processing power (CPUs, cores and so on) on most modern systems and greatly speed up CPU-intensive operations like compiling the kernel. To do this, you can pass a parameter to the make command that specifies the number of jobs to run simultaneously. The specified number of jobs are then distributed and executed simultaneously on each CPU core. The syntax for the command is:
```bash make -j N ``` where N is the number of jobs to run simultaneously. For example, if you have a octa (8) core–capable CPU, you can type: ```bash make -j 8 ``` -
The only needed command to compile the kernel is the
makecommand:$ make O=~/build/kernel make[1]: Entering directory '/home/super/build/kernel' SYNC include/config/auto.conf.cmd GEN Makefile HOSTCC scripts/kconfig/conf.o HOSTLD scripts/kconfig/conf GEN Makefile ...<OUTPUT TRUNCATED>… LD [M] sound/usb/usx2y/snd-usb-usx2y.ko LD [M] sound/x86/snd-hdmi-lpe-audio.ko LD [M] sound/xen/snd_xen_front.ko LD [M] virt/lib/irqbypass.ko make[1]: Leaving directory '/home/super/build/kernel' -
The end product of this command (that is, the kernel) is sitting pretty and waiting in the path:
~/build/kernel/arch/x86/boot/bzImage -
You need to install the modules because you compiled portions of the kernel as modules (for example, the NTFS module). Type the following:
sudo make O=~/build/kernel modules_installOn your Rocky system, this command will install all the compiled kernel modules into the
/lib/modules/<new_kernel-version>directory. This path will translate to/lib/modules/6.5.7-custom/in this example. This is the path from which the kernel will load all loadable modules, as needed.Tip
The footprint (size) of the kernel modules installed via
make modules_installcan get pretty significant because the modules include debugging symbols. As a result, you could easily end up with a/lib/modules/6.5.7-custom/directory that is close to 5GB in size!For this guide you avoid this large size by including the
INSTALL_MOD_STRIP=1option in yourmake modules_installinvocation. You can reduce the total size by orders of magnitude (For example - less than 200 MB) by stripping away these debugging symbols.This can be done by including the
INSTALL_MOD_STRIP=1option to themake modules_installcommand.
Installing the kernel
Assuming you have a PC and are working out of the ~/build/kernel/ directory, the compiled kernel that you created in the last exercise will be in this path - <kernel-build-dir>/arch/x86/boot/bzImage or, to be precise, in our example ~/build/kernel/arch/x86/boot/bzImage.
The location of the corresponding map file for this is at ~/build/kernel/System.map. You will need both files for the install phase.
The System.map file is useful when the kernel is misbehaving and generating “Oops” messages. “Oops” messages generate on some kernel errors because of kernel bugs or faulty hardware.
This error is akin to the Blue Screen of Death (BSOD) in Microsoft Windows. These messages include a lot of detail about the system's current state, including several hexadecimal numbers.
System.map allows Linux to turn those hexadecimal numbers into readable names, making debugging easier. Although this is mainly for the benefit of developers, it can be handy when you are reporting a problem.
Let us go through the steps required to install the new kernel image.
-
While in the root of your kernel build directory, copy and rename the
bzImagefile into the/bootdirectory:sudo cp ~/build/kernel/arch/x86/boot/bzImage \ /boot/vmlinuz-<kernel-version>Here,
<kernel-version>is the version number of the kernel. The filename for the example kernel you are using in this guide isvmlinuz-6.5.7-custom. So here is the exact command for this example:sudo cp ~/build/kernel/arch/x86/boot/bzImage \ /boot/vmlinuz-6.5.7-customNote
The decision to name the kernel image
vmlinuz-6.5.7-customis somewhat arbitrary. It is convenient, because kernel images are commonly referred to as vmlinuz, and the suffix of the version number is useful when you have multiple kernels available or kernels that provide specific functionality (For examplevmlinuz-6.50.0-ws). -
Now that the kernel image is in place, copy over and rename the corresponding
System.mapfile into the/bootdirectory using the same naming convention:sudo cp -v ~/build/kernel/System.map \ /boot/System.map-6.5.7-custom -
With the kernel in place, the
System.mapfile in place, and the modules in place, you are now ready for the final step. The syntax for the command needed is:kernel-install add <kernel-version> <kernel-image>Here,
<kernel-version>is the version number (and name) of the kernel. And<kernel-image>is the path to the newly compiled kernel image.For our example, type:
sudo kernel-install \
add  6.5.7-custom /boot/vmlinuz-6.5.7-custom
The kernel-install command is a nifty shell script. It might not be available in every Linux distribution, but it is available in newer Fedora, RHEL, CentOS distributions. This tool automates many of the final manual things you would ordinarily have to do to set up the system to boot the new kernel you just built.
In particular, the tool does the following:
- It creates the appropriate initial RAM file system image (the initramfs image-that is, the
/boot/initramfs-<kernel-version>.imgfile). To do this manually on systems wherekernel-installis not available, use themkinitramfscommand. - It runs the
depmodcommand (which creates a list of module dependencies). - It updates the boot loader configuration.
For systems running the newer versions of GRUB2, the file will be /boot/grub2/grub.cfg. For EFI based systems /boot/efi/<distro>/fedora/grub.cfg is also updated.
And for systems running the legacy versions of GRUB, this will be the /boot/grub/grub.conf or /boot/grub/menu.lst file. And for very new distribution that implements the new Boot Loader Specification (BLS), there is an addition of a new boot loader entry to the /boot/loader/entries/ directory, or any directory pointed to by the variable named blsdir.
On your demo EFI based Rocky server running GRUB2 using BLS, the creation of a new boot entry is in the boot loader file located here: /boot/loader/entries/6fa25ca775f64accb0d3e53f0e4e6e92-6.5.7-custom.conf
$ sudo cat  /boot/loader/entries/6fa25ca775f64accb0d3e53f0e4e6e92-6.5.7-custom.conf
title Rocky Linux (6.5.7-custom) 8.5 (Green Obsidian)
version 6.5.7-custom
linux /vmlinuz-6.5.7-custom
initrd /initramfs-6.5.7-custom.img $tuned_initrd
options $kernelopts $tuned_params
id rocky-20220212013135-6.5.7-custom
grub_users $grub_users
grub_arg --unrestricted
grub_class kernel
Note
Most distributions have several grub2-* utilities readily available that can be used for performing various GRUB2 and boot loader housekeeping tasks. For example, you can use the grub2-set-default command to change or set the default kernel to boot at system startup.
Booting the custom kernel
The next stage is to test the kernel to ensure the system can boot with it.
-
Assuming you did everything the exact way that the doctor prescribed and that everything worked out exactly as the doctor said it would, you can safely reboot the system and select the new kernel from the boot loader menu during system bootup:
sudo reboot -
After the system boots up, you can use the
unamecommand to discover the name of the current kernel:$ uname -r 6.5.7-custom -
You will recall that one of the features that you added to your new kernel is the ability to support the NTFS file system. Ensure that the new kernel does indeed have support for NTFS by displaying information about the NTFS module:
[rockstar ~]$ modinfo ntfs
filename:       /lib/modules/6.5.7-custom/kernel/fs/ntfs/ntfs.ko
license:        GPL
version:        2.1.32
description:    NTFS 1.2/3.x driver - Copyright …..
...OUTPUT TRUNCATED...
That is all there is.
Author: Wale Soyinka
Contributors: Steven Spencer, Louis Abel, Ganna Zhyrnova