All of the examples in this document use root actions, with ordinary user actions commented separately. In the markdown code block, the command description will be indicated with # on the previous line.
Review basic permissions
It is well known that the basic permissions of GNU/Linux can be viewed using ls -l:
Shell > ls -l
-  rwx  r-x  r-x  1  root  root    1358  Dec 31 14:50  anaconda-ks.cfg
↓   ↓    ↓    ↓   ↓   ↓     ↓       ↓        ↓            ↓
1   2    3    4   5   6     7       8        9            10
Their meanings are as follows:
| Part | Description |
|---|---|
| 1 | File type. - indicates that this is an ordinary file. Seven file types will be introduced later. |
| 2 | Permissions of the owner user, the meaning of rwx respectively means: read, write, execute. |
| 3 | Permissions of the owner group. |
| 4 | Permissions of other users. |
| 5 | Number of subdirectories (. and .. included). For a file, it represents the number of hard links, and 1 represents itself. |
| 6 | Name of the owner user. |
| 7 | Name of the owner group. |
| 8 | For files, it shows the file size. For directories, it shows the fixed 4096 bytes occupied by the file name. To calculate the total size of a directory, use du -sh |
| 9 | Last modified date. |
| 10 | The name of the file (or directory). |
Seven file types
| File types | Description |
|---|---|
| - | Represents an ordinary file. Including plain text files (ASCII); binary files (binary); data format files (data); various compressed files. |
| d | Represents a directory file. By default, there is one in every directory . and ... |
| b | Block device file. Including all kinds of hard drives, USB drives, and so on. |
| c | Character device file. Interface device of a serial port, such as a mouse, keyboard, etc. |
| s | Socket file. It is a file specially used for network communication. |
| p | Pipe file. It is a special file type; its main purpose is to resolve errors caused by multiple programs accessing a file at the same time. FIFO is the abbreviation of first-in-first-out. |
| l | Soft link files, also called symbolic link files, are similar to shortcuts in Windows. Hard link file, also known as a physical link file. |
The meaning of basic permissions
For file:
| Digital representation | Permissions | Description |
|---|---|---|
| 4 | r(read) | Indicates that you can read this file. You can use commands such as cat, head, more, less, tail, etc. |
| 2 | w(write) | Indicates that the file can be modified. Commands such as vim can be used. |
| 1 | x(execution) | Permissions for executable files (such as scripts or binaries). |
For directory:
| Digital representation | Permissions | Description |
|---|---|---|
| 4 | r(read) | Indicates that the contents of the directory can be listed, such as ls -l. |
| 2 | w(write) | Indicates that you can create, delete, and rename files in this directory, such as commands mkdir, touch, rm, etc. |
| 1 | x(execute) | Indicates that you can enter the directory, such as the command cd. |
Info
For directories, the r and x permissions usually appear together.
Special permissions
In GNU/Linux, in addition to the basic permissions mentioned above, there are special permissions that we will introduce one by one.
ACL permissions
Q: What is ACL?
ACL (Access Control List) solves the problem that the three identities under Linux cannot meet the needs of resource permission allocation.
For example, the teacher gives lessons to the students and creates a directory under the OS's root directory. Only students in this class are allowed to upload and download; others are not. At this point, the directory's permissions are 770. One day, a student from another school came to listen to the teacher and asked how permissions should be assigned. If you put this student in the owner group, he will have the same permissions as the students in this class - rwx. If the student is added to the other usersgroup, he will not have any permissions. At this time, the default permission allocation cannot meet the requirements; you need to use ACLs.
There is a similar feature in Windows. For example, to assign permissions to a user for a file, for a user-defined directory/file, right-click ---> Properties ---> Security ---> Edit ---> Add ---> Advanced ---> Find now, find the corresponding user/group ---> assign specific permissions ---> apply, and complete.
The same is true of GNU/Linux: add the specified user/group to the file/directory and grant the appropriate permissions to complete the ACL permission assignment.
Q: How do I enable an ACL?
You need to find the device's file name and the mount point's partition number. For example, on my machine, you could do something like this:
Shell > df -hT
Filesystem     Type      Size  Used  Avail Use% Mounted on
devtmpfs       devtmpfs  3.8G     0  3.8G    0% /dev
tmpfs          tmpfs     3.8G     0  3.8G    0% /dev/shm
tmpfs          tmpfs     3.8G  8.9M  3.8G    1% /run
tmpfs          tmpfs     3.8G     0  3.8G    0% /sys/fs/cgroup
/dev/nvme0n1p2 ext4       47G   11G   35G   24% /
/dev/nvme0n1p1 xfs      1014M  187M  828M   19% /boot
tmpfs          tmpfs     774M     0  774M    0% /run/user/0

Shell > dumpe2fs /dev/nvme0n1p2 | head -n 10
dumpe2fs 1.45.6 (20-Mar-2020)
Filesystem volume name:   <none>
Last mounted on:          /
Filesystem UUID:          c8e6206d-2892-4c22-a10b-b87d2447a885
Filesystem magic number:  0xEF53
Filesystem revision #:    1 (dynamic)
Filesystem features:      has_journal ext_attr resize_inode dir_index filetype needs_recovery extent 64bit flex_bg sparse_super large_file huge_file dir_nlink extra_isize metadata_csum
Filesystem flags:         signed_directory_hash
Default mount options:    user_xattr acl
Filesystem state:         clean
Errors behavior:          Continue
When you see the line "Default mount options: user_xattr acl", it indicates that ACL has been enabled. If it is not enabled, you can also enable it temporarily -- mount -o remount,acl /. It can also be enabled permanently:
Shell > vim /etc/fstab
UUID=c8e6206d-2892-4c22-a10b-b87d2447a885  /   ext4    defaults,acl        1 1

Shell > mount -o remount /
# or
Shell > reboot
Viewing and setting of ACL
To view ACL, you need to use the getfacle command -- getfacle FILE_NAME
To set ACL permissions, use the setfacl command.
Shell > setfacl <option> <FILE_NAME>
| Option | Description |
|---|---|
| -m | modify the current ACL(s) of file(s) |
| -x | remove entries from the ACL(s) of file(s) |
| -b | remove all extended ACL entries |
| -d | operations apply to the default ACL |
| -k | remove the default ACL |
| -R | recurse into subdirectories |
Use the teacher's example mentioned at the beginning of the article to illustrate ACL.
# The teacher is the root user
Shell > groupadd class1
Shell > mkdir /project
Shell > chown root:class1 /project
Shell > chmod 770 /project
Shell > ls -ld /project/
drwxrwx--- 2 root class1 4096 Jan  12 12:58 /project/

# Put the students in the class into the class1 group
Shell > useradd frank
Shell > passwd frank
Shell > useradd aron
Shell > passwd aron
Shell > gpasswd -a frank class1
Shell > gpasswd -a aron class1

# A student from another school came to listen to the teacher
Shell > useradd tom
Shell > passwd tom
# If it is a group, "u" here should be replaced by "g"
Shell > setfacle -m u:tom:rx  /project

# "+" sign is added in the output message
Shell > ls -ld /project/
drwxrwx---+ 2 root class1 4096 Jan  12 12:58 /project/

Shell > getfacl -p /project/
# file: /project/
# owner: root
# group: class1
user::rwx
user:tom:r-x
group::rwx
mask::rwx
other::---
Maximum valid permissions of ACL
Q: When using the getfacl command, what does the "mask:: rwx" in the output message mean?
The mask specifies the maximum valid permissions. The permissions given to the user are not real permissions; the real permissions can only be obtained by using the "logical and" of the user's permissions and mask permissions.
Info
"Logical and" means: that if all are true, the result is true; if there is one false, the result is false.
| Permissions set by users | Mask permissions | Result |
|---|---|---|
| r | r | r |
| r | - | - |
| - | r | - |
| - | - | - |
Info
Because the default mask is rwx, the result of any user's ACL permissions is their own permissions.
You can also adjust mask permissions:
Shell > setfacl -m u:tom:rwx /project
Shell > setfacl -m m:rx /project

Shell > getfacl  -p /project/
# file: project/
# owner: root
# group: class1
user::rwx
user:tom:rwx                    #effective:r-x
group::rwx                      #effective:r-x
mask::r-x
other::---
Delete ACL permission
# Delete the ACL permissions of user/group in the specified directory
Shell > setfacl -x u:USER_NAME FILE_NAME
Shell > setfacl -x g:GROUP_NAME FILE_NAME

# Removes all ACL permissions for the specified directory
Shell > setfacl -b FILE_NAME
Default and recursion of ACL permissions
Q: What is the recursion of ACL permissions?
For ACL permissions, this means that when the parent directory sets ACL permissions, all subdirectories and subfiles inherit those permissions.
Info
Recursion is suitable for files/directories that already exist in the directory.
Look at the following example:
Shell > setfacl -m m:rwx /project
Shell > setfacl -m u:tom:rx /project

Shell > cd /project
Shell > touch file1 file2
# Because there is no recursion, the file here does not have ACL permission.
Shell > ls -l
-rw-r--r-- 1 root root 0 Jan  12 14:35 file1
-rw-r--r-- 1 root root 0 Jan  12 14:35 file2

Shell > setfacl -m u:tom:rx -R /project
Shell > ls -l /project
-rw-r-xr--+ 1 root root 0 Jan  12 14:35 file1
-rw-r-xr--+ 1 root root 0 Jan  12 14:35 file2
Q: If I create a new file in this directory, does it inherit the ACL permissions?
The answer is no, because the newly created file is after the command setfacl -m u:tom:rx -R /project is executed.
Shell > touch /project/file3
Shell > ls -l /project/file3
-rw-r--r-- 1 root root 0 Jan  12 14:52 /project/file3
If you want the newly created directory/file to also have ACL permissions, you need to use default ACL permissions.
Shell > setfacl -m d:u:tom:rx  /project
Shell > cd /project && touch file4 && ls -l
-rw-r-xr--+ 1 root root 0 Jan  12 14:35 file1
-rw-r-xr--+ 1 root root 0 Jan  12 14:35 file2
-rw-r--r--  1 root root 0 Jan  12 14:52 file3
-rw-rw----+ 1 root root 0 Jan  12 14:59 file4

Shell > getfacl -p /project
# file: /project
# owner: root
# group: class1
user::rwx
user:tom:r-x
group::rwx
mask::rwx
other::---
default:user::rwx
default:user:tom:r-x
default:group::rwx
default:mask::rwx
default:other::---
Info
When using the default and recursive options of ACL permissions, the setfacl command must operate on a directory. If the operation object is a file, an error prompt will be output.
SetUID
The role of "SetUID":
- Only executable binaries can set SUID permissions.
- The executor of the command should have x permission to the program.
- The executor of the command obtains the identity of the owner of the program file when executing the program.
- The identity change is only valid during execution, and once the binary program is finished, the executor's identity is restored to the original identity.
Q: Why does GNU/Linux need such strange permissions?
Take the most common passwd command as an example:
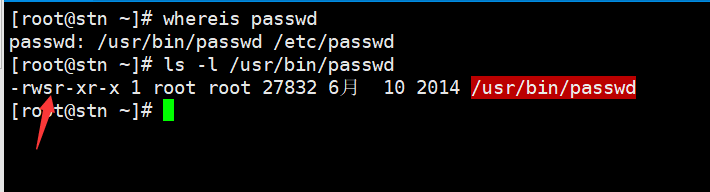
As you can see, ordinary users have only r and x, but the owner's x becomes s, proving that the passwd command has SUID permissions.
It is well known that the ordinary users (uid >= 1000) can change their own passwords. The real password is stored in the /etc/shadow file, but the shadow file has a permission of 000, so ordinary users do not have any permissions.
Shell > ls -l /etc/shadow
---------- 1 root root 874 Jan  12 13:42 /etc/shadow
Since ordinary users can change their passwords, the system must store their passwords in the /etc/shadow file. When an ordinary user executes the passwd command, it will temporarily change to the owner of the file -- root. For the shadow file, root can not be restricted by permissions. This is why the passwd command needs SUID permission.
As mentioned earlier, basic permissions can be represented by numbers, such as 755, 644, and so on. SUID is represented by 4. For executable binaries, you can set permissions like this -- 4755.
# Set SUID permissions
Shell > chmod 4755 FILE_NAME
# or
Shell > chmod u+s FILE_NAME

# Remove SUID permission
Shell > chmod 755 FILE_NAME
# or
Shell > chmod u-s FILE_NAME
Warning
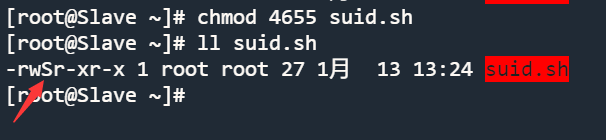
When the owner of an executable binary file/program does not have x, the use of capital S means that the file cannot use SUID permissions.
# Suppose this is an executable binary file
Shell > vim suid.sh
#!/bin/bash
cd /etc && ls

Shell > chmod 4644 suid.sh
Warning
Because SUID can temporarily change ordinary users to root, you need to be especially careful with files with this permission when maintaining the server. You can find files with SUID permissions by using the following command:
Shell > find / -perm -4000 -a -type f -exec ls -l {} \;
SetGID
The role of "SetGID":
- Only executable binaries can set SGID permissions.
- The executor of the command should have x permission to the program.
- The executor of the command obtains the identity of the owner group of the program file when executing the program.
- The identity change is only valid during execution, and once the binary program is finished, the executor's identity is restored to the original identity.
Take the locate command, for example:
Shell > rpm -ql mlocate
/usr/bin/locate
...
/var/lib/mlocate/mlocate.db

Shell > ls -l /var/lib/mlocate/mlocate.db
-rw-r----- 1 root slocate 4151779 1月  14 11:43 /var/lib/mlocate/mlocate.db

Shell > ll /usr/bin/locate
-rwx--s--x. 1 root slocate 42248 4月  12 2021 /usr/bin/locate
The locate command uses the mlocate.db database file to quickly search for files.
Because the locate command has SGID permission, when the executor (ordinary users) executes the locate command, the owner group is switched to slocate. slocate has r permission for the /var/lib/mlocate/mlocate.db file.
The SGID is represented by the number 2, so the locate command has a permission of 2711.
# Set SGID permissions
Shell > chmod 2711 FILE_NAME
# or
Shell > chmod g+s FILE_NAME

# Remove SGID permission
Shell > chmod 711 FILE_NAME
# or
Shell > chmod g-s FILE_NAME
Warning
When the owner group of an executable binary file/program does not have x, use uppercase S to indicate that the file's SGID permissions cannot be used correctly.
# Suppose this is an executable binary file
Shell > touch sgid

Shell > chmod 2741 sgid
Shell > ls -l sgid
-rwxr-S--x  1 root root         0 Jan  14 12:11 sgid
SGID can be applied not only to executable binary files/programs but also to directories, though it is rarely used.
- Ordinary users must have rwx permissions on the directory.
- For files created by ordinary users in this directory, the default owner group is the owner group of the directory.
For example:
Shell > mkdir /SGID_dir
Shell > chmod 2777 /SGID_dir
Shell > ls -ld /SGID_dir
drwxrwsrwx  2 root root      4096 Jan 14 12:17 SGID_dir

Shell > su - tom
Shell(tom) > cd /SGID_dir && touch tom_file && ls -l
-rw-rw-r-- 1 tom root 0 Jan  14 12:26 tom_file
Warning
Because SGID can temporarily change the owner group of ordinary users to root, you need to pay special attention to the files with this permission when maintaining the server. You can find files with SGID permissions through the following command:
Shell > find / -perm -2000 -a -type f -exec ls -l {} \;
Sticky BIT
The role of "Sticky BIT":
- Only valid for the directory.
- Ordinary users have w and x permissions on this directory.
- If there is no Sticky Bit, ordinary users with w permission can delete all files in this directory (including files created by other users). Once the directory is given SBIT permission, only the root user can delete all files. Even if ordinary users have w permission, they can only delete their own files (files created by other users cannot be deleted).
SBIT is represented by the number 1.
# Set SBIT permissions for the directory
Shell > chmod 1777 DIR
# or
Shell > chmod o+t DIR

# Remove SBIT permissions from the directory
Shell > chmod 777 DIR
# or
Shell > chmow o-t DIR
Q: Can the file or directory have 7755 permission?
No, they are aimed at different objects. SUID is for executable binary files; SGID is used for executable binaries and directories; SBIT is only for directories. That is, you need to set these special permissions according to different objects.
The directory /tmp has SBIT permission. The following is an example:
# The permissions of the /tmp directory are 1777
Shell > ls -ld /tmp
drwxrwxrwt. 8 root root 4096 Jan  14 12:50 /tmp

Shell > su - tom
Shell > cd /tmp && touch tom_file1
Shell > exit

Shell > su - jack
Shell(jack) > cd /tmp && rm -rf tom_file1
rm: cannot remove 'tom_file1': Operation not permitted
Shell(jack) > exit

# The file has been deleted
Shell > su - tom
Shell(tom) > rm -rf /tmp/tom_file1
Info
root (uid=0) users are not restricted by the permissions of SUID, SGID, and SBIT.
chattr
The chattr permission protects important files or directories on the system from accidental deletion.
Usage of the chattr command -- chattr [ -RVf ] [ -v version ] [ -p project ] [ mode ] files...
The format of a symbolic mode is +-=[aAcCdDeFijPsStTu].
- "+" means to increase permissions;
- "-" means to reduce permissions;
- "=" means equal to a permission.
The most commonly used permissions (also called attributes) are a and i.
Description of attribute i
| Delete | Free modification | Append file content | View | Create file | |
|---|---|---|---|---|---|
| file | × | × | × | √ | - |
| directory | x (Directory and files under the directory) |
√ (Files in the directory) |
√ (Files in the directory) |
√ (Files in the directory) |
× |
Examples for files:
Shell > touch /tmp/filei
Shell > vim /tmp/filei
123

Shell > chattr +i /tmp/filei
Shell > lsattr -a /tmp/filei
----i---------e----- /tmp/filei

Shell > rm -rf /tmp/filei
rm: cannot remove '/tmp/filei': Operation not permitted

# Cannot be modified freely
Shell > vim /tmp/file1

Shell > echo "adcd" >> /tmp/filei
-bash: /tmp/filei: Operation not permitted

Shell > cat /tmp/filei
123
Examples for directories:
Shell > mkdir /tmp/diri
Shell > cd /tmp/diri && echo "qwer" > f1

Shell > chattr +i /tmp/diri
Shell > lsattr -ad /tmp/diri
----i---------e----- /tmp/diri

Shell > rm -rf /tmp/diri
rm: cannot remove '/tmp/diri/f1': Operation not permitted

# Allow modification
Shell > vim /tmp/diri/f1
qwer-tom

Shell > echo "jim" >> /tmp/diri/f1
Shell > cat /tmp/diri/f1
qwer-tom
jim

Shell > touch /tmp/diri/file2
touch: settng time of '/tmp/diri/file2': No such file or directory
Remove the i attribute from the above example:
Shell > chattr -i /tmp/filei /tmp/diri
Description of attribute a
| Delete | Free modification | Append file content | View | Create file | |
|---|---|---|---|---|---|
| file | × | × | √ | √ | - |
| directory | x (Directory and files under the directory) |
x (Files in the directory) |
√ (Files in the directory) |
√ (Files in the directory) |
√ |
Examples for files:
Shell > touch /etc/tmpfile1
Shell > echo "zxcv" > /etc/tmpfile1

Shell > chattr +a /etc/tmpfile1
Shell > lsattr -a /etc/tmpfile1
-----a--------e----- /etc/tmpfile1

Shell > rm -rf /etc/tmpfile1
rm: cannot remove '/etc/tmpfile1': Operation not permitted

# Cannot be modified freely
Shell > vim /etc/tmpfile1

Shell > echo "new line" >> /etc/tmpfile1
Shell > cat /etc/tmpfile1
zxcv
new line
Examples for directories:
Shell > mkdir /etc/dira
Shell > cd /etc/dira && echo "asdf" > afile

Shell > chattr +a /etc/dira
Shell > lsattr -ad /etc/dira
-----a--------e----- /etc/dira/

Shell > rm -rf /etc/dira
rm: cannot remove '/etc/dira/afile': Operation not permitted

# Free modification is not allowed
Shell > vim /etc/dira/afile
asdf

Shell > echo "new line" >> /etc/dira/afile
Shell > cat /etc/dira/afile
asdf
new line

# Allow creation of new files
Shell > touch /etc/dira/newfile
Remove the a attribute from the above example:
Shell > chattr -a /etc/tmpfile1 /etc/dira/
Question
Q: What happens when I set the ia attribute on a file?
You cannot do anything with the file other than to view it.
Q: What about the directory?
Allowed are: free modification, appending file contents, and viewing. Disallowed: delete and create files.
sudo
The role of "sudo":
- Through the root user, assign the commands that can only be executed by the root user (uid=0) to ordinary users for execution.
- The operation object of "sudo" is the system command.
We know that in the GNU/Linux operating system, only the root (administrator) user has permission to run commands in the /sbin/ and /usr/sbin/ directories. Generally speaking, a company has a team to maintain a set of servers. This set of servers can refer to a single computer room in a single geographic location, or to a computer room across multiple geographic locations. The team leader uses the root user's permissions, while other team members may only have the permissions of an ordinary user. As the person in charge has a lot of work, there is no time to maintain the server's daily operations; most of the work falls to ordinary users. However, ordinary users have many restrictions on command use, and at this point you need to use sudo.
To grant permissions to ordinary users, you must use the root user (uid=0).
You can empower ordinary users by using the visudo command. What you are actually changing is the /etc/sudoers file.
Shell > visudo
...
88 Defaults    secure_path = /sbin:/bin:/usr/sbin:/usr/bin
89
90 ## Next comes the main part: which users can run what software on
91 ## which machines (the sudoers file can be shared between multiple
92 ## systems).
93 ## Syntax:
94 ##
95 ##      user    MACHINE=COMMANDS
96 ##
97 ## The COMMANDS section may have other options added to it.
98 ##
99 ## Allow root to run any commands anywhere
100 root    ALL=(ALL)       ALL
     ↓       ↓    ↓          ↓
     1       2    3          4
...
| Part | Description |
|---|---|
| 1 | User name or owner group name. Refers to which user/group is granted permissions. If it is an owner group, you need to write "%", such as %root. |
| 2 | Which machines are allowed to execute commands. It can be a single IP address, a network segment, or ALL. |
| 3 | Indicates which identities can be transformed into. |
| 4 | One or more authorized commands (represented by absolute paths). Multiple authorization commands need to be separated by commas. |
For example:
Shell > visudo
...
101 tom  ALL=/sbin/shutdown  -r now
...

# You can use the "-c" option to check for errors in /etc/sudoers writing.
Shell > visudo -c

Shell > su - tom
# View the available sudo commands.
Shell(tom) > sudo -l

# To use the available sudo command, ordinary users need to add sudo before the command.
Shell(tom) > sudo /sbin/shutdown -r now
If your authorization command is /sbin/shutdown, it means that authorized users can use any of its options.
Warning
Since sudo is an operation that "increases user permissions", one must be extremely careful when dealing with the /etc/sudoers file!
Due to various reasons during the initial design of sudo (such as complex design, redundant functions, heavy historical burden, etc.), the current sudo has discovered many high-risk vulnerabilities:
- CVE-2019-14287
- CVE-2021-3156
- CVE-2025-32462
- CVE-2025-32463
You can use the Rust version of sudo as an alternative. For more details, see here.
Author: tianci li
Contributors: Serge, Ganna Zhyrnova