Note
The last version of Rocky Linux that this procedure was tested on was version 8.5. Because the bulk of this procedure relies on source builds directly from Asterisk and a simple set of Development Tools from Rocky Linux, it should work on all versions. If you run into a problem, please let us know!
Installing Asterisk on Rocky Linux
What is Asterisk?
Asterisk is an open-source framework for building communications applications. Additionally, Asterisk turns an ordinary computer into a communications server, powers IP PBX systems, VoIP gateways, conference servers, and other custom solutions. It is used by small businesses, large businesses, call centers, carriers, and government agencies worldwide.
Asterisk is free and open source and is sponsored by Sangoma. Sangoma also offers commercial products that use Asterisk under the hood, and depending on your experience and budget, using these products might be more beneficial than rolling your own. Only you and your organization know that answer.
It should be noted that this guide requires the administrator to do a fair amount of research on their own. Installing a communications server is not difficult, but running one can be quite complicated. While this guide will get your server up and running, it will not be ready for you to use in production.
Prerequisites
At minimum, you will need the following skills and tools to complete this guide:
- A machine running Rocky Linux
- A comfort level with modifying configuration files and issuing commands from the command-line
- Knowledge of how to use a command line editor (we use
vihere, but feel free to substitute it with your favorite editor.) - You will need root access and ideally be signed in as the root user in your terminal
- The EPEL repositories from Fedora
- The ability to log in as root or run root commands with
sudo. All commands here assume a user withsudorights. However, the configuration and build processes run withsudo -s. - To grab the latest build of Asterisk, you must either use
curlorwget. This guide useswget, but feel free to substitute the appropriatecurlstring if you prefer.
Update Rocky Linux and install wget
sudo dnf -y update
This will keep your server up-to-date with all packages released or updated since the last update or installation. Then run:
sudo dnf install wget
Set hostname
Set your hostname to the domain you will be using for Asterisk.
sudo hostnamectl set-hostname asterisk.example.com
Add needed repositories
First, install the EPEL (Extra Packages for Enterprise Linux):
sudo dnf -y install epel-release
Next, enable Rocky Linux' PowerTools:
sudo dnf config-manager --set-enabled powertools
Install development tools
sudo dnf group -y install "Development Tools"
sudo dnf -y install git wget
Install Asterisk
Downloading and configuring the Asterisk build
Before you download this script, ensure you have the latest version. To do so, navigate to the Asterisk download link here and look for the latest build of Asterisk. Then copy the link location. As of the writing of this document, the following was the latest build:
wget http://downloads.asterisk.org/pub/telephony/asterisk/asterisk-20-current.tar.gz
tar xvfz asterisk-20-current.tar.gz
cd asterisk-20.0.0/
Before running the install_prereq below (and the remaining commands), you are going to need to be the superuser or root. It is much easier at this point to get into sudo permanently for a while. You will exit out of sudo later in the process:
sudo -s
contrib/scripts/install_prereq install
You should see the following when the script completes:
#############################################
## install completed successfully
#############################################
Now that you have all of the required packages, our next step is to configure and build Asterisk:
./configure --libdir=/usr/lib64 --with-jansson-bundled=yes
Assuming that the configuration runs without issue, you will get a large ASCII Asterisk emblem, followed by the following on Rocky Linux:
configure: Package configured for:
configure: OS type  : linux-gnu
configure: Host CPU : x86_64
configure: build-cpu:vendor:os: x86_64 : pc : linux-gnu :
configure: host-cpu:vendor:os: x86_64 : pc : linux-gnu :
Set Asterisk menu options [For more options]
This is one of the steps where the administrator will need to do his homework. Many menu options exist that you might not need. Running the following command:
make menuselect
will bring you to a menu select screen:
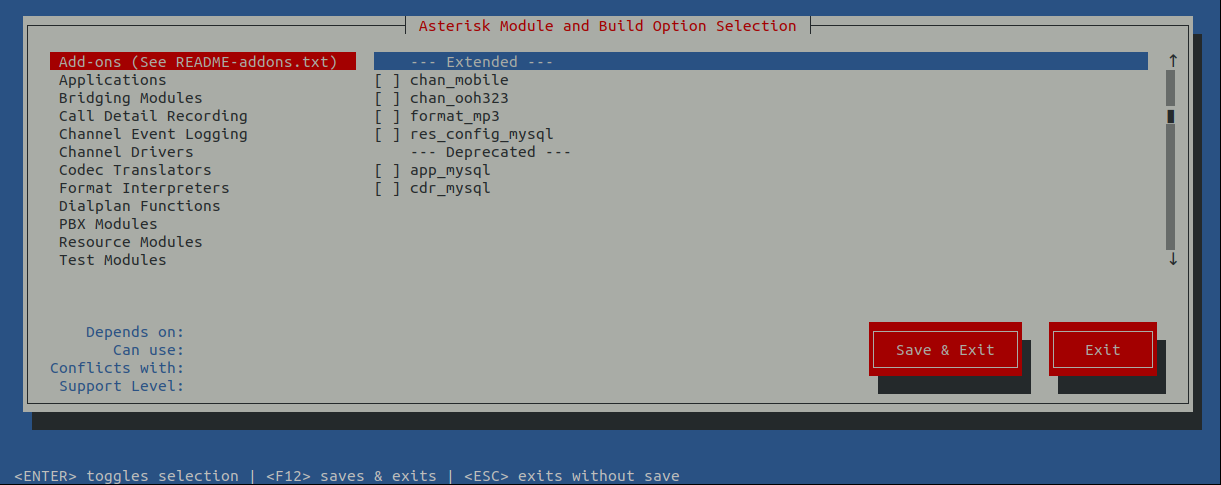
Look through these options carefully and make selections based on your requirements. As stated earlier, this will take some additional homework.
Build and install Asterisk
To build, you want to run the following commands in succession:
make
make install
Installing the documentation is not required, but unless you are a communications server expert, you will want them installed:
make progdocs
Next, install the basic PBX and configure it. The basic PBX is just that, very basic! You will probably need to make changes going forward to get your PBX to function as you want it to.
make basic-pbx
make config
Asterisk configuration
Create user & group
You will need a specific user and group just for Asterisk. Create them now:
groupadd asterisk
useradd -r -d /var/lib/asterisk -g asterisk asterisk
chown -R asterisk.asterisk /etc/asterisk /var/{lib,log,spool}/asterisk /usr/lib64/asterisk
restorecon -vr {/etc/asterisk,/var/lib/asterisk,/var/log/asterisk,/var/spool/asterisk}
Since most of the build work is complete, go ahead and exit out of the sudo -s command. This will require that most of the remaining commands use sudo again:
exit
Set default user & group
sudo vi /etc/sysconfig/asterisk
Remove the comments on the two lines below and save:
AST_USER="asterisk"
AST_GROUP="asterisk"
sudo vi /etc/asterisk/asterisk.conf
Remove the comments on the two lines below and save:
runuser = asterisk ; The user to run as.
rungroup = asterisk ; The group to run as.
Configure Asterisk service
sudo systemctl enable asterisk
Configure firewall
This example uses firewalld for the firewall, which is the default in Rocky Linux. The goal here is to open SIP ports to the world and to open RTP (Realtime Transport Protocol) to the world on ports 10000-20000 as recommended by the Asterisk documentation.
You will almost certainly need other firewall rules for other forward-facing services (HTTP/HTTPS), which you will probably want to limit to your IP addresses. That is beyond the scope of this document:
sudo firewall-cmd --zone=public --add-service sip --permanent
sudo firewall-cmd --zone=public --add-port=10000-20000/udp --permanent
Since you have made the firewalld commands permanent, you must reboot the server. You can do that with:
sudo shutdown -r now
Test
The Asterisk console
To test, connect to the Asterisk console:
sudo asterisk -r
Which will bring you into the Asterisk command-line client. You will see this prompt after displaying the basic Asterisk information:
asterisk*CLI>
To change the verbosity of the console, use the following:
core set verbose 4
Which will show you the following in the Asterisk console:
Console verbose was OFF and is now 4.
Show sample end-point authentications
At the Asterisk command-line client prompt, type:
pjsip show auth 1101
This will return username and password information you can use to connect to any SIP client.
Conclusion
The above will get you up and running with the server, but you are responsible for finishing out the configuration, connecting devices, and further troubleshooting.
Running an Asterisk communications server takes time and effort and will require research by an administrator. For more information configuring and using Asterisk, see the Asterisk Wiki here.
Contributors: Steven Spencer, Ganna Zhyrnova